Nightstand: Panel and Groove Work, Router Plane Fence Changes

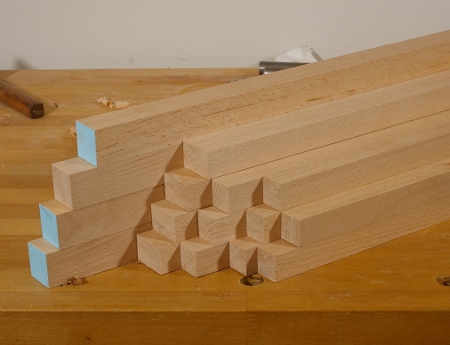
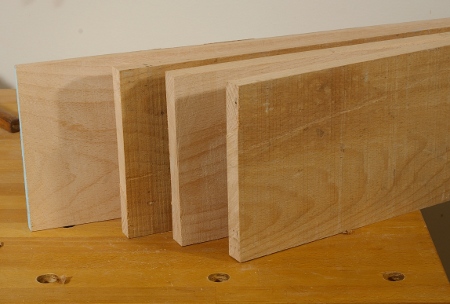
With the panels milled to thickness, it was time to make the grooves in the frame to house them. Normally, this isn’t such terrible work; I don’t have a plow plane, but I do have a router plane with a fence that I made and it works, just not as quickly as a plow. With this project, however, there were a few additional matters:

  • I needed an additional fence setting, because the grooves in the legs go at a different offset than the stretchers.
  • There are more than three times as many grooves to make in this project than my previous project.
  • All of the leg grooves are stopped on both sides.
  • Two of the stretchers have strange profiles.
  • Beech is much more difficult to work than the stuff I’ve used for other projects with panels.

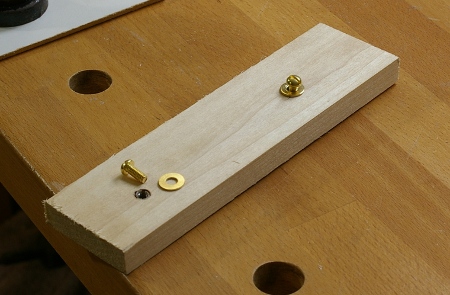
I started by modifying my homemade router plane fence. First, I took it apart and replaced the wood screw fasteners with screw inserts and brass machine screws so that it would be easier to move around:

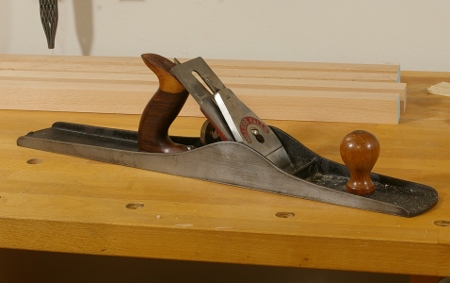
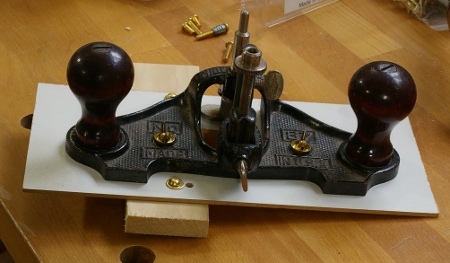
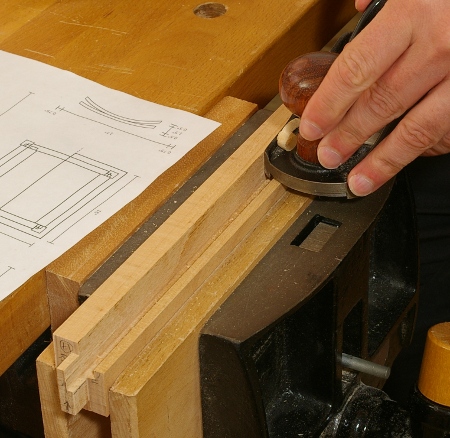
Then I drilled a few more holes at different offsets on the fence mount so that I could move the fence sideways. Here’s a view of the complete router plane and fence:

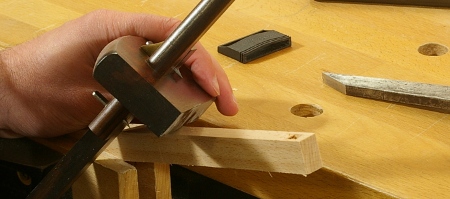
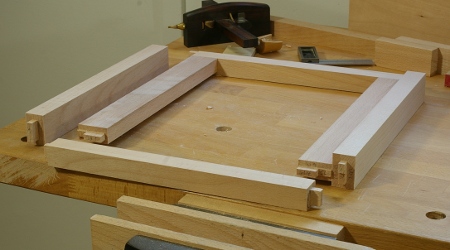
With this done, I did the grooves for the stretchers. These were mostly straightforward, except for the ones on the side middle. Viewed from one end, these have J-shaped profiles because they form part of the enclosure for the drawer. (I don’t think I will ever design anything like this again; I’ll just use additional stretchers or something to avoid complications like this.)

So first, I had to cut a groove about 3/4″ deep into the stretcher:

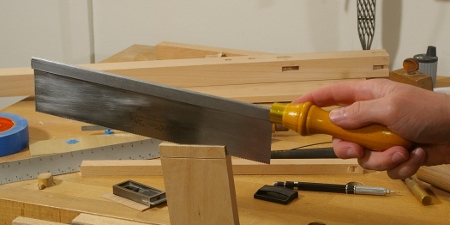
Then I scribed a line from the bottom of this to the proper height and sawed off most of the waste. The first time, I did it freehand (as shown below), but on the second one, I wised up and clamped a batten on top to use as a sort of guide.

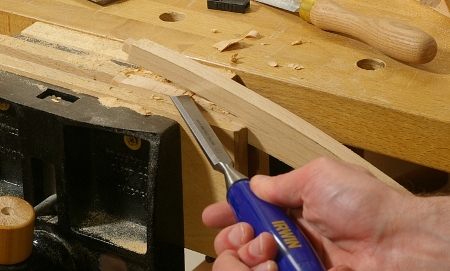
Finally, I used a block plane to bring the side down to final height:

The stretchers were then out of the way, but the grooves in the legs remained, so I moved the fence on the router plane and did them.

The whole process took quite a long time. A plow plane would have made very quick work of the stretchers because those grooves aren’t stopped. However, the leg grooves were just slow going. There’s just a lot of constant time-consuming adjustment when you go progressively deeper on a router plane, especially an older one like this, where there is a little bit of play in the blade alignment. You have to be a little careful about how you tighten it. I imagine that the Veritas router plane doesn’t have this problem, but I’m not shelling out the dough to get one of those when I’ve already got one that works (I’d rather have a plow plane).

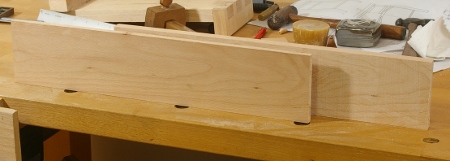
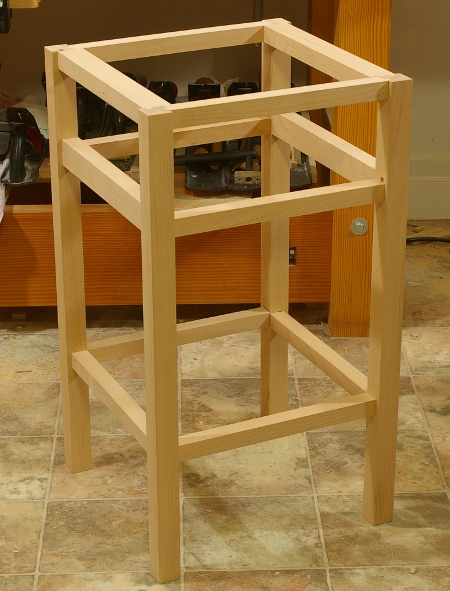
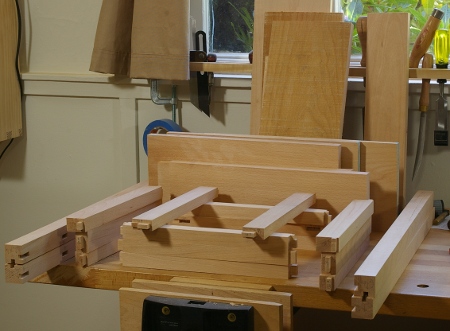
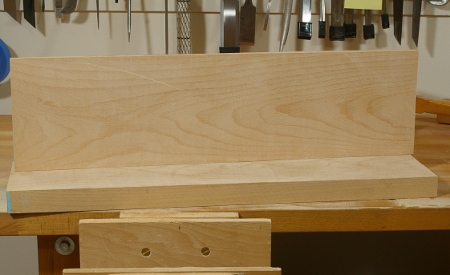
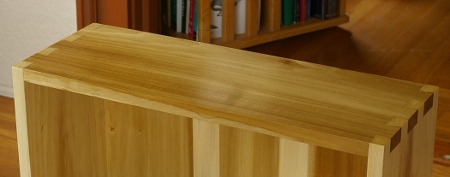
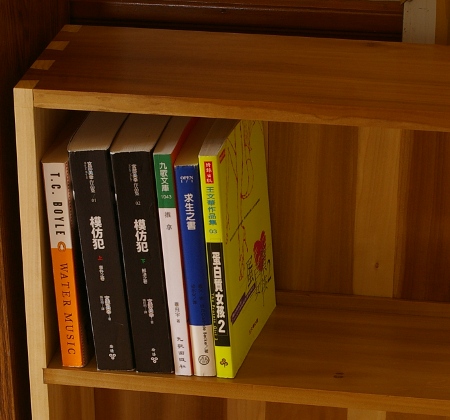
At long last, I was ready to start sawing the panels to size and fit into the grooves this morning. Turned out well; I now have the sides done (the back requires a glueup which is in progress):

I’m almost ready to glue up some of the frame.

Nightstand: Decoration

One of the design specifications for the nightstand project was that it had to have “something curved.” After some grumbling about this, I decided to take it as an invitation to steal something I saw in one of Krenov’s books.

The first step was to resaw the wood for the piece. The target board was only 3.5″ wide and was a real piece of cake with the frame saw:

After getting this four-square, I headed back to the drawing board and squeezed out a full-scale drawing of the decoration piece. Unfortunately, I don’t have a big enough printer, so to make the template, I had to tape two pieces together using a light box from my old slide photography days and some mysterious hands:

In retrospect, this was a silly way to do it. I should have found someone who had a printer that can do legal size. (Strangely enough, I just ordered one, but not for this kind of thing.)

Next, I taped the frankentemplate to the board and traced the pattern:

Before anything else, I now had to address the way that the decoration was to be joined to the frame. Basically, this is a twin mortise-and-tenon, and the layout promised to be a pain. To mark the mortise offset into the frame piece, I did this:

  1. Test-fit the closest frame stretcher in its mortise.
  2. Lined up a piece of scrap flush with this stretcher’s front.
  3. Centered my mortise chisel alongside this piece.
  4. Made a mark with the chisel in the frame at this offset.
  5. Used a marking gauge to make a line for where to chop the mortises.

That sounds a little complicated, but it’s not. It was a lot easier than chopping the mortises themselves, because the mortises are so tiny that you have to be really careful prying out the waste, or you’ll dent up everything and have awful marks on the frame. Nonetheless, the task is complete soon enough:

Then, on to the tenons, which were also oh-so-much-fun to lay out. It’s a little easier, though:

  1. Using the same stretcher test-fit, measure the distance between the depths of the front of the stretcher and the start of the mortises that you just cut.
  2. Set a (different) marking gauge to this distance and scribe it on a piece of scrap.
  3. Chop a mortise along the scribe line in the scrap (with the same chisel that you used for your original mortises, obviously).
  4. Set your mortise gauge according to the mortise in the scrap.

Hey, that wasn’t so bad, was it? The only real grumble I have with this right now (and this holds for all mortises) is that my mortise gauge takes too long to set. Because one screw fastens both arms, they touch (through a center plate), so when you’re setting one arm, the other one moves. You have to fiddle with it a lot. Grr, when I get some free time, I’m going to make some gauges and I am going to solve this stupid problem, and probably not by just using a single arm like some of those nice English and Japanese gauges.

The good news is that once you have your gauges set, you don’t have to reset them for the next joint if it’s the same type.

In any case, with the tenon marked, it was time to saw the cheeks and do the usual mortise-and-tenon stuff:

Before long, you have your tenons.

It was then time to cut out the pattern and shape. I did the cutting with my coping saw, and then I evened and squared up the top and bottom with my Shinto saw rasp:

I’ve mentioned before how much I like this tool, but it has its limits, and one of them is that it can’t get into confined spaces so well. To square up the insides, I pared across the grain with a chisel, and then used a knife in the tightest areas:

Then it was time to shape it. I used the old “finger on the side while holding the pencil” trick to outline the rounding depths:

Shaping the top was a matter of a minute or so with the saw rasp. The bottom was also reasonably fast with the Gramercy sawmaker’s rasp, though I would have preferred a larger half-round for that. I did the inside with anything that would fit. The last shaping tool was 80-grit Norton 3X sandpaper, which thankfully fits everywhere, which left me with this:

Then I hand-sanded with 120, 220, then 320 grit to get to the final point, and I test-fit it with the front of the frame:

It looks fine, I suppose, but it took longer to make this than I care to admit. I think I may glue up just the top tenons in the decoration to account for wood movement. This thing isn’t exactly structural.

Nightstand: Frame Joinery Complete

The nightstand project requires 24 mortise-and-tenon joints for the external frame, four for the drawer runner supports, and four more for the decoration on the front. I’ve cut all of these except the ones for the decoration. Here’s a shot of a test-fit of the external frame (without the runners):

My speed improved significantly while making all of these joints. When I started the first one, it was taking me as long as 45 minutes to make one. Most of the time was spent paring off little bits of the tenons, most annoyingly, on the shoulders. By the time I did the drawer runner pieces, I was doing them in under 30 minutes. (Yeah, the pros do them six times faster, but I’m not a pro.) What’s more important to me than speed is accuracy, and that improved tremendously, too. All of my tenons now seem to fit right off the saw. The only paring I need to do is still that little bit on the shoulders, but it’s going faster now. I’m using the mystery chisel for that because a 1.5″ chisel has a lot of registration area. It really seems to be holding its edge well.

I also managed to cut myself with my dovetail saw. Ouch, I didn’t realize it was that sharp.

This project’s joints are a motley bunch. I’m using different offsets at different locations to try to maximize contact based on constraints of panel and corner placement. Some have haunches to improve alignment. Here’s a shot of the middle frame layer, the one that the drawers will rest upon, showing the drawer support runners that I just finished up today:

The runners, back, and right side are depicted in their intended final configuration, and the front and left sides are not attached. When finished, the sides will have rabbets with grooves for where the side panels will rest, and the rear will have a groove for the rear panel.

This is a shot of the current state of the parts and parts-to-be:

The mostly-complete parts (18 of them) are in the front, and the number of pieces in the back indicate that I still have a fair amount of work to do here:

  • join the top
  • join and rabbet the shelf
  • mill the pieces for the drawer and make the drawer
  • mill the panels
  • groove the frame for the panels and shelf
  • make the drawer pull (wood for drawer pull not shown here)
  • glue up everything
  • varnish

What to do next? Well, I’d better pick something. I do have a deadline for this piece. It’ll be either the decoration or joining the shelves, I think.

Nightstand: Joinery Started

Yesterday, I finished milling all of the nightstand pieces except the drawer and panels. Looking back, it looks like it took me two and a half weeks to do all of it. It might have gone a little faster if the wood hadn’t moved so much after resawing. I had to go to another board to get enough consistent material for the top and shelf. The shelf was especially bad; I had originally intended that segment to be the top, but I introduced so much twist into the board when milling that I had to thin it out.

I wonder how much faster this would have gone with a bandsaw. When I think about it, probably not too much, because it would still require planing and more flattening, and if I get faster at that stuff, then that eliminates a big chunk of the time I spent on this. (The resawing, that’s a different story.)

But that’s mostly behind me now, so I arranged the pieces I had into the orientations that I’ll use for the frame layout:

It was a little tricky to get everything oriented so that none of the grain will stick out like a sore thumb. Some of the faces have ray fleck because they’re cut on the radial plane (as if they were from a quartersawn board), and although this pattern looks great in beech, I didn’t want to make it stand out on this piece. In addition, due to the various cuts on the board, the visible ray thicknesses vary slightly from piece to piece, so I matched them up on each side of the nightstand as much as possible.

With that done, I labeled each piece, made a map of the joints, and was able to do the top rear joints today–two little haunched mortise-and-tenon joints!

It’s such a relief to be at this stage now. My worries now are essentially how I should go about cutting these things. I started with the rear top because no one is ever going to see those, so if I mess them up, it’s okay. I guess I’ll finish off the rest of the joints around the top and work my way down to the next level, so that I can mark off the distances from existing joints as I go.

The joints will be a mixed bag of mortise-and-tenon joints. I’m using haunched ones at the top because I want more registration surface and I want to avoid blowing out mortises at the end (I was very careful this time). In the middle and the bottom, there will be more basic mortise-and-tenons, but the tenon lengths will vary. I have this in the drawing, or at least I pretend I do.

Making a map of the joints helps a lot. I had a mental one for the stool project, but because there are three times as many joints in this one, I decided to scribble it down on paper. And what an incredibly professional scribble it is.

You can see how I first drew it in 3D with circles and arrows (and a paragraph on the back of each one, har), but gave up on that and just broke it into top, middle, and bottom levels. I give each joint a number and when I cut a joint, I put the number on each piece. Here, the numbers go counter-clockwise around the frame from top to bottom. At first, I was numbering consecutively when moving from level to level, but then I decided it might be easier to just add ten to the starting number for the previous level and go about it that way. At the very least, it makes it easy to identify the level to which the joint belongs.

Nightstand: Frame Pieces Milled

After a lot of resawing, scrubbing, and milling, I finally have all of the frame components milled to size:

It was a moderate amount of work–less than I thought, but still non-trivial. One of the biggest problems that I’m having is that the board I’m using has quite a bit of tension built up inside. Flatsawn 8/4 beech will do that to you. In any case, whenever I resaw (and sometimes when I rip), the board moves and I end up with some cupping. My reference face would be flat before the resaw, then afterwards, it would get cupped again–sometimes almost as much as 1/32″. By the third time this was about to happen to me, I wised up and took a slightly different approach so that I minimized the amount of waste and work that I had to do:

  1. Use the scrub plane to get the reference face flat.
  2. Use the jack plane with the heavily cambered blade to even out the scrub marks. A fore plane set up the same way would work fine, too. After this, the board should be pretty flat. Don’t break out the jointer yet.
  3. Scribe a line around the edges of the board from your reference face. Set the gauge 1/8″ thicker than the thickness that you’re ultimately aiming for. The line probably won’t be super-straight, but it will be straight enough.
  4. Resaw along that line. If you’re using a hand-powered saw instead of a bandsaw, do not forget to grunt and/or growl occasionally. The least you can do is scowl.
  5. Your reference face is no longer flat because some of the board’s tension was released; sigh if necessary.
  6. Reflatten your reference face, using the scrub first if necessary. This time, use your jointer, winding sticks, and all that jazz to get it totally flat.
  7. Scribe a line around the edges from the reference face, this time to the intended thickness, and mill down the opposite face as you normally would.

So in theory, I’m ready to cut some joinery. However, before I go crazy and start chopping mortises in the wrong place again, I have the the drawer, panel, top, and shelf components to mill. I’m using the wood left over from the resawing for the drawers and panels so that they match the frame:

There’s enough wood here for all of the drawer and panel parts. Unfortunately, I have to do a lot of hogging and flattening on these pieces, too. The good news is that I don’t have to resaw any of these.

With these pieces all earmarked, that means I have (practically) nothing left from this board for making the top and the shelf. I’m a little surprised; I thought that one 6′ 7-inch-wide 8/4 board would be enough, judging from its weight and what I was visualizing. What I didn’t count on was how much all of the cupping and re-cupping from resawing would use up so much wood. This is fine, though; I grabbed another board from my stash and cut off a piece today. Perhaps it’s even better this way, because now I know that the top will be have consistent-looking wood, because its components will all come from the same part of one board.

Nightstand: Legs Milled, Bench Scraped, Etc.

Today, I thought I would have the opportunity to get a lot of stuff done on the nightstand. It turns out that I didn’t get quite so much accomplished, at least in terms of the project. The legs are now milled to profile, which is great, because they’re the longest pieces in the project:

Further evidence that I should really make a saw bench sometime is that I managed to scrape up part of the bench while ripping the board:

Yeah, oops. It’s cosmetic, of course, but it begs the question of how I managed to do that in the first place. Well, I had the board held down over the edge of the bench while I started the cut. On cuts like this, I tend to do the first 1/3 of the cut over on the left side of the vise, and then move the board over to the right of the vise when finishing the cut.

This would be a lot easier on a sawbench, especially without a stupid vise in the way. Unfortunately, this is one of those things that I just don’t feel that I have the time for at the moment because I have to concentrate on the current project. On the list of other things that I should do sometime is really redo my bench top–move it flush to the legs according to the Gospel of Schwarz, get the rear vise jaw flush with the front, and maybe thicken up the top. Maybe I’ll have time for the sawbench at least when I’m finished with the nightstand.

But after the legs were milled, it occurred to me that there was one little thing that I really did need to address at the moment, and that was my jointer plane. The one I’ve been working with up until now is a frankenplane of sorts–an unknown early-type Stanley with a type 6-8 frog, a kidney-holed lever cap, and a Hock blade. Well, that’s all fine and good, except that the tote is broken and the lateral adjuster is kind of woogie. It works, but it’s annoying and sometimes makes the hand ache.

So I could have made a new tote (I had previously glued it back together but that didn’t last) and tried to bang out the kinks in the lateral adjuster, but it turns out that I had a Millers Falls #22 (type 2, postwar) right next to it that I had wanted to use at some point. In fact, back when I had my handle-varnishing jamboree about a year ago, the tote and knob from this plane were happy to attend. But mostly, it’s been sitting in pieces at the bottom of the bench, looking kind of stupid.

I pulled it out and spent an hour or so scraping and sanding off the rust, got most of the surfaces clean (primarily by wiping it with camellia oil), oiled the threads, and put everything back together. Then, for the final touch, I stole the Hock blade from my old jointer and put it in. Bingo, a “brand new” jointer:

Nope, no sole-flattening or anything. Mostly, it was all about cleaning out the dead spiders from the inside of the frog and making sure that it works. Really, that’s all I seem to care about in these metal planes now, quite a difference from when I first started out.

Nightstand: Resawing Legs With The Frame Saw

Even though I have not yet completed the cutting list for the nightstand, I do know that I will need four 24″ long legs that are 1.25″ square. I had meant to get the stock milled for this sooner, but it’s been a busy week. I finally completed the flattening of the 7″ wide 8/4 board segment that I plan to use today, and then faced the task of resawing this thing into the piece for the legs and a panel for one of the sides.

It’s been a few months since I last did any resawing, and I wasn’t particularly looking forward to it, given how much work it’s been the last few times. But this time was a little different (otherwise I wouldn’t even be writing about it).

I wanted to try out the techniques shown in a few videos of those magnificent Japanese sawyer’s saws. They use them mostly perpendicular to the grain, letting the huge area of the saw register a very smooth cut through the wood. I can’t do this completely with my frame saw because its blade is not deep enough to register so well, but I could at least try to do it partway.

I started by the diagonal cuts along marked lines that are necessary in order to get a square cut started. Further cutting along each side at a very slight diagonal established a somewhat shallow kerf on side. Then, to connect the two kerfs, I clamped the board upright in my front vise and went at it almost perpendicular to the grain (I’m pushing it here):

As noted before (by several folks), it is really important to tighten up the blade to a very high tension in order to keep the blade from binding up and cutting a curve. From time to time, I would reach the end of the kerfs I’d cut on each side and I’d have to extend them. I think that this actually took more time than doing the bulk of the sawing. In fact, most of this went very quickly because the saw followed the kerfs better than before.

I sawed all the way down to a spot about an inch away from the end, and then wondered if there was any better way to finish off the cut with the vise. I then did a very silly thing: I clamped the board in upside down, with the saw upside down, and pushed the saw up from underneath to finish it off. Don’t do this; it’s ridiculous. Afterwards, I realized that it would have been a lot easier to clamp the board flat to the bench with the uncut end hanging off the end, and just work the saw sideways for that last little bit. There are other setups that I’ve seen that do a better job still, but I don’t have the resources for that yet.

So I was finished with this bit:

Not bad, not perfect, though. There’s one saw mark on the top center-left, but it’s very shallow (one pass of the fore plane will remove that).

I’m starting to figure out that my frame saw is pretty good for boards that aren’t so wide. This was a 7″ wide piece of beech, and that’s probably about the maximum that’s comfortable with this saw. If I ever build another frame saw, it will have the following changes:

  • Longer frame and blade to handle wider boards better.
  • Wider blade for better registration.
  • Much larger teeth.
  • Improved hardware for attaching the blade. I’m not sure how to go about that just yet, but I do think that it ought to be bigger than the stuff I currently use.
  • Yeah, a saw bench would help a lot, too.

That said, what I have is workable for what I do now, and I do have to finish this project in a reasonable amount of time. (I think it’s supposed to be done by the end of August.)

Nightstand: Plan

After a lot of agonizing, it appears that I finally have a plan drawn up for my next project, a nightstand. When researching designs (otherwise known as “typing nightstand into Google Image Search and bracing for the worst”), I found two basic types. The first is a box with an open front. The second is more like a table with a shelf at the bottom. Both have a drawer at the top. After conferring with the “client,” I chose the latter.

Here is the front view. I stole the idea for the arched decoration in the front from Krenov.

The top view cutaway into the shelf follows. On the left of the center line, the stretcher for the area above the drawer is shown. It’s a little bit wider then the one at the bottom of the drawer (shown at right), but there is an extra stretcher front-to-back on the bottom to support the drawer:

The front view cutaway perhaps shows it with a little more clarity. On the left of the center line in the drawing, the front stretchers are cut away, showing the side stretchers and the drawer support.

I could, in theory, integrate the lower drawer supports into the lower side stretchers, but I worry about wood movement between the legs and the front stretcher because a single piece would need to connect to both (I’m not worried about the ones at the top because they will not provide support most of the time.). I’m looking out for wood movement in particular because I’ll be building this out of beech, which is not known as the most stable wood in the world. So I won’t be mortising in the top of this piece, either.

The drawing isn’t quite yet complete. I haven’t added all of the measurements that I need (and hopefully I won’t mess them up this time), and I haven’t broken out the components to come up with a cutting list. I didn’t draw in the drawer. (Do I need to? Maybe.) And perhaps I will come up with a different scheme to support the drawer.

[Update: The mostly-complete plan is now available on the Plans and Guides page.] Err, not at the moment.

One thing is pretty clear: This project looks like the most complicated piece I’ve attempted so far. There are fewer components than the shoe rack, but this is far less repetitive, and they assemble in a much more complex way. However, I have attempted to standardize several of the component thicknesses, which should speed the milling process by minimizing the number of cuts I need to make with the frame saw.

For what it’s worth, a significant part of the agony in coming up with this drawing was trying to find a suitable 3-D modeling system for Linux so that I didn’t have to use Inkscape again. That didn’t work out, so I’ll just stick to what I know for now

Stool: Finished

This morning, I decided that the latest coat of varnish on the stool was dry enough, and that it should be the final coat. So I rubbed it out with #000 steel wool and mineral oil. I didn’t want to use rottenstone because I didn’t want it to be too smooth.

The result looks like a stool to me:

There are some glitches that I’ve described in previous posts. There’s a not-so-pretty spot on the inside of one of the stretchers that I could have leveled out, but didn’t bother to work on because it’s practically impossible to see.

The most important part is, of course, whether the thing actually works. Is it solid enough to stand on? It’s an interesting question for me, because this is my first project meant to bear someone’s weight.

Yeah, it works. It seems really solid. I jumped on it, too, but not too hard. I probably need a little more time to come to terms with the way it is constructed and how the stretchers distribute the load among four to eight joints that are already extremely strong. Yes, this is the way that it’s supposed to be, but going from theory to practice can sometimes be daunting.

This is not to mention that this also marks the finish of a project that I really wanted to build, a piece of furniture that I’ve wanted for a very long time. Aside from the utilitarian aspect (I’m not terribly tall, so sometimes I need a little help in reaching things), it seems that I grew up with the notion that everyone had to have one of these things.

However, this unfortunately wraps up my only project that was really active. My next project is a nightstand that I haven’t finished drawing yet–I’ve been having a particularly hard time with that. In the meantime, I’ve been doing minor work on the shop. I did some cleanup work on some shelves down there. I worked on sharpening a drawknife (but didn’t finish). I cleaned the last of the rust off of my #78 and made some ovolo trim with it in conjunction with the rounding plane I got in Taiwan (thanks for the tip, St. Roy). I picked about 25 plastic bags off the floor (how does that get that way?).

I’m at the point, though, where I can’t lollygag my way around the new project any longer. I suppose it starts this week.

Bookshelf: Prototype Finished

After about four coats of varnish, I felt it was time to rub out the finish and call this project complete. There were many reasons, not the least of which was that we’ve run out of places on our other shelves and need to put something in service immediately. For rubout, I used the steel wool/rottenstone sequence, both lubricated with mineral oil. I’ve always been happy with the way that turns out.

Here’s the view from the left side:

Viewed from this side, it’s got “flames” (the cathedral patterns on the sides) and “racing stripes” (the sapwood strips in the back panel). However, viewed from the left side, the flames aren’t visible, other than a tiny little sliver on the inside right:

This is about all I could do with the yellow-poplar that I had on hand. I struggled for a while to figure out an arrangement that didn’t look totally horrible, and it turned out to a certain degree. I wouldn’t say that it’s something I would repeat. Actually, there are lots of things I wouldn’t repeat, so let’s start with the top:

Aside from the fact that I should have taken a couple of swipes with the smoothing plane on the top before glueup, I’d say that the dovetail contrast here tries, but does nothing. The very top should be a clean rectangle. Next time, I’ll use half-blind dovetails or even fully-blind mitered dovetails. Half-blind dovetails will mean giving up the mechanical strength advantage in this application, because I’ll have to put the tails on the sides, but with this much glue surface, it won’t pull apart any time soon.

The other thing that I will change in my next bookshelf project is the stretcher along the back shelves. I wanted to put the stretchers entirely below the shelves in this project and rabbet the shelves to the stretchers, but I didn’t have enough width in my shelf boards to do so. I am, however, very happy with the strength that the stretchers provide.

Then there is a question of the wood. In this project, I was trying to get rid of some of the stock that I had on hand, but next time, I’ll pick lumber specifically for this project. But which kind? Shelves can be big, and big shelves are heavy, so I don’t want to use something like oak, maple, or that beech that I have on hand, because they’re just too much. Cherry is a good choice because it is both durable and somewhat light, but I’m wary of using too much of it (not to mention that it costs a bazillion dollars a board-foot around here). I actually liked yellow-poplar for this, and while we’re talking about woods that are more prone to dents, I may as well mention the various pines and douglas-fir. And there’s stuff like paper birch, butternut, and sweetgum. Who knows? The only thing I know is that I’m trying to avoid darker woods.

For the moment, though, I have other projects to do, and so, here’s the prototype being taken for a test run:

And you can see that form follows function here, as the “racing stripes” won’t even be visible when the shelf is full. Hee.