While waiting for the glue to dry on my botched-mortise fixes, I broke the edges on the leg frame with sandpaper. I did this moderately, not taking off too much, but more than just a light touch.
Then I chamfered the edges of the top. The more I use the chamfer attachment to my Veritas low-angle block plane, the more I like it. It’s not the easiest thing in the world to control at first, but by taking light strokes (and starting at 1/4 to the end of the cut and working your way back as you would a moulding plane), it does a nice job. Not to mention that it has an adjustable mouth.
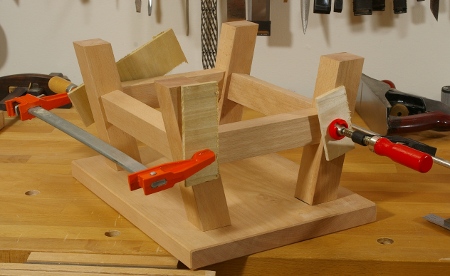
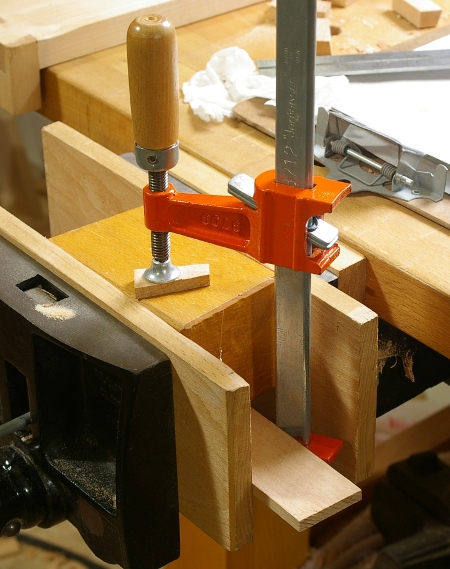
With no excuses left, I had to face the dreaded glue-up task. This part is always a little intimidating to me because you actually have to make sure that you get it done reasonably fast, and I normally like to work slowly. In addition, I’m even more clamp-challenged than most woodworkers.
One thing in particular that worried me was that my joints were very tight; it was difficult to insert and remove the parts without any glue. So how hard would it be to jam these things in?
So, from the preceding photo, you can not only see that I managed to get the joints together, but I needed only two clamps! The frame pieces went together like butter; it seems that the hide glue acted as a little bit of lubricant instead of being an impediment. The only time I really had to use some force was driving one of the legs all the way into the top. I called upon my mallet to do that.
I’m not even sure that these two clamps were necessary. The joints were really holding together tightly, perhaps because of the overall structure.
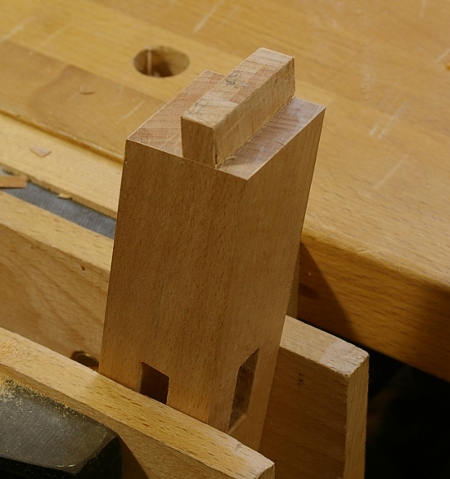
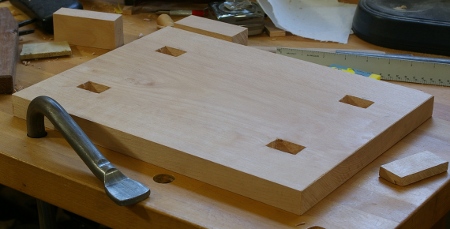
In preparing to attach the stool’s top to the leg frame, I first measured, marked, and cut angled tenons on the tops of the legs. I used the scale drawing again as a guide. Here’s a photo of an angled tenon before I finished cutting the shoulders at the long ends:
That was a fairly simple task, even though I was cutting the tenon before the mortise. To make sure that the tenon fit, I chopped a mortise in a piece of scrap and test-fit.
Then I assembled the frame and double-checked the distance between the tenons, and carefully laid out the lines that I’d chop against on the stool top. Then I broke my mallet chopping the mortises (as described in the preceding post), so I had to wait for the glue to set on the mallet repair until I could get going again. When I did, I was excited to see a test fit.
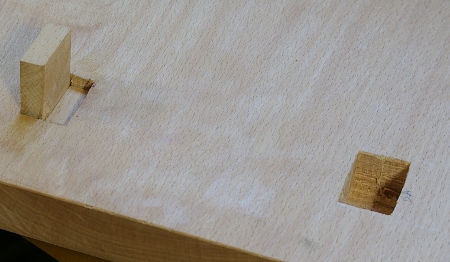
I was not so excited to discover my latest boneup:
Arrgh. I had chopped the mortises on the wrong side of the lines. I have got to get more careful with this. It’s, what, the third time I’ve done that in two months? I was pretty discouraged, so I took a break while I tried to figure out what I would do about it. Also, I was hungry.
Then I went back to the shop and cut out a piece of beech to the same thickness as the tenons. I inserted this into the mortise, and then extended the mortise (this time in the correct location) by chopping against the side of the inserted section:
After doing this for all four mortises, I had the following:
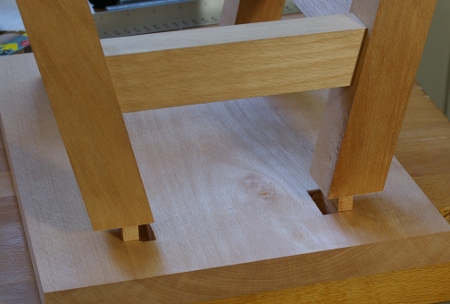
And then I did a test fit to make sure that I’d actually chopped them in the correct place this time:
Phew. It fits, and there’s only a small void showing on the underside of the stool. But if left and glued up like this, there would probably be a tendency to rack, because the legs could conceptually slide around. Therefore, I had to fill in the originally-cut side of the mortise.
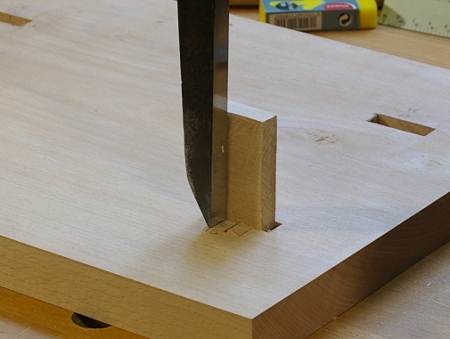
I sliced off a small section of the piece of beech I used to register the chisel when chopping the correct mortise, and glued that on one side where I’d originally chopped the mortise. Then, on the other side, I inserted the section again to “clamp” it in place as the glue dried:
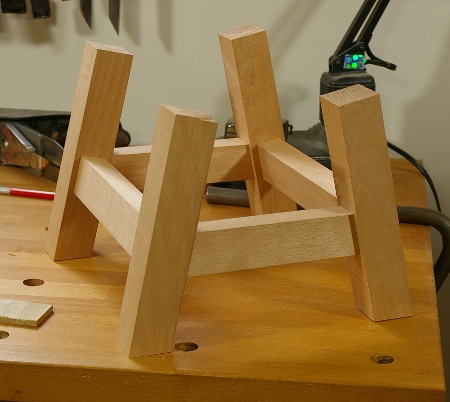
After each mortise got its repair, I did another test fit. Incredibly, it seems to have worked. Now I just have to finish off the edges on the components and glue up.
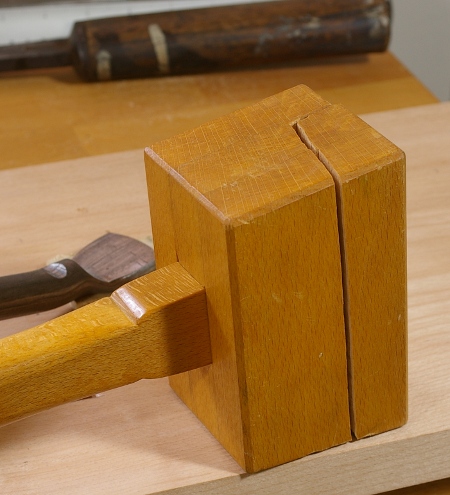
There I was, thumping away at a mortise in the stool top. Whap whap WHAP, hey, something just got funny. Remember how I hinted that the Ash chisel handle might bite it? Well, it turns out that the chisel made a pre-emptive strike (notice the perpetrator lurking in the background here):
A totally predictable failure pattern, I suppose. I did the only natural thing here and glued it back together:
I don’t know how long this repair is going to last.[*] In theory, it should be okay if I manage to strike in the center of the mallet, but then again, the ultimate reason that this happened was because I didn’t hit the chisel handle in the center.
There’s a lesson to be learned here. Maybe one or more of these will help in the future:
A bigger mallet for bigger jobs like this. [note: Joel from Tools for Working Wood commented that this may not be the greatest of ideas: the mallet head should be softer than the chisel handle.]
Strike in the center.
Make the mallet out of wood with an interlocked grain.
Not hit the chisel so hard.
[* Edit: July 24, 2011, about a year and three months later. However, the new break was totally different.]
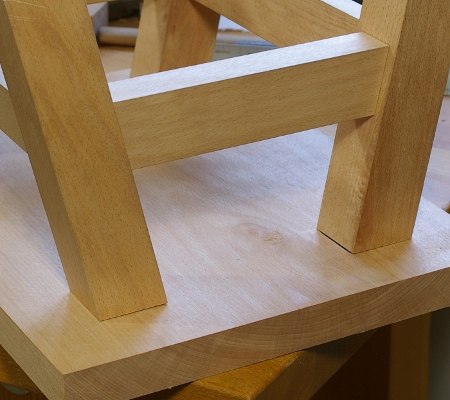
I managed to get a chunk of shop time in today, and finished the remaining mortise-and-tenon joints in the components that make up the stool’s frame.
After doing all of the angled joints first, I found myself relieved when I got to the normal mortise-and-tenon joints. The tenons aren’t any more difficult to cut on the angled joints, but you do have to pay attention when making the mortises. The normal ones are blissfully mindless, which probably explains how I managed to chop a mortise in the wrong place again. I was able to fudge a way around that error. One of these days, I’m going to learn to be careful where I put those things.
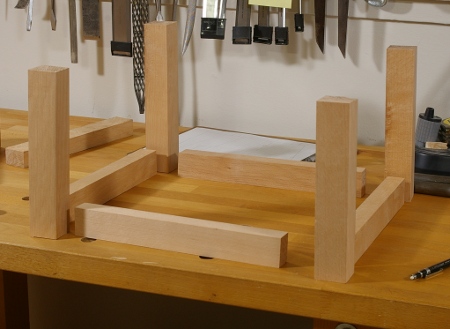
With each of the joints complete, I made a test-fit, and it looks like everything works out pretty well:
The only remaining work to be done here is to cut the top to its final size, and then to attach the top to the legs. That latter part will involve angled tenons, yay.
I have been debating on whether I should chamfer the edges of frame pieces. I was originally planning to, but I kind of like the lines on this thing as it stands now.
Another debate is now if I should make a new mallet or not. The Thagomizer is a great mallet that has worked perfectly for me with the scale of joinery that I’ve been doing so far. However, for the first time, I found myself wishing that maybe I had a little more mass and leverage while chopping the larger mortises in this beech. If I ever do make one, though, it won’t be for a long time. I have too much to do.
In my last post, I sawed the angle at the bottom of one of the legs of the stool. Now, I felt it was time to try one of the angled mortise-and-tenon joints with which half of the stretchers will be attached to the legs.
I again went back to my scale drawing and marked out where the mortise would go:
Unlike most of the joints I’ve made in the past, I couldn’t use one mortise gauge to mark both the mortise and the tenon. This is because a 1″ wide stretcher will meet a 1.5″ leg, so there has to be about a quarter-inch of space on either side of the stretcher so that it’s centered.
So I had to use a little bit of actual calculated measurement for this. Fans of the metric system may want to skip to the next paragraph. My mortise chisel is 3/8″, and half of that is 3/16″. The leg is 1.5″, or 24/16″, and half of that is 12/16″. That means that to center the mortise, I needed to align the near edge at 9/16″ (12/16″ – 3/16″). (Gee, I guess there was a good reason for not going with the 7/16″ chisel for this project after all.)
I used a marking gauge set at 9/16″ to scribe just one line for the mortise. From that point, it’s just like chopping a regular mortise, except at the ends. This mortise is not rectangular, but rather, a parallelogram. I used my sliding T-bevel to get the approximate angle on both ends while chopping.
The preceding image is actually a bit of a fib, because when I was doing this, my hands were switched (left on the chisel, right on the bevel), because I use the mallet with my right hand. I think you get the idea, though.
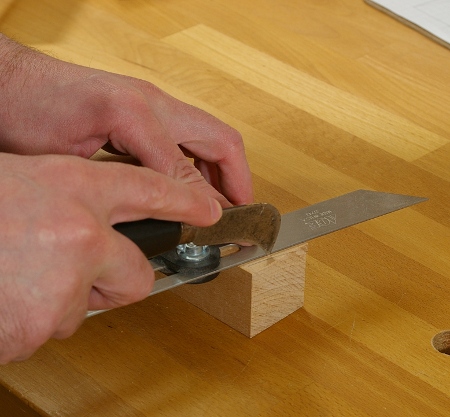
Next up was to saw the tenon. For this, I set up the mortise marking gauge. The first thing I did was to chop a mortise dead center in a 1″ width into a piece of scrap. Then I stuck the knives into the mortise and set the gauge:
Notice that this piece of scrap is roughly sawn on the face that you see here and it’s actually a little more than 1″ wide. This doesn’t matter, because the reference face of the scrap is flat, and I scribed a line at 1″ on the top, but I admit that it makes for a confusing picture.
Proceeding to the actual tenon, I went back to my scale drawing and marked out the limits of the tenon shoulder. When I had a mark in place, I used the sliding T-bevel again to mark the shoulder:
After using the mortise gauge set earlier, it looked just like almost any other tenon, except that the shoulder was at an angle. Sawing at angles turned out to be tricker than I thought, but then I remembered another tip from that book I mentioned in my last post; you can put a piece of scrap with one side relieved between the work and whatever you’re holding it against to bring it roughly square. This worked surprisingly well:
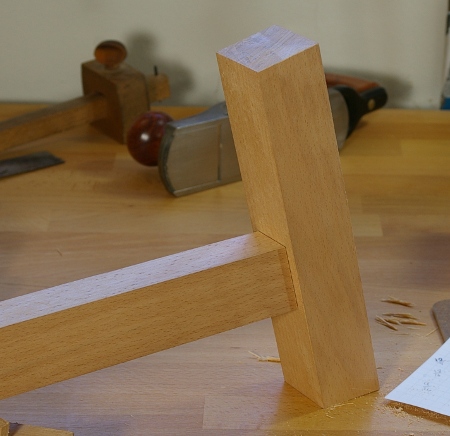
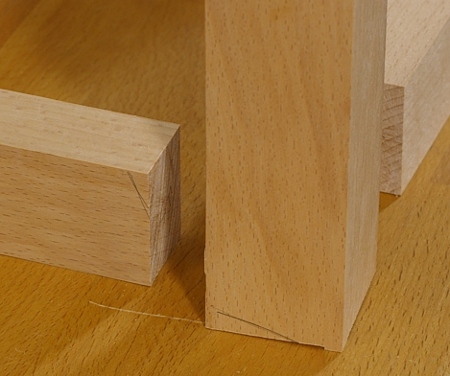
And soon, I test-fit my first angled mortise-and-tenon joint:
There’s a little gap in the joint in this photo; the test-fit revealed that I still had a little more trimming to do on the shoulder.
Three more of these plus four non-angled mortise-and-tenon joints to make, and the frame will be together, ready for its joinery to the top.
To prepare for the joinery for the stool’s frame, I needed to come to terms with the angles at which I was going to set the angled mortise-and-tenon joints. Since I’ve never done one of these at an angle before, I felt that I might take a little extra time in preparing the various tools necessary to make the joints.
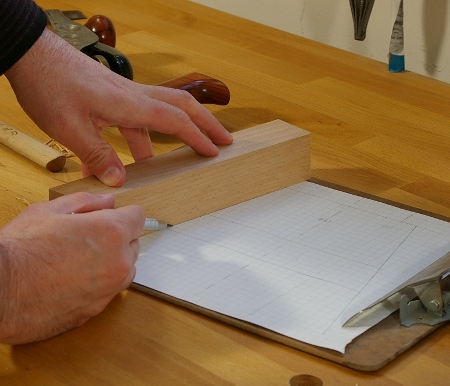
The first step was to create a full-scale drawing of the joint. Interestingly enough, a joinery book I have also says to do this, but I must confess that I didn’t read that before I’d gone through with the process. As I drew up this thing on graph paper, I realized that I had goofed up some of the critical marked measurements on the computer drawing, though the image of the stool itself was correct. I might go back and fix this in the image that I posted before, but I’ve got other stuff to do now.
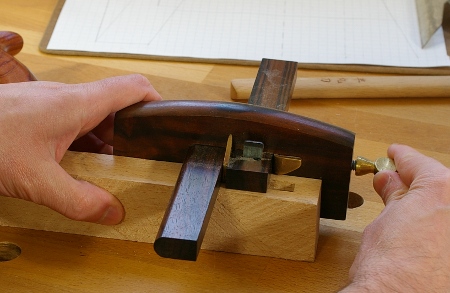
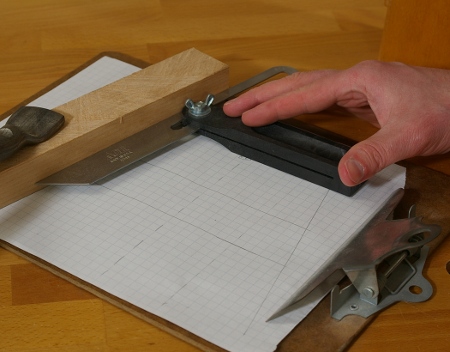
With the drawing on a clipboard and a straight board clamped to one side of the angle on the drawing, I set a sliding T-bevel:
After this was set, I realized that I was getting a little ahead of myself, because I hadn’t yet come up with an arrangement for the frame pieces. So I did that:
Then I marked each piece with its position. As an additional indicator, I also roughly marked where the wood will be cut at an angle, so that I don’t accidentally cut an angle where it’s supposed to be straight:
In the preceding image, the piece on the left is a stretcher, and the center is a leg, which will tilt to the left. The marks here indicate the way the stretcher will meet the leg, and how the leg will rest on the floor.
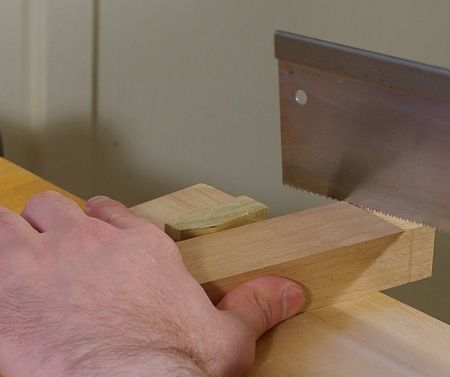
With all of this setting and marking done, I precisely marked the bottom of one of the legs with the T-bevel and a marking knife:
Finally, I sawed it. I don’t have a photo of that, but I guess you’ve seen pics of me sawing stuff before.
Next time, I’ll get down to the business of cutting the joints.
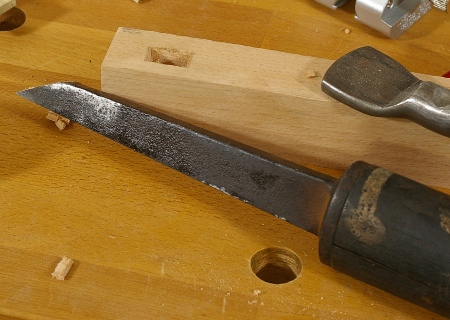
To make the joinery in the stool project, I’m going to need a fatter mortise chisel than my W. Butcher “pigsticker.” Fortunately, while trolling eBay a while back, bidding cheaply on every pigsticker I saw (and losing all of them), I managed to pick up two for about $13 each. When the dust cleared, I had a 3/8″ William Ash and a 7/16″ Samuel Newbould. Both needed work to get back into usable shape, but at least I didn’t have to make a handle for either.
For whatever reason, I picked the Ash to restore now, which had a lot of rust. In retrospect, I have no idea why. The Newbould doesn’t have much rust, but it does have some pitting near the tip, as does the Ash. And of course, that’s the worst part, right? So no problem with the slightly smaller chisel, right?
Well, that is, unless that one has a tip that is about as sharp as a blunt screwdriver, which is exactly what the Ash had. But I’m pretty hardheaded, so I resolved to reshape the bevel. However, even though this type of chisel is laminated and most of the metal is pretty soft, the cutting edge is always ridiculously hard. I didn’t want to spend years trying to muscle that off. For salvation, I turned to…
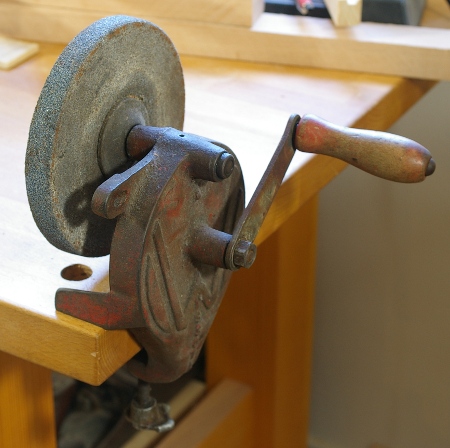
The world’s most horrible grinder.
Hand-crank grinders look cute and all, but I bought this Wissota thing for about 50 cents a long time ago, and after fiddling around for a long time trying to make it turn even halfway reasonably, I put it aside. Some of its many features include:
Grotesquely misshapen, hot-burnin’ wheel
Mismatched bushing/arbor
Missing tool rest (although this might not be such a bad thing)
Bent crank handle
Frozen nuts
Broken clamp knob
But for whatever reason, instead of going out and getting something reasonable, I put it on the bench and started fooling around with it. I managed to get the nuts turning, and when I tightened everything up and turned the crank, it started spinning with a groan. For lack of a better idea, I squirted a little WD-40 into the oil hole, and to my surprise, the noise went away and it turned freely.
So I put on the safety glasses, got a jar of water for cooling the blade, and went to work, using a clamped board as a tool rest. This worked well enough (gotta love those high-carbon steel sparks), and before long, I had an actual bevel on the blade. Whee.
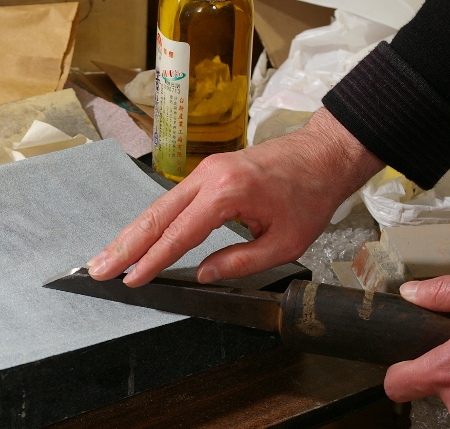
Then I turned my attention to the chisel’s face. There was a lot of pitting near the tip on this one after some flattening:
Oh, how I hate dealing with this mess. It was off to the surface plate and the 3X sandpaper to fix this problem:
The sandpaper doesn’t stay aggressive on this steel for very long. After switching sandpaper about 5 times (note to self: get some 60-grit paper next time), I had finally gotten through the pitting, so I finished smoothing the face, then turned my attention to the bevel side.
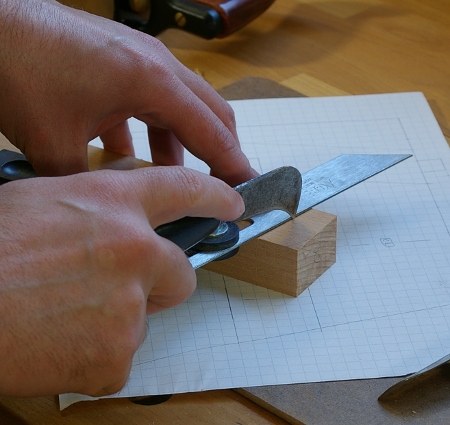
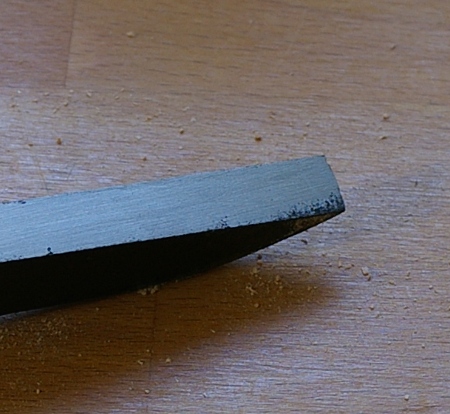
I started with an Eclipse-style honing guide at first, but this chisel is just too heavy for that, so I just did it freehand. This worked well, and before long, I had a sharp chisel. But it’s not truly sharp until you use it to make sure, so I did just that on some beech:
Yeah, I’d say it works. I might remove some of that black oxidation on the sides at some point, but for now, I don’t think I need to. Anyone want to take bets on how long the handle will last?
One question remains: What will become of the world’s most horrible grinder? I might be able to make it work reasonably well with a decent wheel and a little tuning. Or should I get a new one? Grinders are useful things, no doubt about it; I just hadn’t really needed to bother with one until now.