
Even though I have not yet completed the cutting list for the nightstand, I do know that I will need four 24″ long legs that are 1.25″ square. I had meant to get the stock milled for this sooner, but it’s been a busy week. I finally completed the flattening of the 7″ wide 8/4 board segment that I plan to use today, and then faced the task of resawing this thing into the piece for the legs and a panel for one of the sides.
It’s been a few months since I last did any resawing, and I wasn’t particularly looking forward to it, given how much work it’s been the last few times. But this time was a little different (otherwise I wouldn’t even be writing about it).
I wanted to try out the techniques shown in a few videos of those magnificent Japanese sawyer’s saws. They use them mostly perpendicular to the grain, letting the huge area of the saw register a very smooth cut through the wood. I can’t do this completely with my frame saw because its blade is not deep enough to register so well, but I could at least try to do it partway.
I started by the diagonal cuts along marked lines that are necessary in order to get a square cut started. Further cutting along each side at a very slight diagonal established a somewhat shallow kerf on side. Then, to connect the two kerfs, I clamped the board upright in my front vise and went at it almost perpendicular to the grain (I’m pushing it here):

As noted before (by several folks), it is really important to tighten up the blade to a very high tension in order to keep the blade from binding up and cutting a curve. From time to time, I would reach the end of the kerfs I’d cut on each side and I’d have to extend them. I think that this actually took more time than doing the bulk of the sawing. In fact, most of this went very quickly because the saw followed the kerfs better than before.
I sawed all the way down to a spot about an inch away from the end, and then wondered if there was any better way to finish off the cut with the vise. I then did a very silly thing: I clamped the board in upside down, with the saw upside down, and pushed the saw up from underneath to finish it off. Don’t do this; it’s ridiculous. Afterwards, I realized that it would have been a lot easier to clamp the board flat to the bench with the uncut end hanging off the end, and just work the saw sideways for that last little bit. There are other setups that I’ve seen that do a better job still, but I don’t have the resources for that yet.
So I was finished with this bit:
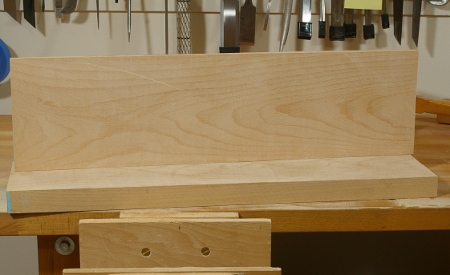
Not bad, not perfect, though. There’s one saw mark on the top center-left, but it’s very shallow (one pass of the fore plane will remove that).
I’m starting to figure out that my frame saw is pretty good for boards that aren’t so wide. This was a 7″ wide piece of beech, and that’s probably about the maximum that’s comfortable with this saw. If I ever build another frame saw, it will have the following changes:
- Longer frame and blade to handle wider boards better.
- Wider blade for better registration.
- Much larger teeth.
- Improved hardware for attaching the blade. I’m not sure how to go about that just yet, but I do think that it ought to be bigger than the stuff I currently use.
- Yeah, a saw bench would help a lot, too.
That said, what I have is workable for what I do now, and I do have to finish this project in a reasonable amount of time. (I think it’s supposed to be done by the end of August.)
