This project is finally done and in its intended location:
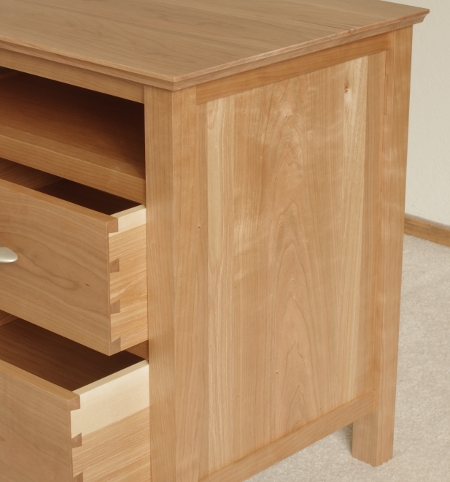
Here’s the obligatory drawer-open, from-the-side photo:
For those who haven’t been following this project, the dark wood is black walnut, the lighter wood is ash. Drawer bottoms are western redcedar, and a few other parts here and there that you can’t see are tuliptree (“yellow-poplar”). Finish is the usual varnish, and this time, I waxed the top, anticipating heavier wear than usual.
The photos here show how the panels and drawers are arranged so that each side looks like it has a continuous piece of ash, framed in. This wasn’t too bad to execute, even though the drawer fronts are a lot thicker than the panels on the sides. You just have to mark stuff out and remember where everything is. It also helps to remember what your plans were in the first place, which can admittedly be a problem when a project takes as long as this one.
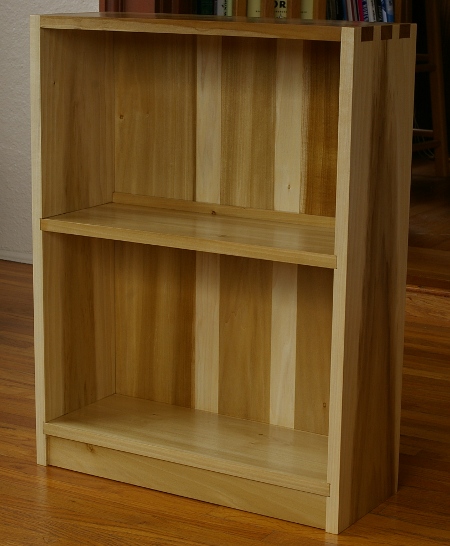
This is sure to be one of the most anticlimactic posts ever; the second bookshelf is done and has been pressed into service.
There isn’t much to say about it other than the finishing technique that I used. Rather than building up a film to complete filling the pores as I normally do, I decided to apply only two coats of varnish over the gel stain. This was primarily to reduce the sheen even more than the diffusers in the “satin” varnish already do.
The glue-up and finishing stages were difficult because this thing is so tall. SWMBO helped me here and I’m really thankful for that. It would have been very difficult otherwise, especially given the comparatively small space I had to work in.
It also turns out that you can get away with murder with a dark stain and just a little care when you apply varnish.
I didn’t really bother to take decent photos of the finished bookshelf. It’s just not a showcase piece; it’s there to hold books so that we don’t have to put them into boxes or just leave them on the floor all over the place. Somehow, I felt that this is a piece that should blend into the background; you shouldn’t notice it’s there most of the time.
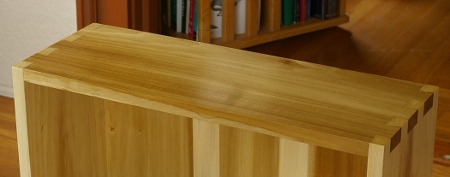
So here’s the top corner, where you can see some of the figure of this exotic yellow-poplar and the highly esoteric literary tastes of this 100% Ph.D. household:
You can barely see the half-blind dovetails at the top. (And, again, I prefer it that way for this piece.)
But wait, there’s more. If you thought that was unimpressive, wait until you see the whole thing in its final location, jammed up against a wall and next to a cheapo particleboard bookcase that I’ll make a replacement for one day:
Hmm, it’s really difficult to get those wide-angle shots to look square. Well, off to the next project.
For the last month, I’ve felt so close to finishing the twin-nightstand project that I thought it could all come together at any moment. The final details proved as time-consuming to complete as the rest of the thing.
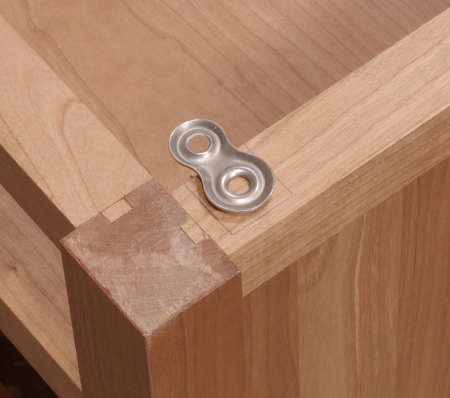
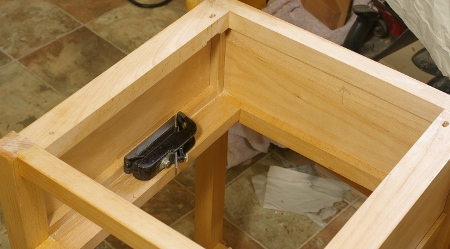
I’ve been varnishing for maybe a month. When I’d gotten enough onto the cabinets, I took care of two remaining steps before the final rubout. The first was how to attach the tops. I decided to use figure 8 connectors because they seemed like a pretty neat approach. Placing them into the cabinets was relatively easy. First, I marked out a box (with no particular offset):
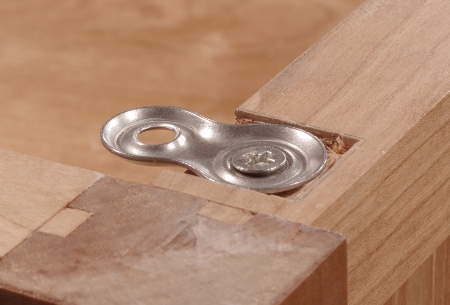
Then I chiseled mostly down to the depth of the connector, using my Veritas mini router plane to go to the bottom:
Then I predrilled a screw hole and did a test fit:
Marking and predrilling the corresponding holes in the tops was a fairly simple matter. However, attaching the tops was more difficult due to the limited space between the shelf and the top. I used a stubby screwdriver, a socket wrench with a driver bit, and practically no vision whatsoever.
The other final task not related to finishing was to cut the legs to height. I didn’t cut the legs to length at the start because I knew there would be some adjusting to do at the end. However, I couldn’t use the ol’ “put the legs under shims, put on a level, flat surface, and mark around” method that’s become popular, because I wasn’t doing a single piece–the nightstands were identical and had to be the same height.
It was easy enough, though. I took a long, thin piece of scrap, marked the desired height to that, then flipped the pieces upside-down (without the tops) on the bench, and marked to that:
It’s a little difficult to see the scrap here because it’s also a piece of cherry, but it’s the thin thing sitting up next to the foreground leg. After making the mark, I scribed around from that mark and sawed off the ends. It worked fine.
Varnishing and sanding between coats was the main time-consumer in the final stages. The cabinets and the drawers got four coats and the tops got five coats. As I have done with the last few projects, I rubbed out the finish with a progression of lubricated #000 and #0000 steel wool only. This was a matte finish again, so I didn’t feel the need to use rottenstone. And really, #0000 does leave a very good finish if you follow the grain most of the time.
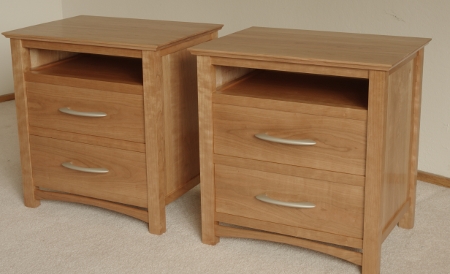
So here are the two together:
If you look closely, you’ll see that the drawer fronts are carefully arranged for continuity left-to-right as well as a balanced figure. On the left piece, the fronts have “cathedral grain” in the same orientation, and on the right, they have ellipses, also in the same orientation. But it turns out that the board used for these fronts was cut so that the front on the top left was next to the front on the top right, and the same is true for the bottom drawer fronts, so there’s a bit of continuity when you look at them left-to-right. (In the end, this probably doesn’t matter at all because they’re not going to be placed terribly close to one another and no one would notice, so don’t think of this as a sort of profound design choice.)
The handles are “halo” handles from Lee Valley.
A closeup of the right-hand cabinet and drawers:
I need to make a note about what’s going on with the woods here. In the side panel, there is a roughly 6″ wide slice of flatsawn cherry stock in the center to give it the central cathedral figure; each side panel has this. On each side of that, there are narrower strips of birch meant to provide contrast as stripes. Then, the outermost strips from the center of the panels are again cherry.
This didn’t quite work out the way I’d planned. I wanted to birch to be slightly brighter and contrast just a little more so that you could see what was going on. It was supposed to be subtle, but not this subtle. However, the grain selection worked, so I’ll take that one.
And then there’s the drawer side fiasco. I said this before, but I’ll say it again: Use something reasonable for drawer sides, not yellow birch. The sides did turn out to look interesting enough, but these were such a nightmare to thickness, surface, and cut tails into that I really don’t recommend that anyone ever do it. Yellow-poplar is a great secondary wood and I should have used that.
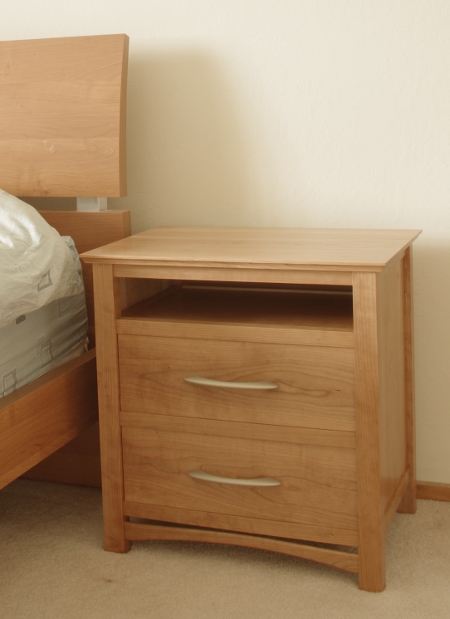
But what’s done is done, and none of this is terribly important in the end. What is important is that they are in use now, and the final placement looks like this:
There’s something very important to note here–These pieces do not incorporate as graceful of a design as my first nightstand. They don’t have the elegant, long legs, they don’t have the simple square footprint, and they don’t have the fancy double-arc decoration. Furthermore, they took longer to build because there are more innards.
So is it a step back from a year and a half ago? It would be if form were everything. But these were designed primarily for function, with the form fitting into a context–they flank a somewhat cheap bed that has no particularly graceful features of its own. They are a tad fancier than the bed itself. Eventually, I will build a replacement for the bed, and at that point, I can make the bed do what the nightstands cannot do on their own.
(The function should speak for itself–I had strict instructions to incorporate a large top surface, plenty of deep drawers, and easily-accessible shelves.)
And there’s one more final step forward with these pieces. I kept them in the same room as the first nightstand while I waited for any remaining solvents to evaporate, so I was able to compare them. The craftsmanship is definitely a step up from back then.
As a postscript, I again need to thank Kirk Eppler, who helped out in a couple of ways when I was building these things.
My deadline for the nightstand project is Wednesday. [Ed: This was posted the Friday before that Wednesday.] I had originally planned on having this thing done about a week before then, but stuff happened. I’ve been applying varnish to the frame, top, and drawer over the past few weeks and they were finally ready. I rubbed out the varnish with 320-grit sandpaper followed by #000 and #0000 steel wool, all lubricated with mineral oil. I decided not to use rottenstone on this project for two reasons: first, the #0000 steel wool got it to where I wanted it to be, and second, I was afraid of getting it into some of the parts that don’t have finish in them. The second concern was a little silly.
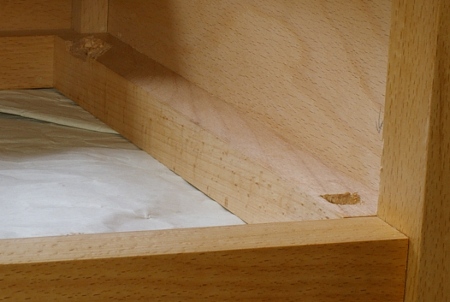
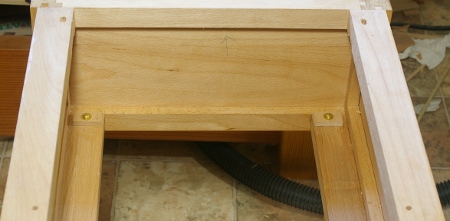
I started assembling the whole thing by drilling holes and cutting recesses in the top stretchers for the screws to attach the top. This was an ugly job that took forever, and I was very silly not to have done this before glueup. I didn’t realize that I would be attaching the top this way until it was glued–I couldn’t find the hardware I was looking for and I didn’t feel like making it. Oh well, it’s not like anyone is going to see this part anyway (it’s on the inside):
Then it was time to solve an uglier problem. The drawer is slightly out of square because (I think) the bottom panel is a hair trapezoidal (thankfully, the end that’s too big is not subject to wood movement). I’ll be a little more careful of that sort of thing in the future, but for now, I decided to make the drawer fit by trimming the side of one of the runners:
Hey, finally a use for my Stanley #75!
With the kludges out of the way, I put in some simple stops for the drawer:
You can also see in the preceding image how the rear holes for the screws to attach the top are elongated to cope with wood movement (and this being riftsawn beech, that’s pretty much a given).
Then, after trimming the bottoms of the legs a little to get them level, I put everything together, waxed the drawer bottom and runners, and it was done:
Here’s a detail of the open drawer:
Though I made more mistakes than I care to admit, reflecting back on this project, it’s pretty positive. Despite the slight goof, the drawer looks perfect and the dovetails are very crisp–and I’d only done one practice half-blind joint a few months back.
Probably most importantly, this was by far the most complicated project I’ve done so far, and I finished it faster than any of my other projects. And it’s done just in time.
This morning, I decided that the latest coat of varnish on the stool was dry enough, and that it should be the final coat. So I rubbed it out with #000 steel wool and mineral oil. I didn’t want to use rottenstone because I didn’t want it to be too smooth.
The result looks like a stool to me:
There are some glitches that I’ve described in previous posts. There’s a not-so-pretty spot on the inside of one of the stretchers that I could have leveled out, but didn’t bother to work on because it’s practically impossible to see.
The most important part is, of course, whether the thing actually works. Is it solid enough to stand on? It’s an interesting question for me, because this is my first project meant to bear someone’s weight.
Yeah, it works. It seems really solid. I jumped on it, too, but not too hard. I probably need a little more time to come to terms with the way it is constructed and how the stretchers distribute the load among four to eight joints that are already extremely strong. Yes, this is the way that it’s supposed to be, but going from theory to practice can sometimes be daunting.
This is not to mention that this also marks the finish of a project that I really wanted to build, a piece of furniture that I’ve wanted for a very long time. Aside from the utilitarian aspect (I’m not terribly tall, so sometimes I need a little help in reaching things), it seems that I grew up with the notion that everyone had to have one of these things.
However, this unfortunately wraps up my only project that was really active. My next project is a nightstand that I haven’t finished drawing yet–I’ve been having a particularly hard time with that. In the meantime, I’ve been doing minor work on the shop. I did some cleanup work on some shelves down there. I worked on sharpening a drawknife (but didn’t finish). I cleaned the last of the rust off of my #78 and made some ovolo trim with it in conjunction with the rounding plane I got in Taiwan (thanks for the tip, St. Roy). I picked about 25 plastic bags off the floor (how does that get that way?).
I’m at the point, though, where I can’t lollygag my way around the new project any longer. I suppose it starts this week.
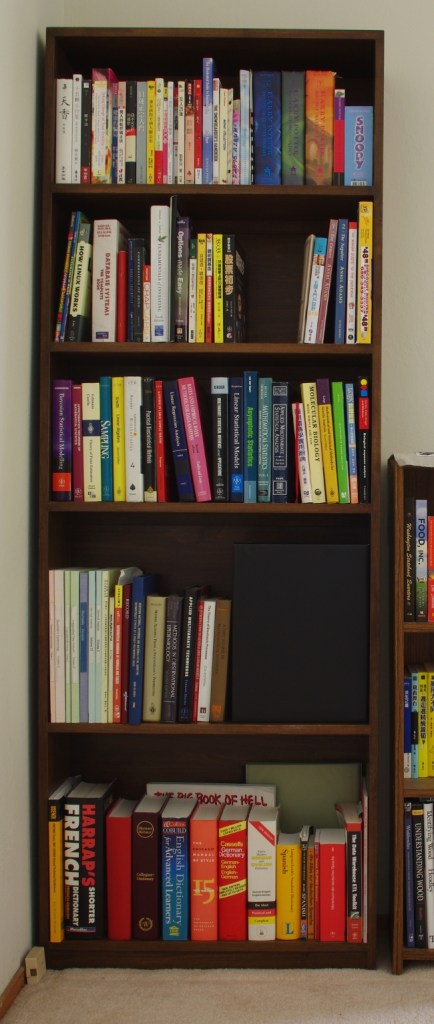
After about four coats of varnish, I felt it was time to rub out the finish and call this project complete. There were many reasons, not the least of which was that we’ve run out of places on our other shelves and need to put something in service immediately. For rubout, I used the steel wool/rottenstone sequence, both lubricated with mineral oil. I’ve always been happy with the way that turns out.
Here’s the view from the left side:
Viewed from this side, it’s got “flames” (the cathedral patterns on the sides) and “racing stripes” (the sapwood strips in the back panel). However, viewed from the left side, the flames aren’t visible, other than a tiny little sliver on the inside right:
This is about all I could do with the yellow-poplar that I had on hand. I struggled for a while to figure out an arrangement that didn’t look totally horrible, and it turned out to a certain degree. I wouldn’t say that it’s something I would repeat. Actually, there are lots of things I wouldn’t repeat, so let’s start with the top:

Aside from the fact that I should have taken a couple of swipes with the smoothing plane on the top before glueup, I’d say that the dovetail contrast here tries, but does nothing. The very top should be a clean rectangle. Next time, I’ll use half-blind dovetails or even fully-blind mitered dovetails. Half-blind dovetails will mean giving up the mechanical strength advantage in this application, because I’ll have to put the tails on the sides, but with this much glue surface, it won’t pull apart any time soon.
The other thing that I will change in my next bookshelf project is the stretcher along the back shelves. I wanted to put the stretchers entirely below the shelves in this project and rabbet the shelves to the stretchers, but I didn’t have enough width in my shelf boards to do so. I am, however, very happy with the strength that the stretchers provide.
Then there is a question of the wood. In this project, I was trying to get rid of some of the stock that I had on hand, but next time, I’ll pick lumber specifically for this project. But which kind? Shelves can be big, and big shelves are heavy, so I don’t want to use something like oak, maple, or that beech that I have on hand, because they’re just too much. Cherry is a good choice because it is both durable and somewhat light, but I’m wary of using too much of it (not to mention that it costs a bazillion dollars a board-foot around here). I actually liked yellow-poplar for this, and while we’re talking about woods that are more prone to dents, I may as well mention the various pines and douglas-fir. And there’s stuff like paper birch, butternut, and sweetgum. Who knows? The only thing I know is that I’m trying to avoid darker woods.
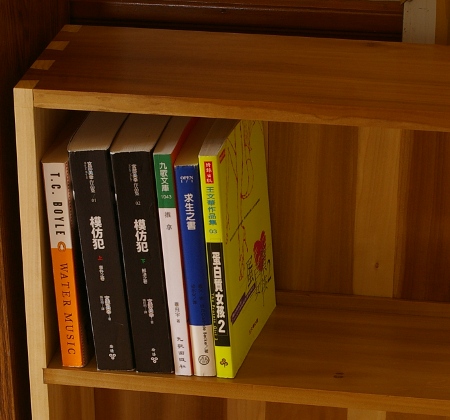
For the moment, though, I have other projects to do, and so, here’s the prototype being taken for a test run:
And you can see that form follows function here, as the “racing stripes” won’t even be visible when the shelf is full. Hee.
Remember the shoe rack I’d been working on for a while? The one I haven’t written about for a while? Well, it’s been in the finishing stage for the last month. I did a tung oil/varnish blend first, and after waiting the requisite million years for that cure, I put on three more coats of varnish.
I started today by rubbing out the finish. That’s always pretty hard work. I used 320, 600, and 1500 grit sandpaper dry at first. In retrospect, the 1500 was not necessary, because I hit it with #000 and #0000 steel wool lubricated with mineral oil afterwards. Why do I always forget what an amazing difference that makes? I did not use rottenstone as a final step this time, because this is a shoe rack and does not need a super-fine glassy finish.
Then I set out drilling holes for the assembly hardware. The sides were relatively easy–just pop them under the holdfasts, mark out, and go crazy with the brace and bit:
(Yeah, Dan, that’s one of my Millers Falls #2 eggbeaters on the right. It’s got a countersink chucked in. Just sayin’, ‘cuz it seems to be eggbeater season.)
The shelves were a lot trickier. I had to bore parallel into the stretchers for a place to insert the screw-in nuts. That’s difficult to do without splitting the wood, so here’s my solution. With scraps protecting each side, one end goes in the vise, the other is held tight with a handscrew:
So what hardware am I using, you ask?
It’s the same kind I used for my saw handles–those furniture connector bolts with the really wide heads that are screwed in with hex drivers. (I like these things, obviously. Very 20th century, I realize.)
Then it was time to see if everything went together okay. It did:
Oddly, it looks just like I wanted it to. Not so oddly, it’s already full. The SO had a job to do here, you see.
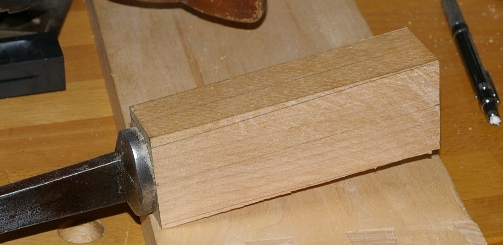
I marked out the angles on the mortise chisel by “feel,” just by sort of looking at all of the pictures I’ve seen and guessing. With two sides cut away, it looked like this:
I cut out these sections with my larger rip saw. It would have taken forever with anything else. Then I used a block plane to smooth around the oval. I nicked the blade of the plane against the chisel bolster doing that. Boo. Grinding that stuff out is always such a pain.
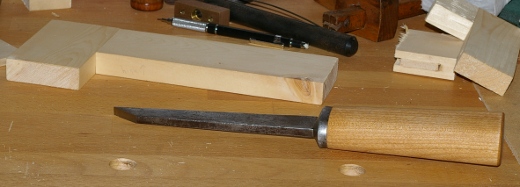
Following the plane, I used a spokeshave to further smooth the oval shape, then, finally, progressive grits of sandpaper on a block to do the final smoothing. This sequence was quick.
A couple of oil/varnish blend applications later, along with the requisite sharpening, it was ready to use. Here it is with its first test mortise-and-tenon joint (upper left, not that stuff to the right):
I’m in the process of varnishing four saw handles, a plane tote, and a plane knob. Here are half of the pieces.
As usual, I’m not being terribly speedy here. It’s been seven months since I started working on that tenon saw handle in the center. Things happen but I like to think that sooner or later, I get back to this stuff. (Especially since I’ve had the saw blade sharpened almost since I started on the handle and it’s otherwise ready to go.)
The larger hand saw handle in the rear is for a Disston D-8 that will become one of my new rip saws, somewhere at around 7TPI. This will be in addition to a No. 7 (I think) that’s going to be a larger 4.5TPI rip saw. The handle for that one is also in this batch, thankfully. Both of these handles were glopped over with some awful green paint that I needed to strip before the refinishing process started. What is it with the green paint?
The initial finish on these two handles was a mix of “colonial maple” stain, some satin polyurethane, and tung oil, for an oil/varnish blend (this makes the rays in the beech look nice). After a few coats of that, I’m now putting on satin polyurethane. I like the way that a top coat of polyurethane feels on the other handles I’ve done (as opposed to alkyd varnish and oil/varnish blends), and it seems to hold up better. It takes a little more effort to get polyurethane to look decent, but it’s not that bad.
I think I need one or two more coats on the handles.
The knob is from a Millers Falls #22 jointer plane that’s been waiting for restoration. I did not use the oil/varnish blend on this (or its accompanying tote), because the ray structure in this tropical wood did not seem worth bringing out. I may be done with the plane parts; I’ll evaluate that later.
Well, this is more or less done. I haven’t decided if I should apply varnish over the oil/varnish blend that I put on it, but it looks decent enough right now.