Goofs Illustrated: Too Many Planes

I’m going to start a new feature that will appear irregularly, meaning “whenever I have material.” Essentially, when I have enough explanation for something that I messed up, I’ll write about it. I was originally going to call these “mistakes,” but I realized that they aren’t that serious (and Kari Hultman agrees). It’s an important distinction because I don’t want to give the impression that you can’t get anything done if you goof up, goof off, or whatever. I’ve completed several projects while doing the “wrong thing.” The contradiction is that in woodworking, completing a project is essentially never the wrong thing to do. Just ask your significant other.

So here we go with the most obvious one: I bought too many stupid bench planes, and didn’t know what to do with them. You’re going to see a lot of confessions like this (if you haven’t already) due to the release of Schwarz’s The Anarchist’s Tool Chest, where he goes into detail about this. It is a recurring thing, though–seems that everyone has to go through it because otherwise, you really don’t know for yourself.

Let’s start with jack planes. I knew that I needed a jack plane and I got a pair of metal Bailey-style models early on because they were not expensive. I got one working well as a general-purpose plane and I was really happy that I was able to get the thing to take nice shavings. So far, so good, but that didn’t stop me from buying more. I ended up with four #5-size ones. I don’t know why, because I use only one of them. I’m currently thinking about adapting a second to shooting-board use, so that would still leave two extras. And that #5 1/4-size plane I picked up? I’ve used it maybe once, but it sure is cute.

What’s probably worse is that I didn’t put a serious camber on my jack plane until, what was it, three years after I got it? That was almost a year and a half ago. Stock prep has never quite been the same since. I’d made a scrub plane, which is great for getting really icky boards into shape, but it never occurred to me that I should have something somewhere between that and a straight edge.

What was I thinking?

So I’m happy with that thing, but am I finished with jack planes?

Oh well, the answer doesn’t matter. Let’s talk about smoothers now, because we have to. At my peak, I had five metal #4-sized smoothers. I’m down to three: one that does what it’s supposed to do when it’s sharp, one that I don’t use so much, and another that I’m prepping to give to a friend. I have a wooden Taiwanese plane that works wonders as a smoother, and I’m thinking about rehabbing a coffin smoother because wooden planes are awesome. And there’s the #3 size that I’ve got, too. It works great but I never use it.

This would be a nice set. The coffin smoother isn’t tuned, though.

At least smoothing planes are small, though. I don’t have as many as a hardcore addict, so they’re easy to stow away and sort of forget about. Unlike jointer planes.

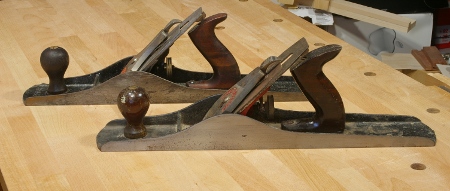
I’ve owned five jointer planes. I had two metal Bailey #7-size examples and they worked okay, but I was never terribly happy with them. I gave one to a friend. I also had a #8 that needed some work. I gave that one to a fellow BAG when I realized that I hadn’t gotten it to work yet because I never really wanted it to.

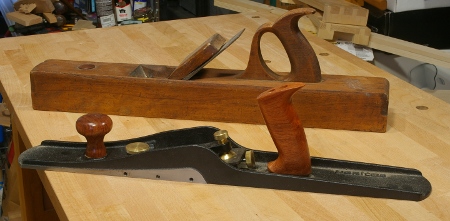
And I was still in jointer hell. The one that remained and I actually used, I didn’t like very much. There was just something about it that bugged me, so this year, I bought two more at about the same time. One of these was a woodie that a friend picked up at the flea (thanks, again, Kirk!). The other is Veritas bevel-up jointer (BUJ). Now that there is a serious plane–and I think it cost more than all of my other bench planes combined. I flattened the sole of the woodie with the BUJ, set the woodie for a thicker shaving (kind of like a fore plane), the BUJ for a fine shaving, and maybe, just maybe, I’ve escaped jointer hell. I found stock prep on the nightstands v2 project to be much less of a chore with these. Remember the phrase, “coarse, medium, fine?” The woodie is medium and the BUJ is fine. On thin boards where the blade is wider than the stock, you don’t need to use a smoother.

If I’m lucky, this will be the end of the jointer debacle.

Oh yeah, and of course, I have two Bailey #6-size planes. I never use them because I’ve found that I prefer the jack plane size as a fore plane. Why? The #6 is too heavy for my weight. When I make a diagonal stroke with one, it’s too much effort to lift it back toward me. I’ve noticed that guys who like the #6 size for this sort of thing tend to outsize me. So, would a wooden plane be better, or should I just stop fooling around and be happy with my jack plane?

Too heavy.

That final question is why I’m still in the goofing-off stage with bench planes. There are two sides to this. On one hand, goofing around with tools can seriously detract from projects that you’re supposed to be working on (and believe me, those are my top priorities). On the other hand, there are certain tools that can save you a lot of time on your projects if you spend enough time goofing around with them.

I have slight excesses of other tools, but the plane surplus is the one I’m embarrassed about. So this will probably be the only goof episode about too many tools.

Nightstands v2: Exterior Frame A

The new twin-nightstand project is coming along. After some quality time with saws and planes, I had all of the external frame pieces milled for each piece:

In the center are eight sticks of yellow-poplar that I salvaged from an old bed frame. They’ll be used for the rear of the nightstands. Looking at the timestamps of the photos, it looks like it took (gasp) almost two weeks to produce this stack. That’s just the speed you’ll experience when you’re working by hand, have at most an hour and a half to work each day, and maybe aren’t the quickest person around. (Would a bandsaw greatly facilitate the speed? You bet it would.)

The next step was to come up with a frame map, as I did for the previous nightstand. Because there are so many components in this piece, it’s best to keep close track of them. And again, as I did in the previous version, I made a really ugly but still-workable and accurate drawing:

There are two kinds of labels here. One begins with a P, meaning “piece,” so P1 is the far left leg in this case. The others, which are simply numbers, label joints. The joints are in four vertical levels in the piece, so I decided to have the lower-level joints start with 1, the next with 2, and so on. Then, the second number denotes the position. In this drawing, the x1 joints are in off the right side of the front left leg. So joint 11 is the lowest one of these, and 21, 31, and 41 are directly above. Naturally, in this system, there will be plenty of holes–for example, there are no joints 25 or 35.

Finally, because there are to be two identical nightstands, I decided to add a letter A or B to the end to identify each one. So you’ll have all sorts of labels like P3A and 43B.

Whew. But that wasn’t the hard part. That honor went to planning which piece would go where:

If I recall correctly, the components for piece A are on the right and piece B’s are on the left. In any case, it was tricky. Because the components came from different offsets into a single flatsawn board, the cut profiles were different. The ones from the center were more or less quartersawn in flavor, but most were riftsawn in one way or the other. The worst part was that two of the legs had very tangential grain on their sides because they came from the center of the board. To produce a consistent look, I decided to put both of those legs on one side, and use matching rails between them. The reason? You can’t look at both sides at once, and in the end, I can always choose to hide that side against the side of the bed if it looks too ridiculous. In any case, that will be on nightstand A, and I’ll try to show that when all of this is done.

I wasn’t just trying to match the grain on each side, though. I decided to try out the arrangement of shoji described in Toshio Odate’s book, where you arrange the pieces so that the core of the tree is pointing inward (bark side out). Because this is a 3-D piece, I also tried to place the legs and rails so that the cores would face the interior of the nightstand. It didn’t look so bad to me, so maybe this traditional arrangement has a bit of merit.

With everything arranged, I labeled each piece and its orientation, put half of the pieces away, and started work on the actual joinery. One week later, and I’ve finished the 24 mortise-and-tenon joints of the exterior frame of nightstand A:

Hey, how about that, it doesn’t seem to look too bad and it took a lot less time than I thought it would. Now it’s B’s turn.

Or, it will be B’s turn when the Thagomizer recovers from its run-in with a holdfast. I broke it in a different spot this time, a clean shear across the top:

Of course, it had to wait until I was working on the next-to-last mortise. I finished that one and the final one with it still broken (it hadn’t split down the middle). Then I removed the head, gunked on and spread the hide glue, and clamped it together. Yeah, I’ve thought about making a new mallet one of these days, but I just don’t have the time right now to be dorking around with tools (sigh). Maybe when this project is near an end and in the finishing process.

Marking Gauge Stability Tweak

Back when I made this marking gauge, I thought I pretty much had it all figured out with the mistakes I made there (see the bottom of the post). But it turns out that one of them was kind of unresolved; how to get the arm to have no play whatsoever (as it was, the arm would swivel a little horizontally because its hole wasn’t a perfect fit). I’d thought of a bunch of stupid ideas, from making the arm trapezoidal to mounting the tightening screw diagonally, but mostly, I forgot about it because it still “kinda” worked and that’s all I cared about.

Then when I was milling the frame components for the new nightstands v2 project, I needed more than one gauge, so I grabbed one of my old Stanleys and noticed that the arm didn’t budge at all. Neither did my other old Stanley. Both of these were rectangular-like arms tightened with a screw from above, like the one I’d made. What did they do that I didn’t?

I flipped them over and found the answer.

The bottoms of the arms are slightly convex and the hole in the marking gauge stock is slightly concave. The gauge on the right is a Sweetheart-era Stanley and is a really good fit.

Upon realizing this, I immediately knocked the wedge and blade of out the arm of my shopmade gauge, pulled the arm out of the stock, and used my Taiwanese shave to put a slight radius on the bottom of the arm. Then I put a rasp into the stock and made a mating surface, and the result looks like this:

The fit doesn’t look terribly appealing to the eye, but doing just this much instantly solved the problem, and I’m really lovin’ this gauge now. At that point, I figured that I’d better get back to milling rather than try to make this dorky tool look better. That was a couple of days ago. I finally got around the taking the photos today. It took about five times as much time to take the photos and write this post than to actually fix the problem. Peh.

(And maybe someone else out there has already figured this out and posted something that I haven’t read.)

[Edit (17 June 2011): OK, so I finally bought The Anarchist’s Tool Chest by Christopher Schwarz, and unsurprisingly, on page 118, he talks about this problem. His solution is to do the wedge-jams-the-arm-into-a-corner thing. That works, but he gives short shrift to thumbscrew-tightened models, which is, of course, an injustice, because they work fine after you do what Stanley (and whoever they stole the idea from) did. Also, he says that the thumbscrew is knurled brass. Well, I couldn’t source any brass for mine, and a lot of new ones sure aren’t solid brass, if they contain any at all. I think a wooden thumbscrew is best (Stanley used these), but I don’t have a tap and threader, so I couldn’t do this. Anyways, it’s another datapoint.]

Hand Resawing Notes

When you’re resawing by hand, there is a big consideration in determining how difficult it’s going to be: Under how much stress is the wood? There are two big factors that I’ve noticed:

  • The cut of the wood
  • Moisture content

Let’s start with the moisture content, because that’s perhaps a little easier to understand. Green wood is usually under a lot less internal stress than dry stuff because that’s more or less its natural state before being cut down. As R. Bruce Hoadley’s book explained, you can cut slices off of a fresh log and it won’t crack apart until it starts to lose moisture. Sure, there might be pitch, resin, sap, or whatever else inside to make it more difficult to cut, but it does mean that the wood will be less likely to close up on you.

Because I rarely get the chance to work with green wood, the cut of dry wood is what causes me the most grief. Dry wood is always under stress of some sort; it’s unavoidable because you’ve taken away the water that was maintaining equilibrium when it was (probably) a stable, living organism. What you want is another state of equilibrium where the lignin is strong enough to hold everything together without cracking. Quartersawn wood is great because it’s under the least stress–because it’s got a consistent density pattern across the cut, it dries evenly and doesn’t tend to cup. Just a little more shrinkage at one end is pretty easy to handle.

Well, that’s nice, except that quartersawn wood is more expensive and it’s a lot harder to find than flatsawn stuff (not to mention that the figure may not be what you’re looking for). So this is the sort of thing I usually end up with:

This is a cross-section the 8/4 stock for the new nightstands that I wrote about earlier. The wood on the bottom that’s closest to the pith (center) is under a lot of stress. You can see a minor check here–this was due to that knot and its proximity to the end of the board.

You can see that this board was fed through a planer a little after drying because the cross-section across the cut is flat. But below is what happens when you resaw it:

That pencil line (and the sawcut) was straight when I started, but as I got further into the cut, the stress along that cross-section was relieved slightly, and this cupping was the new state of equilibrium.

The problem is that this stress relief is a major pain in the tuchus when you’re resawing dry flatsawn stock by hand. Basically, some part of the wood inevitably closes up around your saw as you are sawing, and you find your saw incredibly hard to push or pull through the cut, especially if you’re using a deep-bladed affair such as a Disston handsaw. It’s less severe with a frame saw, but it’s still there.

To work around it, break out your wedges and keep tapping them in as you’re working:

They’ll keep the kerf from closing in around you and it will be easier to saw. You really want to put them in as soon as you can, because the easier you saw, the straighter your cut will be. If your blade is pinched by the wood, it is being bowed out of a straight line, and your cut will wander.

Wedges are easy, except for one minor detail. You mostly want to be working like a bandsaw, perpendicular to the grain. However, when working with a fairly thin blade such as this, you need to be able to establish a shallow kerf in both sides so that your blade can track inside. To get these small kerfs, you need to tilt the saw at a diagonal, and this is precisely where the wedges and/or stress-relieved wood will get in your way. If you pop out a wedge or if you’re not able to drive them in deep enough, the wood will close up around your blade.

So what you often end up doing is tilting the saw just a little and establishing a small kerf until you can get deeper.

A bandsaw arguably does this better, because it always cuts perpendicular to the grain because you’ve got a fence, and the blade will always be cutting next to some (hopefully) straight wood. But that’s not to say that the wood isn’t under stress and isn’t closing around the wood–it is, and that’s why you’ll hear a POP at the end of a particularly nasty cut. You need a fairly beefy bandsaw to resaw wide flatsawn stock. You can cheat a little with wedges by turning the machine off in mid-cut, banging some wedges in, and resuming, but this is to be avoided if at all posssible…

As far as the current project goes, I’ve chosen to cut the thinner slice from the more stressed parts of the wood, the “pith” side. The result is that the thicker slice, having a more consistent density, mostly retains its straight profile, but the thin slice (shown above) cups like crazy. My plan is to make those thin slices into panels, where I can use their more interesting figure to my advantage, and not care about their increased instability, because they will be flexible and slide in grooves.

That said, here is what became of that 8/4 piece of cherry in an intermediate state (the chunk on the right is what remained at the end and I probably won’t use it):

It’s hard to believe how large that board used to seem, and now it’s so much more compact. The crazy thing is though it’s not much different in volume (I was actually efficient at slicing this for a change), it seems like it’s a reasonable weight now, whereas before, it was really unwieldy. Of course, there will be a significant change in volume when I whittle those panels down to desired thickness.

Eh, whatever. What it boils down to is that I’ve got my new project frames right there! There are a few more notes I have for how I chose to cut this, but I’ll save them for a later post.