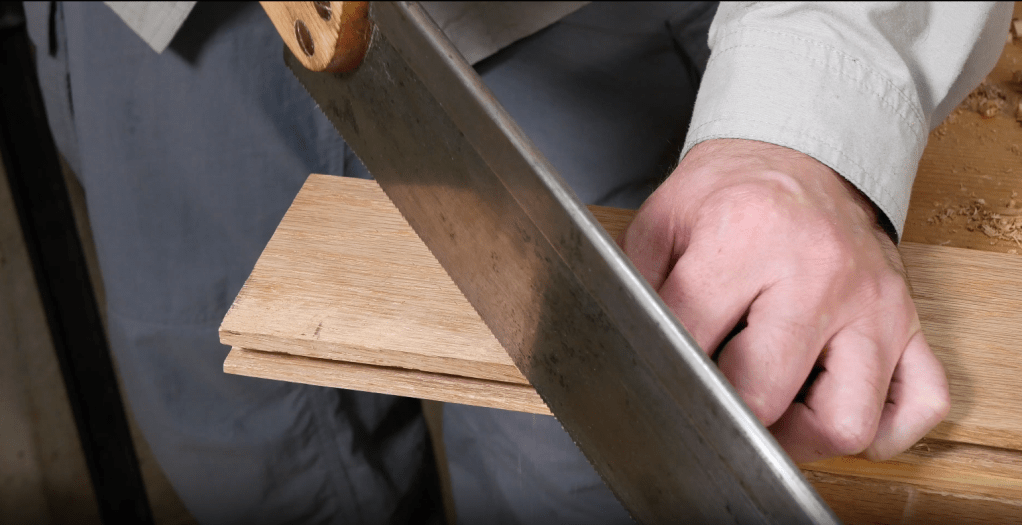
I posted a new video of the hand-tool work done while making a replacement stair nose for my porch. It features probably way too many tools for its sub-4-minute length.
This project and video, like most things lately, is on the short side and was done as time permitted. There just hasn’t been room for longer projects lately.
This was going to be my year for getting enough clamps: I was to troll the tool sales and estate sales to get what I’ve been lacking. Then you-know-what came around, and that plan whimpered and died. As fate would have it, I’ve got an upcoming project that requires more clamps than I have.
Perhaps I was fortunate that I was reading the Roubo translation from LAP recently, and of course Roubo talked all about clamps. He described a panel clamp made from two boards that he called “twins.” He said that “the use of these tools is excellent,” and his recommendations are not to be taken lightly. OK, whatever, it looked reasonable, so I wondered if anyone in the 21st century had made them. I should have guessed that Don Williams had done it; here’s his blog post. There’s a snippet of the Roubo plate in there. Also, keep in mind that even though we’re calling them “Roubo clamps,” we don’t really know how the form evolved over the years to the form he described.
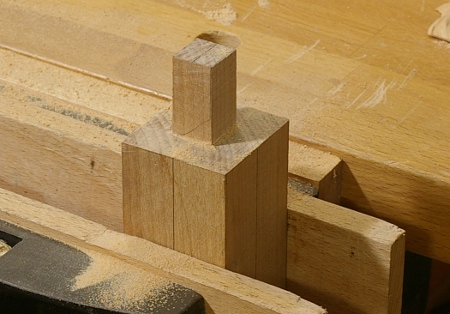
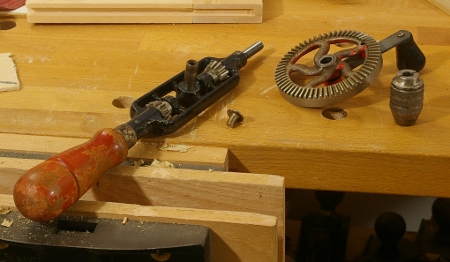
The construction of these is simple enough that it was definitely worth trying. I grabbed some southern yellow pine 2x4s and put a bunch of holes in:
Hand tool disclaimer: I used my drill press. Sure, I could have used my brace, but it would have taken a lot longer, and this is one thing that a machine actually does really well.
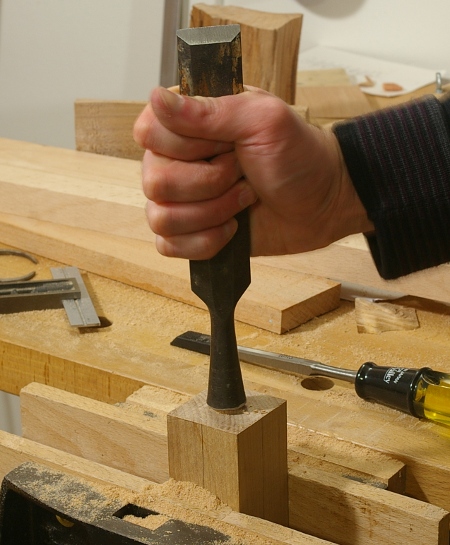
The holes are alternately offset like Williams did. It seemed like a good idea at the time. He used a mortising machine to make 1/2″ square holes. I planned for 3/4″ pegs, and I didn’t like the idea of using round pegs, so I needed to square up the holes. With no mortising machine of my own, I just went at it with the biggest mortise chisel that I own:
Thankfully, these don’t need to be appearance-grade. And yes, I chopped halfway in from each side, and yes, there’s something underneath the wood to keep from putting (any more) nicks into my bench.
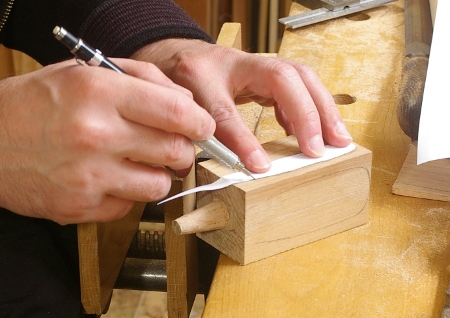
This was something of a chore, but not awful. After that, it was simply a matter of resawing, making the pegs and wedges, and before long, I had three twins:
I tested them on some boards that were lying around:
These seem to work well. I pounded the wedges in pretty hard. Using them requires some acclimation, so I guess another reason to use liquid hide glue is so that you have enough time to put them on. Although I’m using double wedges here, I might change to single ones for the simplicity.
Being southern yellow pine, I think they’ll be strong enough. Roubo describes beefier things: roughly 4-5 inches wide, and 2 inches thick (but is this per side or for both twins?). His described mortises and pegs are 1.5 inches wide–four times the volume profile. But from what kind of wood would he have seen these made? Oak would be very strong for the pegs, but its tendency to split cleanly might be something of a concern for the twins. Beech wouldn’t have that kind of problem. Or what if it were a wimpy sort of thing?
Oh well, I don’t think that’s something I need to concern myself with that until I manage to break these.
Warning: What I talk about in this post is not considered standard practice in any way, shape, or form, and may be completely wrong.
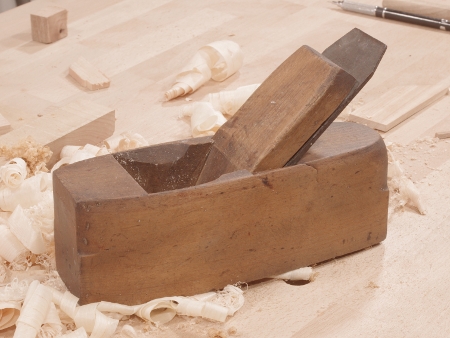
I’ve been wanting an old wooden western-style smoothing plane for a while, and a couple of months back, I picked up an Ogontz/Sandusky coffin-style smoothing plane at the Alameda flea. It’s nothing special–beech body and a big laminated blade a little more than 2″ wide.
It had been used to a certain extent, and the most annoying thing about it was the way the blade face had been sharpened–it was rounded over. It was the “ruler trick” gone mad, I suppose. It may have been done with a grinder. A lot of old blades turn out this way and they’re not particularly easy to sharpen when in this condition. Because there’s often no set angle you can use on the stone, you can’t register it on anything. In this case, it was especially bad because it was quite convex, both across and up and down the face. Oh yeah, and it was pitted, too. Yuck.
I didn’t have time to deal with it, so it sat on the shelf until recently, when something occurred to me. Because the blade is thick and laminated like that of a Japanese plane, it might be possible to use the technique of “tapping out” to create a new flat for the face edge. I recently had to do this to a couple of blades and it seemed to me that it might be worth a try.
The problem is that I’ve never heard of anyone doing this to a Western blade. It could be just totally wrong.
So I tried it first on a blade from a big jointer that was suffering from a similar situation. To my surprise, it worked. But that was a large, brutish plane that I don’t use for delicate tasks, and I didn’t want to go blabbering about it until I’d tried it on something else, such as the smoother.
I’m not going to describe the process of tapping out because Wilbur Pan has already done that. I used a small ball-peen hammer and the silly anvil on the back of my cheap machinist’s vise (I tried tapping on a block of wood at first, but that didn’t work–I might speculate that the soft steel in an old western blade is harder than the (typically) wrought iron used in the Japanese blades). Because the blade was rounded along the complete width, I had to tap it nearly all of the way to the sides. The result was that the high spots on the face were now the edge (as desired), as well as a spot in the center (we’ll see that later).
Before getting any further, I must give you this warning: If you’re interested in tapping something out, don’t try it on a thin Bailey/Stanley-style blade, or any blade that’s solid hardened tool steel. It will most likely crack or chip, because steel that takes an edge and is designed to cut wood is brittle. I’m going to guess that if you’re really crazy about the idea, you might be able to temper the blade first, then tap it out, then harden it again.
Now it was time to sharpen the blade and see if it worked. The bevel was in terrible shape, and there was a big nick, so I had to take it to my (horrible) grinder first. Then it was off to my Sigma Power #120 stone. First I worked the face to what I thought was a pretty good surface, then I put the thing in a honing guide, reformed the bevel at 25 degrees, and finally worked my way up through the grits on both sides. Thinking that the blade seemed sharp enough, I tested it out.
That first test did not go particularly well. I couldn’t manage to take a thin shaving, shavings kept getting jammed in the throat, and the surface left behind was ridged, not smooth. Much not to my amusement, the edge also seemed to have gotten kind of messed up.
I found the shaving thickness problem pretty quickly; the bottom of the plane wasn’t even remotely flat (it was bumpy). A couple of passes with my Veritas jointer fixed that, and I was able to get a good shaving. I popped out a little crud in the mouth, and that fixed the jams. But the surface on the planed wood was still crummy.
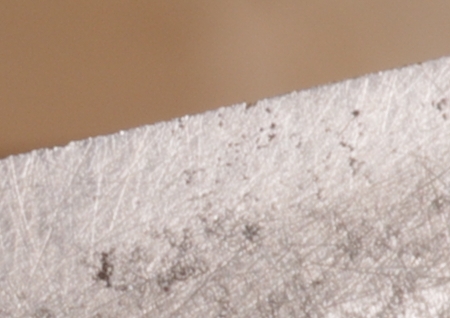
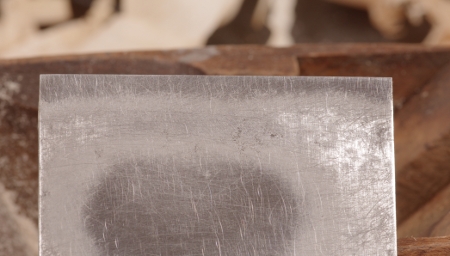
Perhaps my sharpening job wasn’t as good as I’d hoped it was. I took a photo with my macro lens; here is about 3/8″ of the edge:
Basically, the edge wasn’t really sharp to begin with in some spots, and there was still some pitting across the edge.
So I hit the Sigma Power #120 again to remove the pitting, and also to try to get a better bevel shape. I ended up with this after working through my stones:
There was still a very tiny nick-like thing for that one deep pit in there, but would it matter? Well, of course it would sometime, but at this point, I was more interested in seeing if all of this wasn’t a waste of my time, so I put the blade into the plane and tried it out:
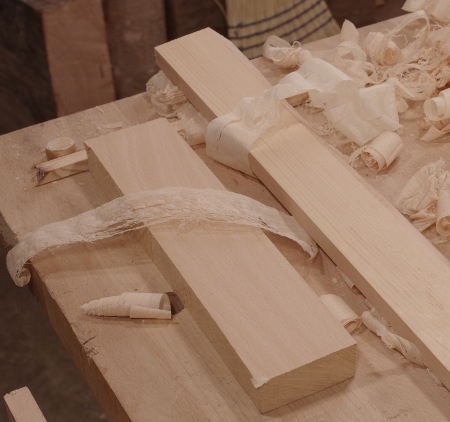
Bingo. Translucent shavings, polished surface, yadda yadda. The wood on the left is beech, and the one on the right is some mystery softwood (spruce or fir, most likely). The softwood actually had some figure that the plane brought out:
Yeah, that’s a little birdseye that’s trying to come out. Strangely, I didn’t find the ridge from that little nick in the edge, but I’m sure I will sometime, so I still have to take care of that.
In the end, the face of the blade looks like this:
So in the center, it’s kind of the opposite of a Japanese blade–whereas those have the hollow in the center and are high on the edges, this one has a big annoying high spot in the center. However, that spot still gives you something to register upon when honing the face. It’s as easy to sharpen as a Japanese blade, too, because there’s much less surface area to float on top of the stone.
Well, we’ll see how this works out. As I hinted at the beginning of the post, this could possibly be one of the most idiotic things I’ve done to a tool.
I’m going to start a new feature that will appear irregularly, meaning “whenever I have material.” Essentially, when I have enough explanation for something that I messed up, I’ll write about it. I was originally going to call these “mistakes,” but I realized that they aren’t that serious (and Kari Hultman agrees). It’s an important distinction because I don’t want to give the impression that you can’t get anything done if you goof up, goof off, or whatever. I’ve completed several projects while doing the “wrong thing.” The contradiction is that in woodworking, completing a project is essentially never the wrong thing to do. Just ask your significant other.
So here we go with the most obvious one: I bought too many stupid bench planes, and didn’t know what to do with them. You’re going to see a lot of confessions like this (if you haven’t already) due to the release of Schwarz’s The Anarchist’s Tool Chest, where he goes into detail about this. It is a recurring thing, though–seems that everyone has to go through it because otherwise, you really don’t know for yourself.
Let’s start with jack planes. I knew that I needed a jack plane and I got a pair of metal Bailey-style models early on because they were not expensive. I got one working well as a general-purpose plane and I was really happy that I was able to get the thing to take nice shavings. So far, so good, but that didn’t stop me from buying more. I ended up with four #5-size ones. I don’t know why, because I use only one of them. I’m currently thinking about adapting a second to shooting-board use, so that would still leave two extras. And that #5 1/4-size plane I picked up? I’ve used it maybe once, but it sure is cute.
What’s probably worse is that I didn’t put a serious camber on my jack plane until, what was it, three years after I got it? That was almost a year and a half ago. Stock prep has never quite been the same since. I’d made a scrub plane, which is great for getting really icky boards into shape, but it never occurred to me that I should have something somewhere between that and a straight edge.
What was I thinking?
So I’m happy with that thing, but am I finished with jack planes?
Oh well, the answer doesn’t matter. Let’s talk about smoothers now, because we have to. At my peak, I had five metal #4-sized smoothers. I’m down to three: one that does what it’s supposed to do when it’s sharp, one that I don’t use so much, and another that I’m prepping to give to a friend. I have a wooden Taiwanese plane that works wonders as a smoother, and I’m thinking about rehabbing a coffin smoother because wooden planes are awesome. And there’s the #3 size that I’ve got, too. It works great but I never use it.
This would be a nice set. The coffin smoother isn’t tuned, though.
At least smoothing planes are small, though. I don’t have as many as a hardcore addict, so they’re easy to stow away and sort of forget about. Unlike jointer planes.
I’ve owned five jointer planes. I had two metal Bailey #7-size examples and they worked okay, but I was never terribly happy with them. I gave one to a friend. I also had a #8 that needed some work. I gave that one to a fellow BAG when I realized that I hadn’t gotten it to work yet because I never really wanted it to.
And I was still in jointer hell. The one that remained and I actually used, I didn’t like very much. There was just something about it that bugged me, so this year, I bought two more at about the same time. One of these was a woodie that a friend picked up at the flea (thanks, again, Kirk!). The other is Veritas bevel-up jointer (BUJ). Now that there is a serious plane–and I think it cost more than all of my other bench planes combined. I flattened the sole of the woodie with the BUJ, set the woodie for a thicker shaving (kind of like a fore plane), the BUJ for a fine shaving, and maybe, just maybe, I’ve escaped jointer hell. I found stock prep on the nightstands v2 project to be much less of a chore with these. Remember the phrase, “coarse, medium, fine?” The woodie is medium and the BUJ is fine. On thin boards where the blade is wider than the stock, you don’t need to use a smoother.
If I’m lucky, this will be the end of the jointer debacle.
Oh yeah, and of course, I have two Bailey #6-size planes. I never use them because I’ve found that I prefer the jack plane size as a fore plane. Why? The #6 is too heavy for my weight. When I make a diagonal stroke with one, it’s too much effort to lift it back toward me. I’ve noticed that guys who like the #6 size for this sort of thing tend to outsize me. So, would a wooden plane be better, or should I just stop fooling around and be happy with my jack plane?
Too heavy.
That final question is why I’m still in the goofing-off stage with bench planes. There are two sides to this. On one hand, goofing around with tools can seriously detract from projects that you’re supposed to be working on (and believe me, those are my top priorities). On the other hand, there are certain tools that can save you a lot of time on your projects if you spend enough time goofing around with them.
I have slight excesses of other tools, but the plane surplus is the one I’m embarrassed about. So this will probably be the only goof episode about too many tools.
I learned a lot of stuff when I was in Taiwan during this past trip. For example, there’s a Taiwanese douglas-fir!
It’s supposedly pretty rare. But rather than expand on how much I like douglas-fir, let’s talk about one of the little trips we took.
The Luodong Forestry Culture Garden is a relatively new combination park and museum. Luodong was a busy hub of activity for logging in the early 20th century, and this park represents the elements that comprised the industry.
The log pond, fed by a natural spring, was a storage facility for logs. Today, you can find a kingfisher perched on the driftwood if you look closely:
It is also the location of the terminus of the former narrow-gauge logging railway, including several museum and workshop buildings, six steam locomotives, and rolling stock that were in use on the line.
Such large-scale logging was made possible the by the railway. The Japanese had attained much experience at rail construction by the end of the 19th century. Now in control of Taiwan, they were quite interested in its vast forest resources, and completed the Yilan line (from Taipei) in 1924, though logging operations were well underway before this time. Luodong is where the narrow-gauge line met the Yilan main line, and the park is the site of the station.
Below, you can see a partial reconstruction of a ramp that was used to roll the logs into the pond:
There’s a photo in one of the buildings that shows a larger-scale ramp. That white speck to the right of the log is a person. These are big logs–we’ll see more of that later.
The forests are located in the mountains, which are quite rugged in Taiwan. One method used to get logs off the hill was the slide (notice the large sculpture in the rear; there are several at the park):
The sled was used for dragging logs across horizontal surfaces where the railway didn’t go:
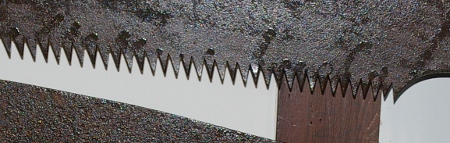
So far, it was an interesting place, all right. But then, in the Forestry Exhibition Hall, we hit galoot pay dirt. It took a lot of self-restraint to refrain from jumping up and down like a kid in a candy shop upon seeing this:
I’d been wanting to see one of those large saws for a long time. It was as large as I expected, but one thing that took me by surprise was just how big the handle was. Compare the handle size with the one below it–this sawyer must have had large hands. Another interesting note is that the larger teeth don’t end in points; they’re flat at the top. I would suppose that this is to provide extra strength.
The labels say 大剖鋸, for big rip saw. Below, there are a few more saws, including some crosscut saws, with the label 五齒孔鋸, meaning five-tooth hole saw. Basically, that means there are five teeth, then a gullet for raking out the sawdust.
Check out the rake angle of second saw! The saw below the large one also featured progressive rake along with the progressive pitch commonly found on a saw of this type. Here’s a close-up–the rake changes from positive to negative.
In this building, there was a timeline of when various operations were done by hand versus machine. Doofus that I am, I didn’t take a photo of it; all I can say is that I was surprised at how long things were done entirely by hand, even ripping logs into boards. It was well, well into the 20th century.
Also included in the display is a handy diagram of how the tools are used. There are no surprises here–the hewing axe (鉞斧) is used for hewing, the crosscut saw is used for crosscutting, and the big rip saw is used for ripping:
Now, you might think that the log above might be a little large for that fellow to handle. That is, until you get to the “mountain life building” and you see a photo of this veritable he-man getting to work:
Notice how he has a second, smaller saw at his side. I’d guess that he started the cut with this thing. What’s particularly fascinating about the way these guys worked and their saws is that they could do it as a single-man operation–no pit saw needed, no pit needed! It’s remarkable how the saw did not need to be wider than the log. I’m going to speculate that they’d saw from one side, then the other, then back, all the way down the log.
There is “DIY” building in the park where they apparently let people mess around with wood and tools, but it was closed when we went there. Too bad.
Everyone seems to make a handle for a handle-less socket chisel that somehow escaped the wrath of mushrooming by way of hammer. In my case, I had a 1.25″ Stanley 720 sitting around asking for some attention. I thought, hey, well, if I ever have a chance to sit down with a lathe, maybe I’ll make one.
Then Bagathon rolled around, and I asked Tom Conroy about what’s involved in making one, because he actually turns stuff and always has good advice. He said that a lathe is not really necessary, and the socket fit itself always needs a bit of tweaking, so I might just try to make one without turning.
So I decided that is what I would do, and I finally got around to it. I dug out the handy block of yellow birch that I used for my pigsticker handle, cut off a piece, marked lines through the center of each face, and then cut what sort of looks like a square tenon for the cone where the socket fits:
After tracing the approximate angle line onto each face here, I used my saw rasp to take it down to a cone. This sounds trickier than it is; all you do is work the corners first so that you have an octagonal shape, then refine it until you have a cone.
Then to fine-tune the chisel’s fit, I put the chisel on top of the cone and twisted a little:
The grime inside the socket left marks on the high spots that I could then pare off:
After a few iterations, the chisel fit, and it was off to shaping. I didn’t know what pattern to use, but I like the general contour of those yellow-handled Lee Valley chisels, so I traced that to a piece of paper, then traced that pattern onto each face:
Next time, before doing anything, I’ll mill the block down to its final extent so that I don’t have to remove as much. Because the block was much wider than the ultimate handle width, I had to saw two parallel faces off and re-mark the pattern.
But even with this, the shaping went relatively quickly, first getting down to a squarish profile:
Then doing the octagon thing again to get to a refined curve, and finally some files and sandpaper to get it smooth, I had something that looked like a handle. Here’s the more-or-less end result before finishing:
It’s not perfectly round, but it’s fairly close. I’m not sure I want perfectly round. The next handle I make will probably have a sort of oval profile.
Tom was right. This wasn’t hard at all, and it didn’t take much time, either. The only thing that was a little bit of a pain was holding the handle in place when it began to take final shape. I had to improvise some jaws to fit in the vise for that.
So I’m back after a vacation, and I’ve been going like gangbusters on the bench modification, right?
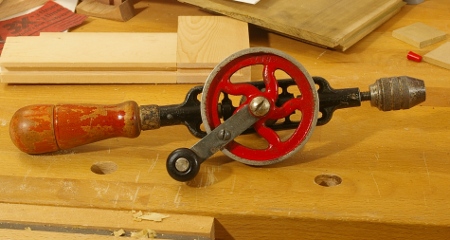
Ha, no. I’ve just been dorking around with this Millers Falls #5A, first taking it apart to degrease:
Then I reassembled it and tested it:
By this point, you’re asking, hey wait, don’t you already have two of those things already? Correct; this drill now goes to a friend. After testing it out, I realized that it actually works better than my two #5s (I guess I’d better pay attention to them sometime). It may not be as pretty, as it is a late model with the plastic side handle (type 17, according to George Langford, but hmm, that chuck is different), but at least it’s got a side handle!
One of the tools that I’ve complained about not having from time to time is a plow plane. Well, I have one now. This story gets weird, though, because I never imagined that I would get one in this form:
Time will tell if I’m completely insane for getting a Stanley #45. This thing is as complicated as everyone says it is, and it is quite heavy, but its adjustments seem to work reasonably as a plow plane. Although I have them, I won’t be using anything but the plow cutters (Stanley, how did you even think that the beading cutters have even a remote chance of actually working?).
I set it up with the 1/4″ cutter and moved the nickers out of the way, and it seems to work pretty well. Given that the only grooves I tend to plow are 1/4″, I might just leave it like this. Thanks again to Roger for making an offer I couldn’t refuse. Even if this thing does drive me crazy, I can just pass it along to someone else for the same.
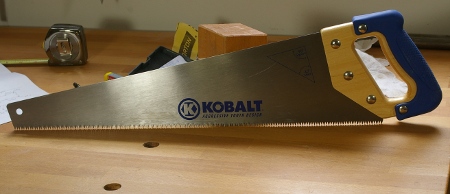
While the handle is in the varnishing stage, I’ve been worrying about how to approach the sawplate for the new saw. Being the cheapskate that I am, I have been considering using the plate from this thing that I picked up for a song and a dance some time ago:
The basic shape is right, but of course, I’d cut the tip off to make it look halfway normal, mill off the teeth, and cut new ones, and do whatever else is necessary to get it fit on the handle.
The trick to all of this is the thickness of the plate. It’s kind of a tricky business, because all of the old saws were taper-ground, and you won’t find a cheap saw these days that is. So I’d be giving that up, but I don’t have any old saws that I can cannibalize anyway.
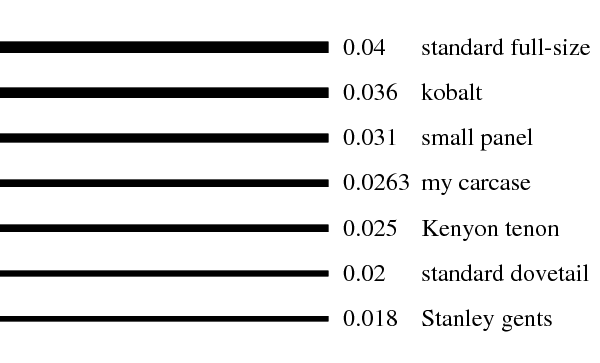
Furthermore, until now, I really didn’t know the thicknesses of any of the plates that I was working with; I was only able to sort of guess by looking at them. Well, that all changed when I finally got off my butt and bought a micrometer. Why I didn’t get one before, I’ll never know. It’s really taken a lot of the guesswork out of a lot of stuff.
I’d been wondering about this because I’ve got saws that turned out in certain unexpected ways due to this, and I really didn’t know about it before. For example, my crosscut carcase saw works wonderfully, but a rip version of it didn’t turn out the way I wanted it to. The plate on those two saws is .0263″, but you’d really want something more like the 0.020″ thickness found on most dovetail saws.
What’s .0063″ of difference? Well, one way to think about it is that it’s 31.5% thicker, which is pretty significant. In theory, you’re cutting 31.5% more wood, and so it’s 31.5% more work to do it. (This does not hold for a crosscut saw, where you are slicing fibers out instead of scooping shavings.) You can also look at it visually; take a look at the following image that I just cobbled together as a PostScript program:
The difference between .020 and .0263 looks pretty striking here. These thicknesses are at the cutting edge. I have the measurements for the tops of the saws that are taper ground, but I’m going to set that aside for the moment.
As you might have noticed, I put labels on this image. Of course, after I got my micrometer, I obsessively measured all of my saws. I don’t have a Kenyon saw, but it’s listed here as a representative for a big tenon saw (the Wenzloff versions have .025″ plates).
There are some surprises, such as that Stanley dovetail saw with the gents handle. This is a relatively new one that I picked out of a basement. I never bothered with it because I already had the Crown equivalent (.0205″), but you can see that it’s quite thin! This is the saw featured in Korn’s book, and it should be pretty obvious that if you’re willing to learn how to sharpen it, it will give you experience with a thinner plate and should work just fine. It’s no wonder he has no trouble recommending it.
So getting back to the question at hand, is the lovely “Kobalt” plate going to work? I think I’m going to give it a shot. It’s about 16% thicker on its cutting edge than the original that I’m working with, but that doesn’t seem that bad (and some of this thickness may be lacquer). The thickness of the original is a little unusual anyway; full-size saws are about 33% thicker. The only blade I have that’s close is my frame saw blade (0.029″), and, er, that’s not gonna work.
Then there’s the matter of taper-grinding. Should I try this? I’ve got sort of an idea of how I can do it without a power tool (although if I were sane, I’d ask to use someone’s belt sander). Would that warp the plate? Hmm.
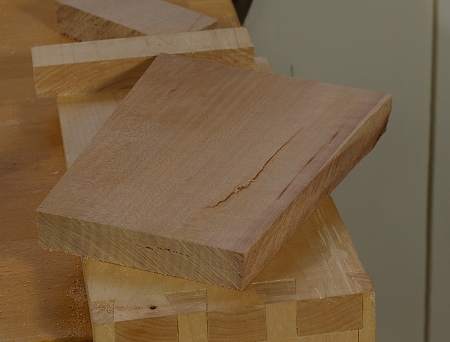
Available time to work on this saw comes and goes, but it’s getting somewhere. After coming up with the template, I grabbed the piece of madrone that I’d worked on before (and made the nightstand drawer pull from) and thought that there might be enough of a solid section to make this handle. I started by ripping down the sides (you can’t split madrone as you can oak, because it does not split terribly straight). I came up with the following ridiculous-looking, yet surprisingly effective workholding arrangement:
I thought that it might be a pain to saw, but it wasn’t that bad. I also have a newfound respect for my front vise. Before long, I had a little board milled.
The big question still remained about the checks. I suspected that I would be able to position the handle cutout where the cracks would not extend, so I traced out the pattern:
Yes, this would be unaffected by the check on the top of this photo, but I didn’t know how far in the one at the right end extended. When it was all said and done, a small amount does remain, but its location is inconsequential (details of that might be in a later post).
I cut out the rough template with the coping saw:
As I was doing this, I started to suspect that the shaping process would be somewhat more difficult than my previous handles. There was something about this wood that just felt different.
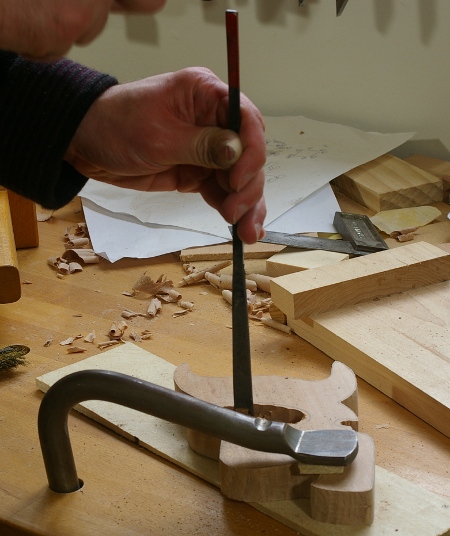
I made quick work of getting down to the lines on the outside with my saw rasp and sawmaker’s rasp, but the inside was a little trickier because there wasn’t much space to work. I started to wish that I had an inchannel gouge, and after a minute or so, I realized that I did have one, that Taiwanese one I’d bought during the holidays.
I don’t have a proper mallet for it, so I just banged at it with a marginally not-uncomfortable chunk of the madrone cutoff, and this got the job done (though I think I want a proper mallet):
It turns out that this is a really good gouge! (The ones with the red at the ends are supposed to be the better ones.) After all of this chopping, there were no nicks and it seemed just as sharp as ever. I’ll have to pick up a few more of those on my next trip.
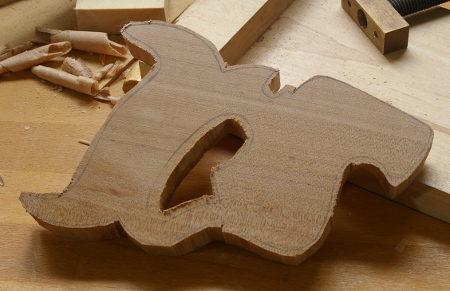
Then it was off to shaping. That, as I suspected, was kind of a pain. Madrone cuts easily enough but its sawdust is really fine and clogs everything quickly. I ended up using a lot of 60-grit Norton 3X sandpaper to fine-tune the shape because that stuff doesn’t clog so easily. I used a 1/4″ chisel for a lot of the nooks and crannies and imagine that some outchannel gouges would have been handy. But I did eventually get it done, and then cut the kerf for the blade using my trusty gents saw:
I also tapered the front with this saw, but made some modifications to the original. Here’s the new handle next to the original:
The new one is tilted slightly counterclockwise to the original in this shot, and there are some perspective issues, but you can see some subtle differences, some intentional, some not quite so. The bottom is a little thicker and the cheek has a little bit more surface area. The front is tapered a little differently. The original’s tapering was uneven, so I decided that I would smooth it out a little on mine. The unintentional change is how the back of the “lamb’s tongue” isn’t as deep as on the original. I can’t figure out how this happened, but I’m not going to bother changing it. (If I didn’t like the way that it looked, I’d change it, but I do like it.)
So now, I suppose I should put some holes in there for the screws and varnish the thing. And I happen to be already varnishing the nightstand at the moment–how convenient.
I’ve got the nightstand drawer in the clamps, put the first coat of varnish on the frame, and sized up the top. Now with just varnishing left on that project, I have been given license to do whatever I want for the next two months while I do the finishing (and wait for the varnish to dry) on that project.
Aw yeah. I’m gonna make me some more tools.
The list includes three saws. One of these is a little panel saw filed rip that I’ve found myself wanting several times in the past. There’s another reason for this–I’ve got an old Disston panel saw, probably a No. 7, that I really like, but won’t use because the handle is loose (due to a crack), the blade’s slightly broken at the end, and it’s kind of rusty. The handle on this thing feels incredibly comfortable in my hand and I’ve always wanted to make one.
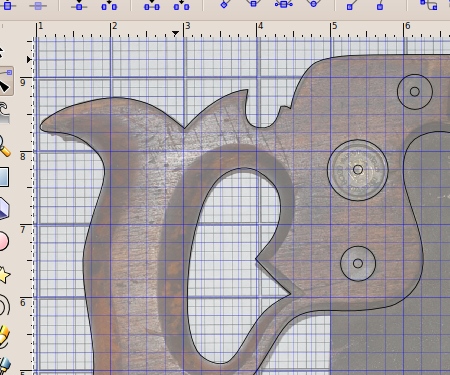
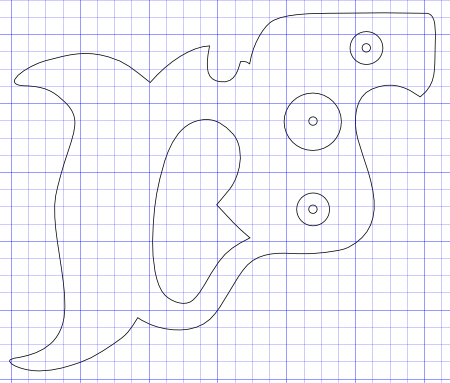
I had a little time today to work on the template for the handle. I dug out an old PostScript program I wrote that draws a grid, barbarically converted it from metric to imperial units, and printed it out. Then I placed it on a wall next to a shelf, put the saw on a shelf, and took a photo (dumb note: this is one of the very few on this site where I used a flash):
Getting back to the task at hand, I loaded a cropped version of that photo into Inkscape, scaled it so that the grid matched the scale of the page, then made that layer transparent and laid out the pattern on top as vector graphics:
This was a lot easier than I remembered it being in the past. It only took about 20 minutes to get it set.
Normally, I would try to simplify old-fashioned lines on a handle because I like to have a somewhat more contemporary design (for example, ease out that angle on the inside), but I like this saw so much that I’m going to try to clone it as faithfully as possible. That’s not going to stop me from using my usual furniture connectors as the hardware, though.
With the lines set, I printed out the template:
Now I have to cut it out and trace it onto the piece of wood that I’ll use for the handle. The trick is that I don’t yet actually have a piece of wood. Okay, gotta work on that.
[Update: This template is now available on the Plans and Guides page.]Aarrgh.