Nightstands v2: Plan

It’s like déjà-vu.

My next project will have the same subject as my immediately previous serious furniture project: a pair of matching nightstands. The one I made last year was for the guest bedroom, which is great for the guests, but now we’d like to rid ourselves of some rather horrible (but cheap) graduate school-era stuff in our own master bedroom.

I’ve been agonizing over the design of these things for months now. I knew the project was coming up, but I couldn’t nail down a design. So as time went on, and I worked on other silly stuff such as the tool cabinet, I slowly defined the parameters.

Unfortunately, I wasn’t fast enough. I haven’t been ready to go with this because I didn’t have a completed drawing. In fact, I didn’t really earnestly start with the drawing until last week. So recently, I spent quite a lot of time both by myself and with the “client,” looking over various designs, trying to find a solid direction.

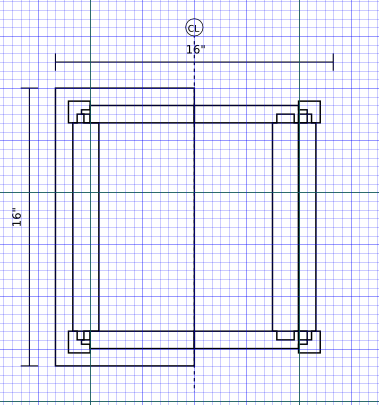
I finally came up with this:

It somewhat inverts the previous plan; there’s going to be an open shelf at the top, and two drawers below. This design also had to “feature something curved,” hence the arched plinth at the bottom (front only; the sides will not be arched).

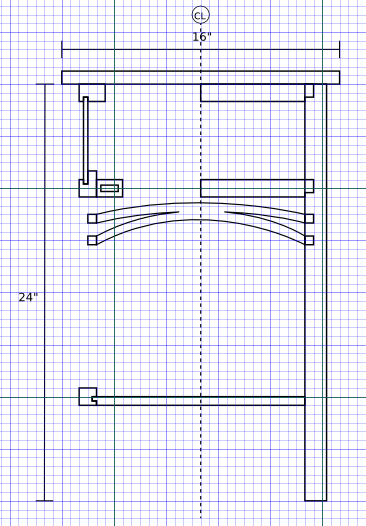
There are a few elements that will be shared with the earlier design. The front cutaway view shows this in a little more detail:

In particular, this will feature frame-and-panel construction rather than the case construction (and housed joints) that you often find on a piece like this. I don’t know why, but I’ve really come to like frame-and-panel, and my general hope is that the piece will be lighter and maybe use a little less wood as a result. The frame around the shelf is a little daring, as the frame pieces on the sides will reside behind a panel when it’s together, but I don’t think it’s that much of a stretch. Happily, the legs are a bit bigger than the first nightstand, so I will have more room when cutting mortises in corners.

This piece will also be my first opportunity to use a secondary wood. I’ll use it in the internal rails as well as the drawer sides and back. What that wood will be, I don’t know yet, but it had better be cheap.

I’ve also been able to complete the cutting list:

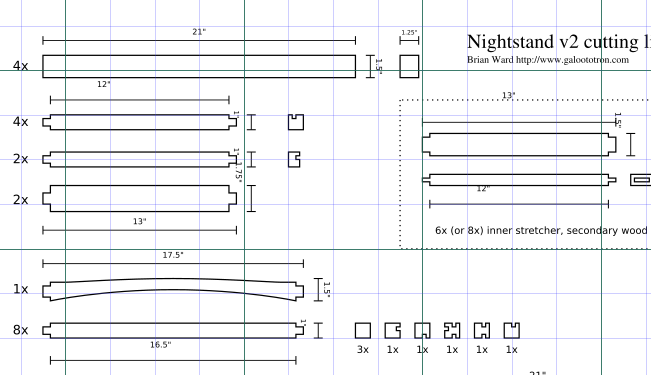
There’s a lot of detail here because I really need to know how much wood I’m going to use. All of that detail was kind of brutal to create–I burned hours on this plan and the cutting list. The catch is, though, that most of that time was spent squaring away details of the design and joinery. When you make a drawing like this, you’re really getting a preview of what it’s going to take to build your piece.

As usual, I’m making the new plan available as a PDF file, free of charge (as if anyone would pay for that thing). I’ve also made that link available on the plans page. grrr, annoyances

Next step: Get some wood! The plan is to use cherry, which may seem a little bit pedestrian, but I’m looking forward to it. It’s very enjoyable to work with hand tools and after all of the monkeying around with beech that I did last year, I could use a break.

Rip Panel Saw: Handle Template

I’ve got the nightstand drawer in the clamps, put the first coat of varnish on the frame, and sized up the top. Now with just varnishing left on that project, I have been given license to do whatever I want for the next two months while I do the finishing (and wait for the varnish to dry) on that project.

Aw yeah. I’m gonna make me some more tools.

The list includes three saws. One of these is a little panel saw filed rip that I’ve found myself wanting several times in the past. There’s another reason for this–I’ve got an old Disston panel saw, probably a No. 7, that I really like, but won’t use because the handle is loose (due to a crack), the blade’s slightly broken at the end, and it’s kind of rusty. The handle on this thing feels incredibly comfortable in my hand and I’ve always wanted to make one.

I had a little time today to work on the template for the handle. I dug out an old PostScript program I wrote that draws a grid, barbarically converted it from metric to imperial units, and printed it out. Then I placed it on a wall next to a shelf, put the saw on a shelf, and took a photo (dumb note: this is one of the very few on this site where I used a flash):

Hey, let’s look at that medallion really quick:

The Disstonian Institute says that this is from around 1874-1875.

Getting back to the task at hand, I loaded a cropped version of that photo into Inkscape, scaled it so that the grid matched the scale of the page, then made that layer transparent and laid out the pattern on top as vector graphics:

This was a lot easier than I remembered it being in the past. It only took about 20 minutes to get it set.

Normally, I would try to simplify old-fashioned lines on a handle because I like to have a somewhat more contemporary design (for example, ease out that angle on the inside), but I like this saw so much that I’m going to try to clone it as faithfully as possible. That’s not going to stop me from using my usual furniture connectors as the hardware, though.

With the lines set, I printed out the template:

Now I have to cut it out and trace it onto the piece of wood that I’ll use for the handle. The trick is that I don’t yet actually have a piece of wood. Okay, gotta work on that.

[Update: This template is now available on the Plans and Guides page.]Aarrgh.

Nightstand: Plan

After a lot of agonizing, it appears that I finally have a plan drawn up for my next project, a nightstand. When researching designs (otherwise known as “typing nightstand into Google Image Search and bracing for the worst”), I found two basic types. The first is a box with an open front. The second is more like a table with a shelf at the bottom. Both have a drawer at the top. After conferring with the “client,” I chose the latter.

Here is the front view. I stole the idea for the arched decoration in the front from Krenov.

The top view cutaway into the shelf follows. On the left of the center line, the stretcher for the area above the drawer is shown. It’s a little bit wider then the one at the bottom of the drawer (shown at right), but there is an extra stretcher front-to-back on the bottom to support the drawer:

The front view cutaway perhaps shows it with a little more clarity. On the left of the center line in the drawing, the front stretchers are cut away, showing the side stretchers and the drawer support.

I could, in theory, integrate the lower drawer supports into the lower side stretchers, but I worry about wood movement between the legs and the front stretcher because a single piece would need to connect to both (I’m not worried about the ones at the top because they will not provide support most of the time.). I’m looking out for wood movement in particular because I’ll be building this out of beech, which is not known as the most stable wood in the world. So I won’t be mortising in the top of this piece, either.

The drawing isn’t quite yet complete. I haven’t added all of the measurements that I need (and hopefully I won’t mess them up this time), and I haven’t broken out the components to come up with a cutting list. I didn’t draw in the drawer. (Do I need to? Maybe.) And perhaps I will come up with a different scheme to support the drawer.

[Update: The mostly-complete plan is now available on the Plans and Guides page.] Err, not at the moment.

One thing is pretty clear: This project looks like the most complicated piece I’ve attempted so far. There are fewer components than the shoe rack, but this is far less repetitive, and they assemble in a much more complex way. However, I have attempted to standardize several of the component thicknesses, which should speed the milling process by minimizing the number of cuts I need to make with the frame saw.

For what it’s worth, a significant part of the agony in coming up with this drawing was trying to find a suitable 3-D modeling system for Linux so that I didn’t have to use Inkscape again. That didn’t work out, so I’ll just stick to what I know for now

Stool: Setting Angles, Arranging Joints

To prepare for the joinery for the stool’s frame, I needed to come to terms with the angles at which I was going to set the angled mortise-and-tenon joints. Since I’ve never done one of these at an angle before, I felt that I might take a little extra time in preparing the various tools necessary to make the joints.

The first step was to create a full-scale drawing of the joint. Interestingly enough, a joinery book I have also says to do this, but I must confess that I didn’t read that before I’d gone through with the process. As I drew up this thing on graph paper, I realized that I had goofed up some of the critical marked measurements on the computer drawing, though the image of the stool itself was correct. I might go back and fix this in the image that I posted before, but I’ve got other stuff to do now.

With the drawing on a clipboard and a straight board clamped to one side of the angle on the drawing, I set a sliding T-bevel:

After this was set, I realized that I was getting a little ahead of myself, because I hadn’t yet come up with an arrangement for the frame pieces. So I did that:

Then I marked each piece with its position. As an additional indicator, I also roughly marked where the wood will be cut at an angle, so that I don’t accidentally cut an angle where it’s supposed to be straight:

In the preceding image, the piece on the left is a stretcher, and the center is a leg, which will tilt to the left. The marks here indicate the way the stretcher will meet the leg, and how the leg will rest on the floor.

With all of this setting and marking done, I precisely marked the bottom of one of the legs with the T-bevel and a marking knife:

Finally, I sawed it. I don’t have a photo of that, but I guess you’ve seen pics of me sawing stuff before.

Next time, I’ll get down to the business of cutting the joints.