My last post covered the weird joint I experimented with in a new project that I’ve been working on, a tool cabinet. During my last few projects, I’ve really gotten a feel for a set of tools that I use on a fairly regular basis but don’t have a real place for. These tools–marking gauges, measuring tools, some smaller planes, and the like–are always sort of hard to find because they’re lying about on a table next to the bench. So they’re hard to find, and they take up a lot of space. My saw till solved these problems for my saws, and my absurd chisel rack solved them for the chisels. I figured that a medium-sized cabinet would do the trick with these tools.
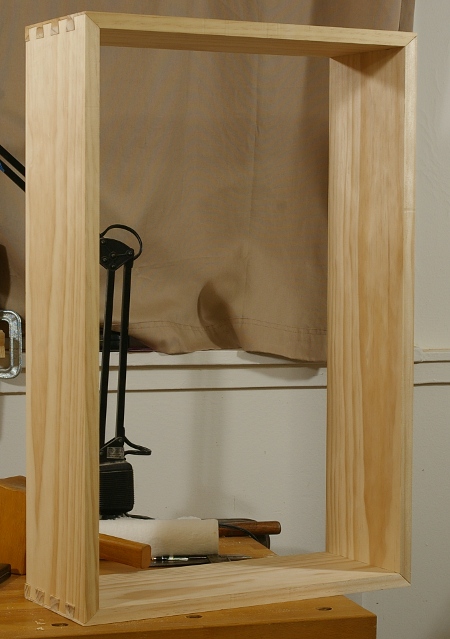
Going at probably the slowest possible pace for a woodworker, I finished the other three crazy joints in the carcase and test-fit the sides:
They basically fit (the lower right corner needs a little more adjustment), so now it’s time to think about what to do with the insides.
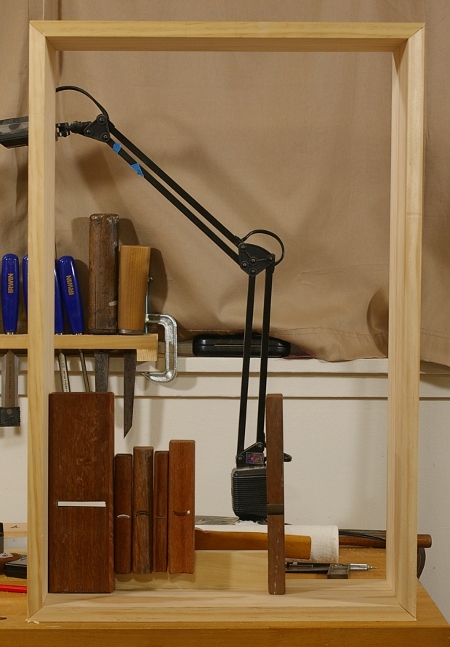
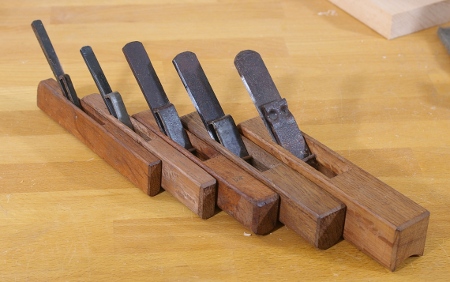
I already had the idea to put my Taiwanese planes inside. I grabbed about 3/4 of them and arranged them like this:
So, in all, they’d take about 1/4 of the space in the rear half of the cabinet. The front half will be sort of empty, because I plan to put on doors that are open most of the time, and these doors will have lighter tools attached (such as marking gauges and squares).
It’s all preliminary, but one idea that I’m going to carry over from my saw till is to have it reconfigurable. In other words, I’ll use screw inserts to hold the tool holders in place, so that if I decide that I don’t like some tools I’ve chosen for the cabinet, I’ll just replace them.
That’s all fine and good, but now I’ve got something else to do before finishing this: I’ve got to pack up the shop, because we’re moving. The next two weeks are going to be hectic. I’ve got more than half of my tools packed already, I believe.
There is, at least, some good news. The new place not only has space for a shop, but I’ll also be able to hang stuff on the walls. So my saw till will have a spot, as well as the chisel rack and this new cabinet (once complete). I’ll also probably be able to hang some eggbeaters and a few other things. Right now, my boring tools are pretty disorganized.
I also might build a new bench. However, that’s looking a little farther into the future.
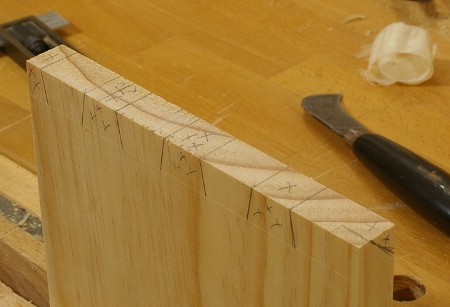
This weekend, I started work on a new project for the shop that will soon be desperately needed. As with nearly all of my other projects, I drew it up and decided on the joint–dovetails for a carcase frame, of course. I recalled that I’d seen a mitered-shouldered through dovetail joint, did a little bit of reading on it, and decided that it would be a neat one to try.
Except that I decided to make it a half-blind version. I clearly did not plan this one out very well, but I was very careful when laying out the tailboard, making sure to put the Xs in the waste parts, and indicating where the shoulder would miter. I thought that this would be a piece of cake, I’d just rough out the miter on both pieces when fitting the pinboard, then fine-tune it later. After all, both miters would be the same angle, right? Right?
What could possibly go wrong?
It should have occurred to me that I’d screwed up somewhere simply based on the fact that as I was sawing down the pinboard the first time, I managed to saw on the wrong side of one of the lines. At the time, I chalked this up to not having taken a break, the anticipation of the big game soon to start, and the fact that a really annoying song was playing on the radio when I made the mistake.
Unfortunately, it was actually fate trying to warn me, and I didn’t listen. Instead, I just sawed off the end of the pinboard, marked it out again, and went upstairs to watch the game.
When I came back the next day, I managed to saw everything correctly, popped out most of the waste, and then, to make sure that the pins and tails fit, sawed off a small amount of the miter on the shoulders.
The tails and pins fit without paring. That was as far as the good times went, though, because that’s when I got out my other T-bevel, set it to 45 degrees, and went to mark out the final miter for the corner.
Something wasn’t right. Why didn’t the miter line up to the corners of the joint? Everything should be the same width and thickness, ri–oh, wait. Duh, on a half-blind dovetail, unless the tailboard is thinner than the pinboard, the joint profile will not be square, and that’s not going to be a 45-degree miter. Furthermore, you can’t cut your miter beyond the half-blind portion if you’ve already done your tailboard, because the tailboard probably doesn’t extend that far.
I don’t know how long I stared at that thing, trying to figure out what to do. I didn’t know if I should try to salvage it, or just hang my head in shame and start anew with something a little more conventional.
Masochist that I am, I chose to try to salvage it because I hadn’t cut beyond the half-blind portion of the shoulder. For another equally long time, I tried to figure out what this was going to look like. I’m not sure I had an idea, but in any case, I started by marking out the miter on the pinboard from the pin base to the half-blind line (or whatever it’s called). Then I measured that angle: 50 degrees. That seemed really fishy to me, but I set my T-bevel to the 40 degrees necessary to complete the full 90 degrees and marked it lightly on the tailboard.
I banged the pieces together a little. Of course, I dented the beautifully-surfaced face that my newly-acquired Taiwanese plane had made because I used a buffer scrap that was too small. At this point, I didn’t care about that anymore, I just wanted those two miter lines to be perpendicular, and to my surprise, they were.
So I pulled the pieces apart and shaved down to the miter lines with my Veritas mini shoulder plane (this worked remarkably well). And then I banged the pieces together to see if they drew tight.
They didn’t, of course. In addition to this unsightly gap, there were also big gaps at the pinboard baseline, and I suspected that they might be related. I put the work down for the night and went off to freak out about something else.
When I dragged myself back the next morning, I tried jamming a piece of paper into the miter gap. It went in only halfway, so I pulled the pieces apart and checked the square of the long edge to the mitered surface. It was slightly out of square–kind of convex on the top. I pared it out (maybe making it a little convex in the process) and tried again.
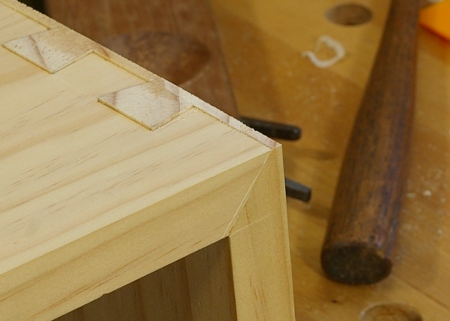
I almost fainted. There’s no way that this should have drawn tight given the number of errors that I made.
The preceding photo was taken after I pared off the excess of the pinboard on the end–I wanted to see what it looked like. I’m afraid to admit this, but I sort of like it. Only I wish I could say that I’d actually planned it that way.
During my last project, I noticed that my carcase saw is not cutting quite as well as it used to, and that it can even occasionally bind in the kerf if I’m not careful. It still works pretty well after about three years since I first shaped and sharpened the teeth, though.
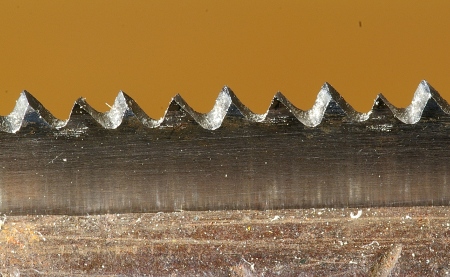
Independently, I decided to finally get a macro lens, and like the nerd that I am, I thought I would point it at the saw teeth to see what they look like (since these are too small for me to really want to strain my eyes on):
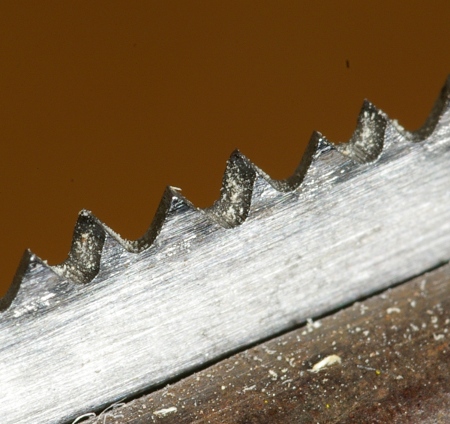
Remember that this is a 14TPI saw, so the area shown here is a little more than a half-inch wide. The image here translates to roughly 8x magnification on a 100dpi display. Here’s a view from an angle:
You can see that a few of the tips have gotten the slightest bit rounded. I will need to resharpen this soon, though I think I’ll take it through the next project first. It will be interesting to see how this looks when I do so, because this was basically only the second crosscut saw I ever sharpened, and I have a much finer file now.
I’m almost tempted to get a new plate and back from Mike Wenzloff, like I did for my recent joinery saw, because it would be heavier and thinner. But I don’t think I want to mess around with making new saws for now. I should at least put together that big backsaw whose parts are currently waiting for me. Oh, did I mention that I fell victim to the miter box syndrome? I’m not sure what to do about that, either.
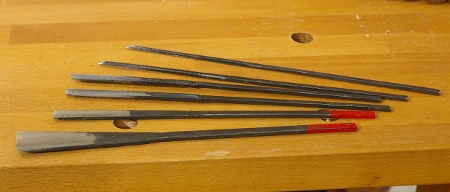
When preparing for this year’s trip to the tool shop, I decided to try to concentrate on purchasing tools that I believe I actually need (imagine that). I had a few ideas already, and I started out with a pile of Taiwanese carving tools–primarily outchannel gouges, but also a V tool and some other stuff:
I also got a big pile of hollowing and rounding planes:
Of course, right away, I might be straying from the “buy what you need” mantra, because I’m not sure I really need all of these. However, they’re so much fun and so cheap (less than $10 each) that it’s hard to resist. And as usual, the blades are great: forge-welded cutting steel on softer metal with hollowed faces that take just a minute or two to flatten. I sharpened and tested all of these in almost no time at all.
When I saw this compass plane, I realized that I didn’t have one and that this was probably a good time to get one:
This plane exhibits a very common scenario for the better planes sold in Taiwan: a blade made in Japan (supposedly) and a body made in Taiwan. There is also a double-convex version of this plane, as seen a blog that doesn’t seem to exist anymore.
It’s a wicked fun plane to use. I had to try it out; I first gouged out a curve in some wood and then smoothed it out with this thing. It’s really remarkable how easy this goes when everything is tuned correctly. Although this wasn’t the cheapest tool in the shop at about $30, it’s really hard to beat the performance at any price.
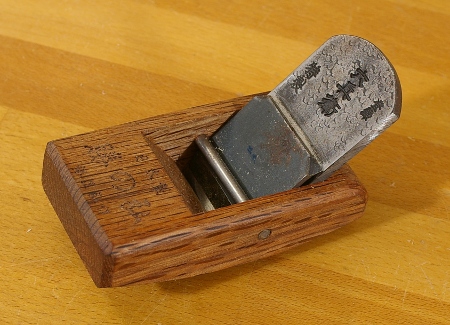
The final tool that I’m going to talk about for this year’s trip is another plane. I got to wondering what a full-sized Taiwanese bench plane would be like. However, as I mentioned before, most bench planes in Taiwan are either wholly from Japan or have a Japanese blade with a Taiwanese body. The shop had one bench plane with all-Taiwanese components, though, and at $35, it was about a third of the price of the hybrids, so I bagged it:
I didn’t have to wait long to use it, either, because while I was still in Taipei, Uncle had a cabinet door that didn’t fit. So I sharpened the blade with the same sandpaper that I used for the chisel on the old cabinet.
It worked fine for this purpose, but it was a job that didn’t need finesse–I wouldn’t have had the time for that, anyway. Not only was the sandpaper (“Matador” brand, 1200 grit) not quite as fine as I had wanted, but the body was new and probably needed some tweaking. I also set the blade for a rather thick shaving.
When I brought it back home, however, I had time to tune the plane. So because it’s somewhat similar to a Japanese bench plane, I dug into Odate’s book and looked at Wilbur Pan’s blog for his experience first, then looked at what I had in front of me.
The first thing I did was to sharpen the blade on my waterstones, and I got a wonderful edge in no time. However, I also noticed something that I still need to think about–this blade was fairly well-cambered, so its initial grinding had it set up as sort of a jack plane.
The type of plane is important because you’re supposed to set up the sole differently depending on its purpose. The rougher the cut, the more you’re supposed to hollow the sole, or so the story goes. However, I don’t need another jack plane, and because the mouth on this one is ultra-tight, I decided that I might want to keep my options open and proceed with caution.
However, something needed to be done to the body because it appeared that the wood had moved slightly since production, causing some of the sole in front of the mouth to protrude a little from the level of the mouth and end. I suspected that I was having trouble with this because my shavings were not of a consistent thickness. I verified this with a straightedge using the method that Odate describes, and quickly marked the high spots. He says to use a scraper plane or something of that nature to take down the high spots (and form a hollow). Wilbur Pan likes to use a card scraper, and I would have done that as well, except that I am silly and haven’t actually gotten around to making one.
I ended up carefully using my Veritas low-angle block plane to knock off the high spots. I didn’t really hollow the sole because I would rather use a scraper for this. But it was enough for a semi-serious test of what the plane can do, and it does make a delightful shaving. A little more work on flattening out the camber on the blade, and this thing could easily be my go-to smoother.
This brings up an important question: What exactly am I doing? After all, I have more bench planes than I can shake a stick at. It seems to be, though, that the more I use wooden planes, the more I like them. It doesn’t seem to matter if they’re western or Asian planes–I simply like the way wooden planes feel, and I’m really starting to appreciate how easy it is to adjust them. Perhaps I will downsize a few of my metal planes sometime.
Someone (who?) once said, “Wood on wood–sure feels good!” There’s a lot of truth to that.
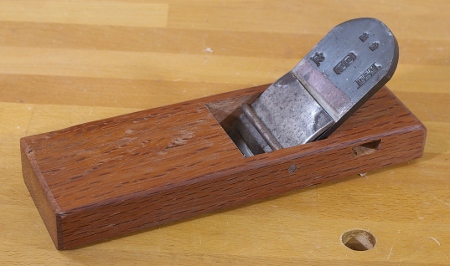
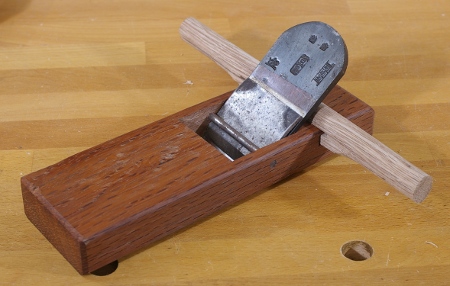
PS: In case you’re wondering what the rectangular hole underneath the blade is, for, the plane comes with a removable handle. When fit, it looks like this:
I believe this is for getting a sturdy grip to pull when using the plane for tougher work, but I’m not too sure. I don’t think it’s the sort of thing you’d use two hands on because it’d be hard to control like that. I likely won’t be using it.