After a while working on the bench-on-bench, I decided to make a fairly brief video describing my experience with it. I did this because although there are a lot of videos that show building one of these things, there aren’t many that say what they’re good for. I also wanted to highlight a few things about my design that I’ve found helpful.
There seem to be several little camps when it comes to stock preparation methods. There are those who rive arrow-straight oak with a froe and plane it down, the hand plane exclusivity evangelists, the hand plane to flatten/thickness planer on rest, the “hmm, maybe hand planes and a big bandsaw” types, the machine heads who won’t use anything but jointers and planers, the various router sled types, and then, of course, the people who mostly do hand work, but keep a huge jointer in a separate area as a dirty secret. You know who you are.
Doing it completely by hand taught me a lot of things, and switching to a hybrid approach with a thickness planer saved me some time. I’ve never really been religious about stock preparation, so this discussion might start to seem a little out of place on this blog, which is mostly about hand work.
But something inside of me wasn’t satisfied with a few things. First, I wasn’t thrilled about flattening stuff by hand anymore. Second, I didn’t want a jointer. Finally, I wasn’t enthusiastic about my thickness planer being such a one-trick pony. I’d read about planer sleds that could flatten boards, but when I looked into them, I wasn’t too impressed. There was one overriding problem: Holding the work conveniently, yet securely.
Still, the sled idea sat in the back of my mind. I kept thinking to myself that there must be a reasonable way to get a board to stay in place, and that some sort of traditional approach to workholding might work. Maybe double wedges? But how? Finally, about a year and a half ago, something went off in my head and I had a basic design. I built a prototype. Surprisingly, it worked. I was then able to refine it some more.
So without further ado, here is my video describing the multiwedge planer sled.
A video might seem a little unusual for me, but I really felt that it was the best way to illustrate the sled.
I really hope it will be useful to someone else as well. It’s been great for me.
This may not be the most exciting conclusion in a two-part tool organizational feature, but here’s what I cobbled together:
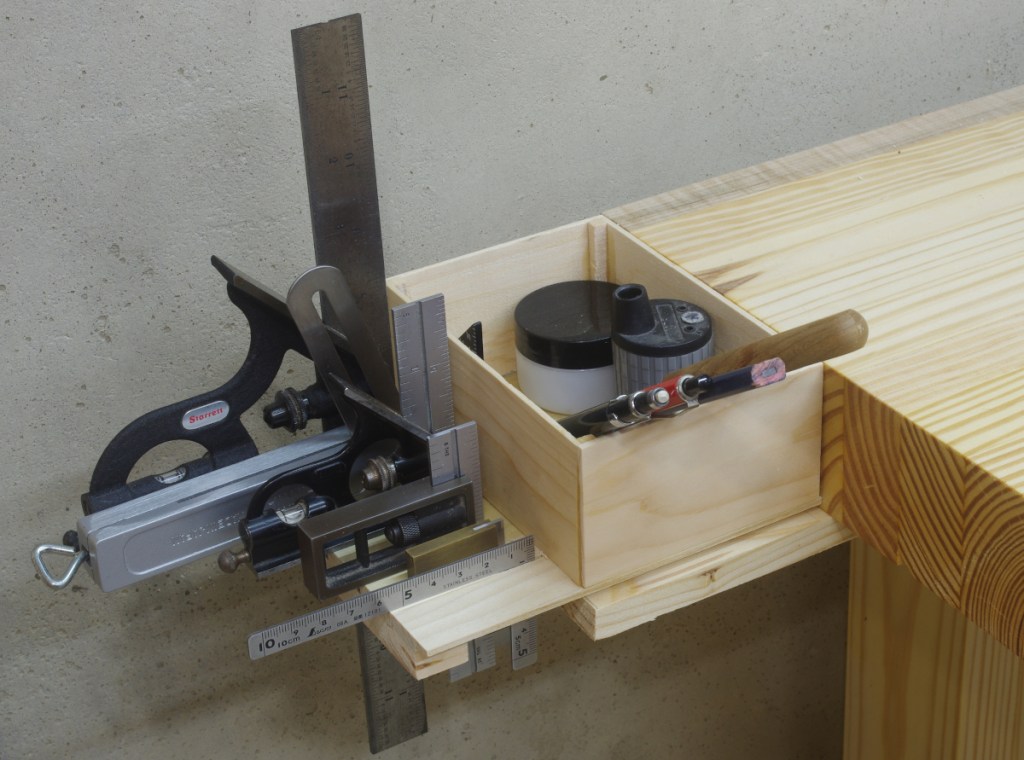
Referred to by a friend as a “bench hanger-on-er,” I’m going to call this the “tool corral” on my auxiliary bench. It’s really just a platform with two areas for tools. The first and most obvious is the box, which was hastily assembled and glued to the platform on the near side only (take that, seasonal wood movement). I have no idea if this is going to be even halfway durable, but at least it looks somewhat better than a plastic bin screwed down to the platform, which was my other idea. As you can see here, the box does not protrude above the benchtop, so in its unloaded form, it doesn’t get in the way of anything big that might overhang the bench.
The space to the left is a little less obvious when empty, and consists of a bunch of expanded kerfs that I (hastily, of course) made with the bandsaw. Then I “closed up” the edge by just gluing a strip of wood (in the same grain orientation) to the underside. This is for bladed measuring tools. I modified the near one by stuffing most of it with a strip of wood. Otherwise, one particular square would always tip and drop through.
I could have gotten more adventurous by adding a few spaces for chisels to hang in the front, I guess. Maybe I’ll still do that; I certainly don’t have any qualms about bolting on something else to this already-questionable affront to workbench aesthetics.
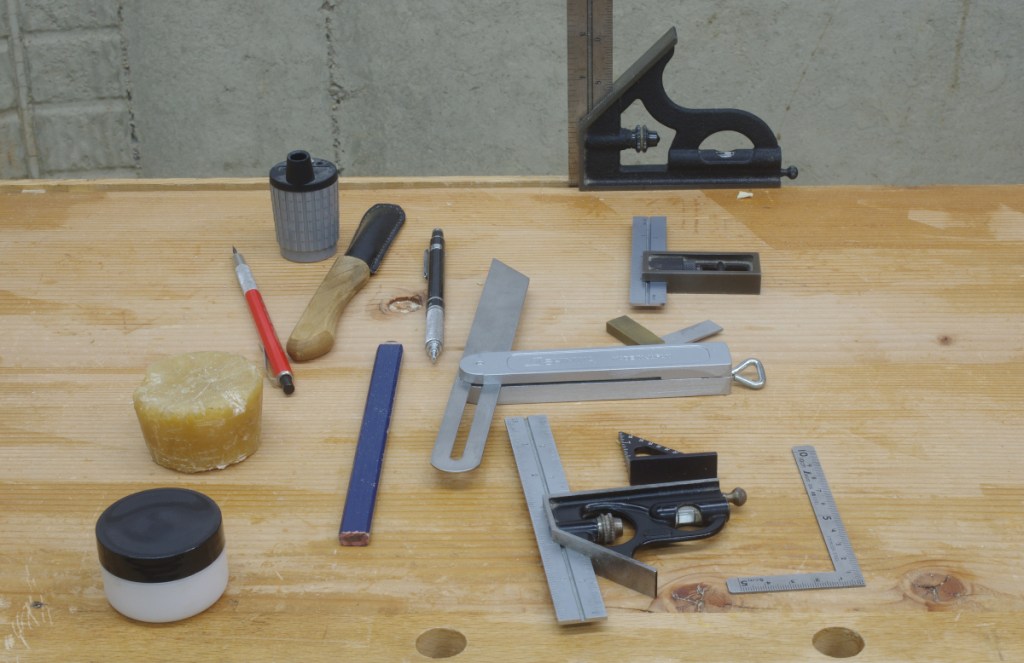
So here’s what it looks like in use:
I was originally going to build something to hold the pencils upright, but laziness got the best of me.
Except for the wax (for which I found another home), It sucked up every last tool that I’d previously complained about. Built using only scrap wood, I think this should suffice until I build a chest. If there’s anything I do like about it, it’s the way that the squares fit neatly and mostly out of the way. When I use the traditional-style tool rack on the back of my main bench, it always seems like the squares are either getting in the way of something, hogging space, or in danger of dropping through because the opening on the rack is too wide.
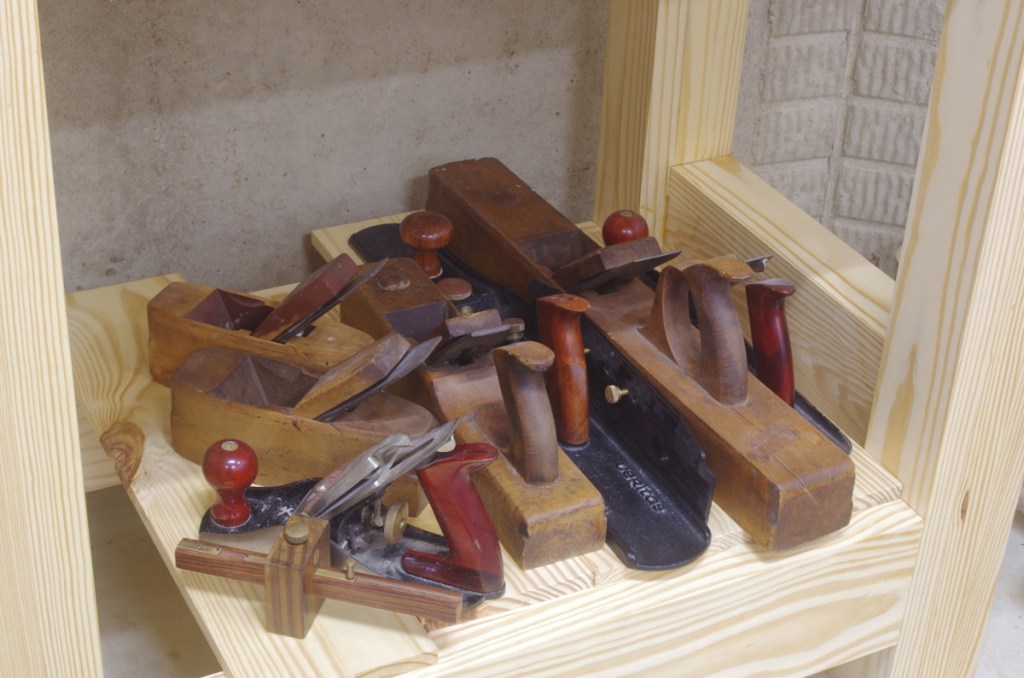
I’ve got a dumb problem that’s been lurking for years (with the exception of when everything was in storage). It’s this:
I use these tools regularly, yet I have no regular places to store them. So they inevitably end up lying on the bench. I only managed to isolate them because I just finished most of the small chest build, and cleaned up everything else.
I’ve decided that I should fix this. The long-term plan is to make a “Dutch tool chest” that should end these kinds of shenanigans once and for all, but I’m waiting on the Fitz Treatise because I haven’t thought about how to approach it. Besides, waiting to see what she writes seems like a lame enough excuse to put off building it for a while. In the meantime, I’ve started building a stopgap thing that will hopefully take care of it in the interim. It will not be a “drawer off on one side” that you see in some old illustrations–I promise that it will be far more idiotic.
What I wonder is, how does this even happen in the first place? It’s not like these are uncommon tools. I’ve just had a really hard time finding the way I’d like to store them.
[Edit: I’ve now made a video explaining this bench.]
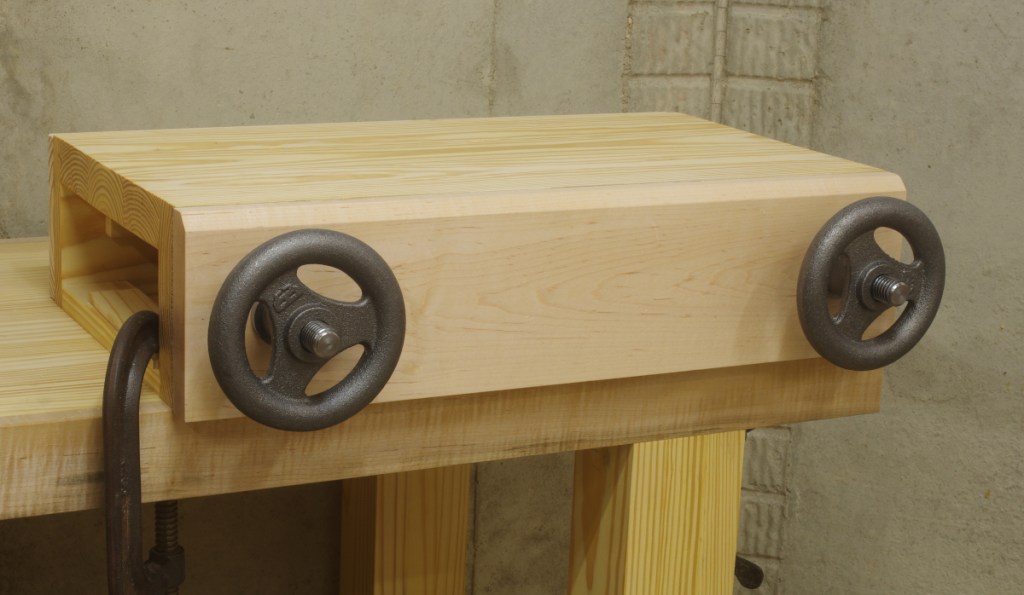
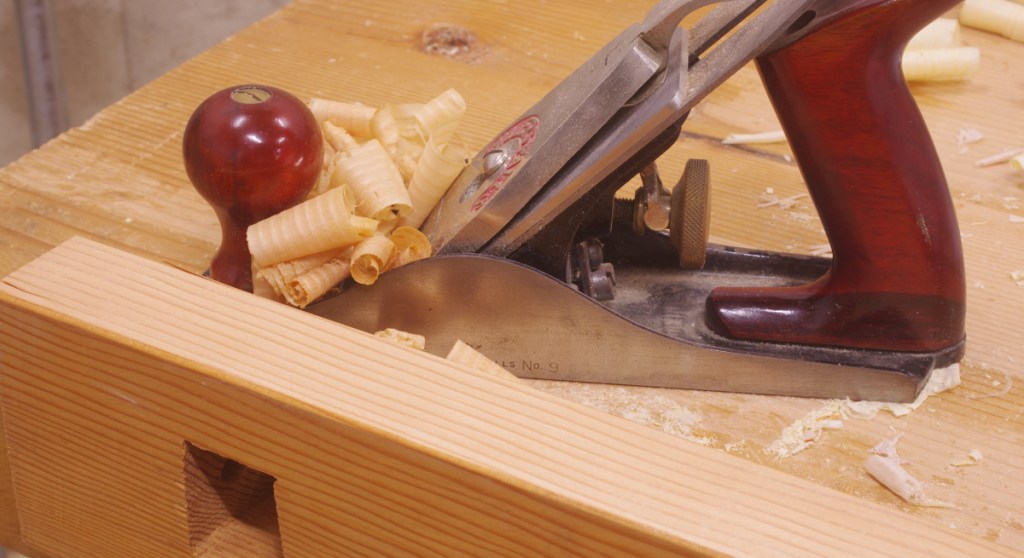
I’ve been interested in the idea of a so-called “Moxon” vise or bench-on-bench setup for a while, but there have been many other projects that have taken precedence. The idea of a higher sawing position for smaller cuts just seems like a good idea. Over the summer, I asked a group of woodworking pals what they thought of it, and I got some feedback including “just do it, you won’t be sorry.” Also included was a bookbinder’s finishing press treatise/rant from our friendly neighborhood bookbinder who stated that (among other things) if I really wanted to make something specialized for woodworking, I should go for bench-on-bench. Since there’s a near-zero chance of me wanting to get into bookbinding (sorry, Tom), I decided to go for bench-on-bench.
Unlike Joe’s elegantly-finished vise, I decided to go with the ever-sturdy southern yellow pine for most of the construction, and ordered the Benchcrafted hardware. As usual, the hardware sat for several months while I dealt with other projects.
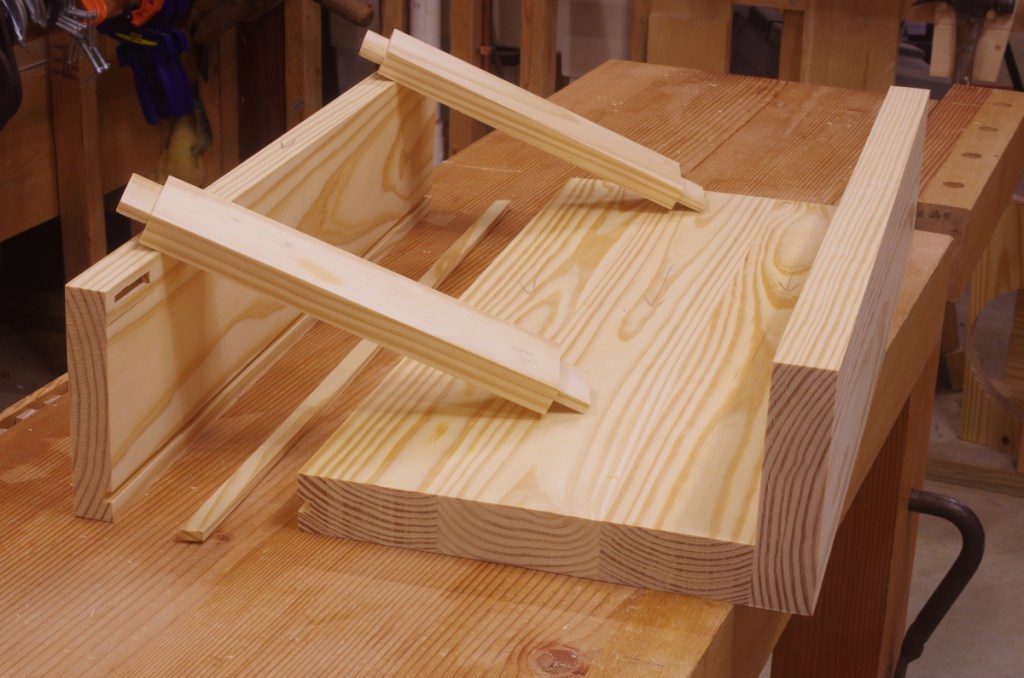
There doesn’t seem to be much consensus on the construction of bench-on-bench, so I decided that I would stick to the “every one of these is different” rule and make a solid inverted “U” shape for the top and front/back, with some stretchers along the bottom. The stretchers are not for support, but to provide a way to clamp it down. Here are the parts ready for final glue-up:
This is, of course, upside-down. I waited to glue on the rear because I felt the need to do that along with the stretchers. In addition, I used a loose tongue there (with the appropriate diagonal-grain configuration) not for strength, but to keep the top aligned with the rear during glue-up. This might be the first time that I’ve used this kind of joint.
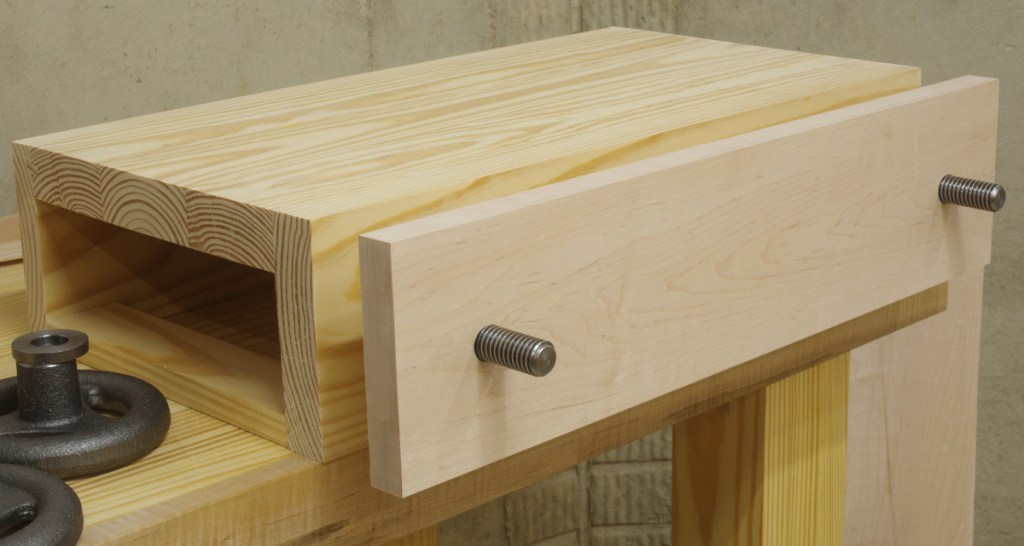
There wasn’t too much to do after that. The next step was fitting the chop:
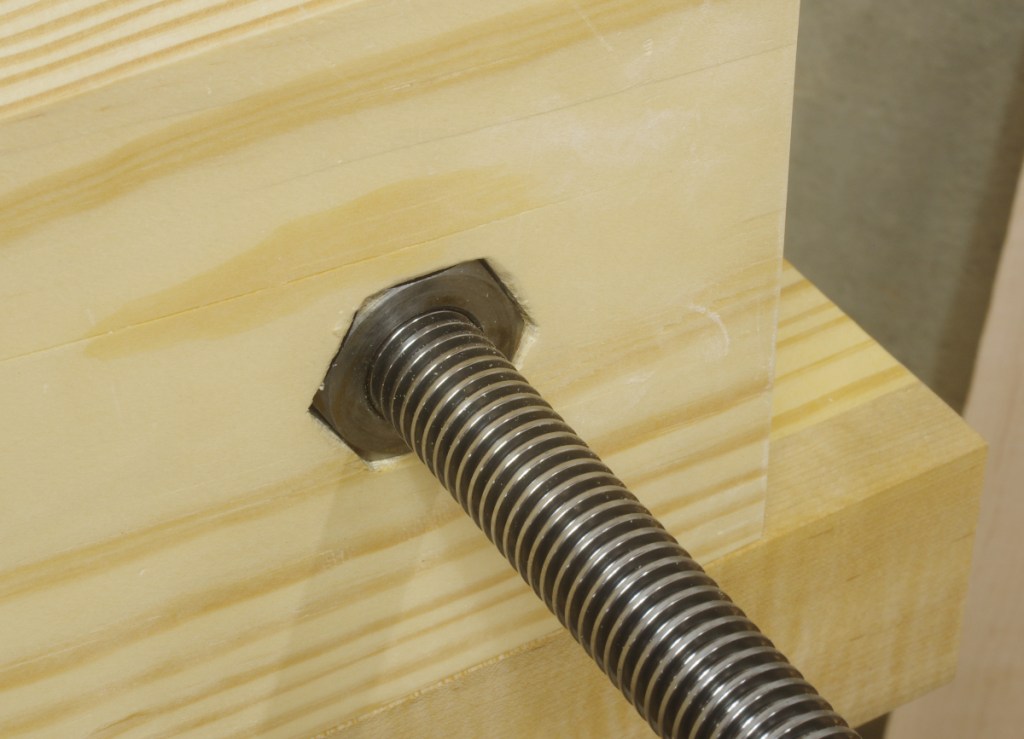
The chop is a 4/4 piece of soft maple. The Benchcrafted instructions suggest a configuration with the vise nuts for the fixed chop recessed inside, so for no good reason (other than stupidly not doing it the quicker way on the drill press before gluing the front on), I traced the nuts on, and chopped out the waste:
Then, I chamfered the top of the front chop, added the “crubber” (the cork/rubber gasket material that BC includes with the hardware), and did a quick rubdown with some tung oil:
You can see that this is currently clamped to the bench with C-clamps on the stretchers. I suppose that I could add dog holes in the bench and use a threaded rod or something. but this seems OK for now.
I added one more component: a slide-up stop at the rear. Here’s how that looks in the “partway up” position:
It can extend higher, and is held in place with a couple of threaded levers. I’m not sure if adding this was a good idea or not, but the main reason I put it there was to try to get some bench hook functionality. For example, when doing the crosscuts to remove the waste from tenons, I thought it might be handy to take the work out of the vise and lay it along the back. Ditto for using it to stop a piece when cutting a small groove leading to a knife line with a chisel.
At worst, if the stop doesn’t prove to be useful, I can just stow or remove it.
Here’s one final view, with the vise holding a board in “dovetailing” configuration:
This seems to hold securely. I did several test cuts and nothing appeared out of the ordinary. It does seem much more comfortable than stooping down to my (low) main bench to cut stuff. The auxiliary bench that I’m using here might be a little on the top-heavy side now; I do want to add more weight to the bottom. Happily, this should be soon, with one upcoming project that will use this new tool.
While building whatever it is that I’ve been building up until now, I’ve always had this feeling in the back of my head that I’ve been ignoring a type of construction that might be pretty useful. And this sort of hit home when I read through The Anarchist’s Design Book recently. I have to admit that I’ve always found the idea of round tapered tenons to be a little dodgy-sounding, but I didn’t have much faith in my reasoning. This kind of joinery is the basis for many kinds of chairs that seem to hold up just fine. When a lot of real-world evidence contradicts you, it’s probably not good idea to try to bend your mind to ignore that reality.
In the book, it doesn’t look all that complicated. I got to thinking, “Well, I could do that.” I ordered a tapered tenon cutter, a reamer, and picked up a piece of 8/4 red oak from the lumberyard. It was at least worth trying the first project in the book, the staked sawbench. I’ve been wanting to build a second sawbench for a while now, so what did I have to lose?
I started by gluing up the top of the sawbench (you’ll see that later), then worked on the legs. I picked the worst part of the board for the legs, saving the nice straight stuff for other projects. It seemed that, once dimensioned square, I’d want a reasonable way to get an octagonal profile, so I first tried to tack a leftover from the sliding deadman track onto an old sticking board to get some sort of channel for the leg to rest in:
This worked:
But it wasn’t great. The leg tended to slip off of the sloped edge. I decided that it was worth making something better than this 5-minute hack.
I came up with a new sticking board-like thing with a proper channel (what are these things called?):
Simply put, this worked far better. The end is held in place with one dog that also serves as a stop for the work:
This is easy to do when you have round dog holes; you just bore a hole in the far end of the board to accept the dog. I clamped the whole thing in place on the other side with the tail vise.
I can use this for holding cylindrical stuff as well, but there’s one more advantage to this. Notice how the side is flush? This means that I can also use it in my bandsaw:
Since we’re hand-tool oriented here, we won’t dive deeper, but it should be clear enough that you can use the bandsaw to quickly rough out the profile, then move the whole mess over to the bench and finish it off with planes.
With the legs profiled, it was time to get them shaped at one end in order to use the tenon cutter. This was new territory; I decided to start with a drawknife that I’ve had for some time but never really had much use for:
The tenon cutter could almost fit at this point, but it still needed some rough shaping and I’m not confident enough with the drawknife to go too crazy. This is the point where I turned to my Shinto saw rasp, which turned out to be just the right thing.
I got the first one made in spite of going at it blind (other than seeing it in the book):
Getting the tenon straight was a little disconcerting (you can test it by putting it in a reamed hole and turning; if it wobbles around, it’s not straight). I eventually found that if you hold the tenon cutter in a vise or clamp or something, you can get pretty good results by holding the leg from the other end and turn, like you would a pencil sharpener. This works because you’re keeping a steady angle. You might find that the leg can want to shift to a different spot as you’re starting out. Let it do so; it’s shifting to the center.
I need to do more experimentation on the best way to keep the tenon cutter fixed and getting a stake to line up more easily at the beginning. I also found that if you rub a little wax on the tenon before you start, it makes for a lot easier job (and a lot less noisy). But the good news is that making the tenons got a lot faster as I got used to it.
Then it was off to reaming the mortises, which I’ve also never done before. I started by clamping the top to my first sawbench with some standoffs, then using a regular auger bit with the “sliding bevel resultant angle” method to bore the initial hole. Then it was off to reaming in much the same way:
This process, like the tenons, takes a little bit getting used to, but gets much faster as you get accustomed to it.
I’m not sure about that reamer. In the preceding photo, I’m using a 12-inch sweep brace, but the shank of the reamer is pretty soft and gets dinged up, and the chuck on this brace doesn’t hold it that well. I switched to a brace with a Millers Falls “Lion” chuck, which is better, but I’m still not thrilled with it. This reamer is really meant for power drills. For hand braces, especially this big one, something with a traditional square-taper shank would put my mind more at ease. I wonder if the power tenon brace adapter that Lee Valley sells is the right size.
In any case, I had the test fit ready in what seemed like no time:
Yes, Roubo would have a fit at the way I put the heart of the tree on the inside for the one edge of the top, but Roubo didn’t have southern yellow pine. This would be a disaster with, say, beech, but SYP is far more stable, and I did it this way to make the grain directions align in a certain way.
At this point, I decided to just jump off the deep end and glue it up right away. I could have planned ahead a bit better there. I decided that I would use a chisel to split the tops of the tenons to accept a wedge, so I didn’t put a kerf in there, but it didn’t dawn on me that I would need to bang the wedges in at the same time that I glued the legs in place… until I reread the book a little more closely. I didn’t even have wedges made, so there was a mad rush to make some wedges and pound them in.
So I don’t have any photos of that process. But I do have a finished sawbench now:
The hardest part, I think, was finding some way to hold the legs while sawing them to final length. I ended up clamping them to the end of my bench, but in retrospect, I might have done better by just clamping them to my original sawbench.
This seems to have gone OK, especially for the first time through. I really had no idea what I was doing here. The legs really line up well. It looks decent. I was especially happy about how quickly it went together. Really, this was just a few hours in the shop for a couple of days. Best of all, it seems to work, which should be a really big help when cutting down those really long boards.
With this behind me, I feel like perhaps I might be capable of making a chair one day. But there are other things requiring my attention in the immediate future.
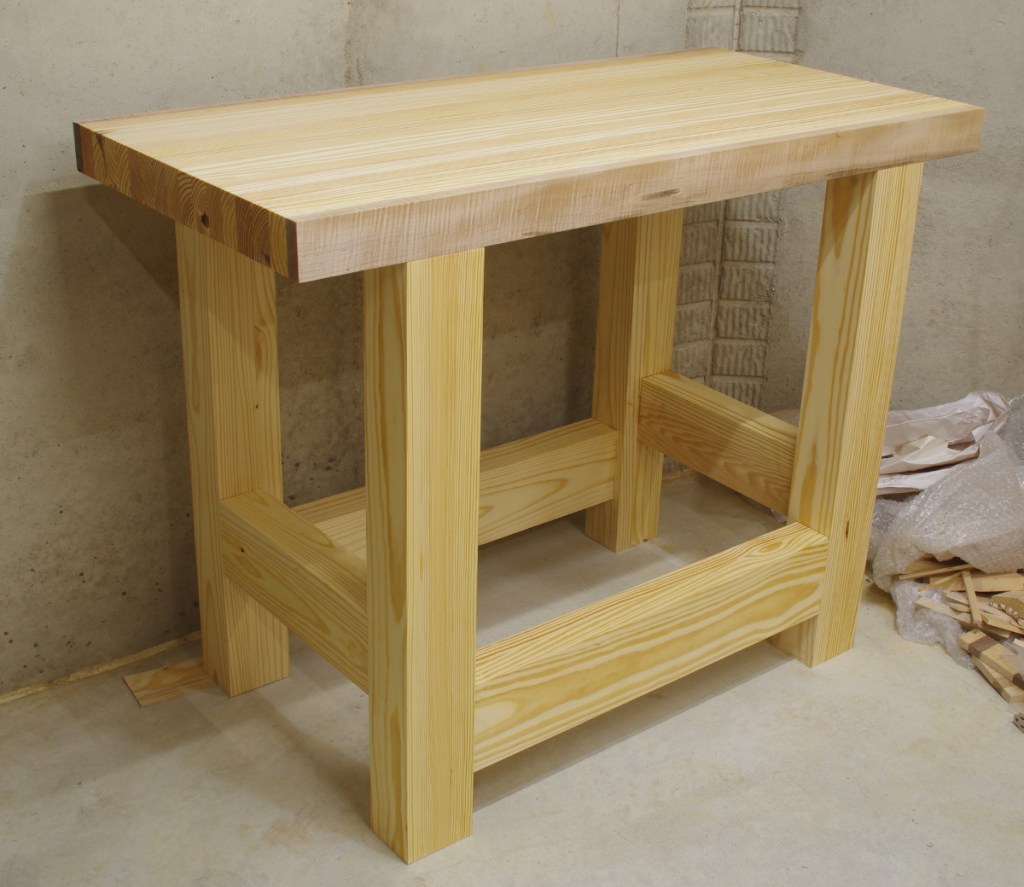
One effect of my cross-country move from the San Francisco bay area to Maryland is that I now have easier access to more types of wood. In particular, I can get southern yellow pine (SYP, also called simply “yellow pine” by actual southerners). Even if the local supplies of it are kind of weird, there are big-box stores carrying it within a 2-hour drive.
Since I finished one substantial laminated-top project (the “auxiliary bench“) with SYP along with a few other utility pieces, I have now used it in addition to a bunch of other woods for workbench construction. I asked some friends back in California if they were interested in my thoughts on SYP now that I’ve had a chance to work on it, and they said, “yeah, why not?”
Because this blog is about woodworking, this discussion is oriented mostly on using this wood (and others) for workbench construction. However, this is by no means its only use.
Here’s what I will survey:
Southern yellow pine
Douglas-fir (several varieties)
Beech (F. sylvatica and F. grandifolia work similarly)
Soft maple
To recap the Chris Schwarz book, you’re not looking for the “perfect” wood when building a workbench. You generally want something that’s reasonably heavy, reasonably stiff, and cheap. That last bit is important because you’ll use a lot of wood on a bench, and you’re also probably going to beat the crap out of it as well, so there’s no use if you get all sentimental about that kind of thing. Workability also helps, especially if you plan to use a lot of hand tools.
Southern Yellow Pine
When Schwarz first started to research workbenches, he was lucky to have a source of cheap wood that he wouldn’t feel bad about consuming and mauling with abandon. Or perhaps we were the lucky ones. Things might be very different for the aspiring benchbuilder if Schwarz had no access to southern yellow pine in his local big-box stores. Even in those retailers, which tend to be overpriced for lumber, this stuff is currently running between 50 and 75 cents per board-foot.
So it’s cheap, it’s stiff, it’s usually pretty heavy, and you can get it in wide, thick sizes. The 2×12 is the go-to size; if the pith runs through it, in clear enough pieces, you can slice that out and have quartersawn stuff as a result. It’s also fine to use narrower stuff like 2x10s if they look good.
Moreover, it’s sold dry (well, mostly dry). This is a requirement: If you don’t kiln-dry yellow pine, the sap/pitch makes for a wretched sticky mess. Even when dried, it’s still possible to run into “pitch pockets” with clumps of goo that hasn’t fully set into resin.
You gotta clear that stuff out. Ick.
So you’re thinking that there’s got to be a catch. There are two principal issues:
It’s not available in many parts of the country. Well, at least if it’s not pressure-treated.
You might need to pay attention to the latewood.
At this point, I should mention that there are several different kinds of “southern” yellow pine. The kind that you’re most likely to get commercially is loblolly pine, and that’s what we’ll concentrate on.
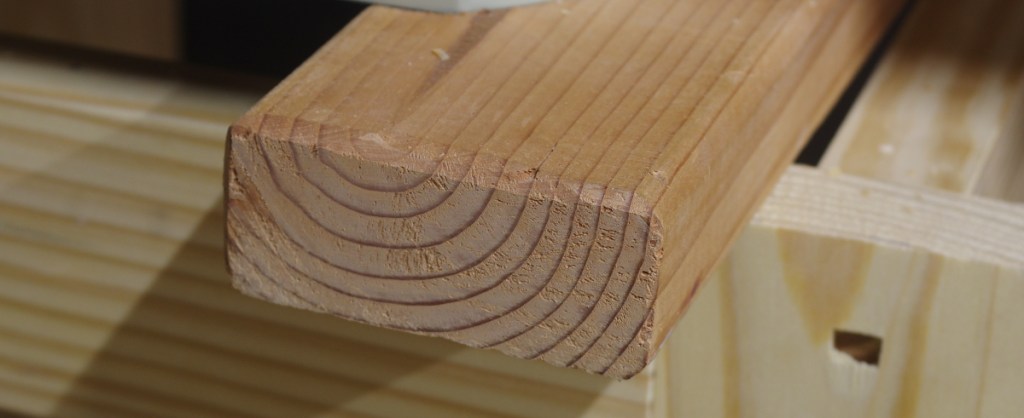
So let’s talk about those growth rings. Many woods have a substantial difference between the so-called earlywood (sometimes called springwood) and latewood (summerwood) in their annular rings, but in SYP (and douglas-fir, which we’ll get to soon), it’s dramatic. Simply put, the earlywood is fairly soft and the latewood is dense and tough.
This varies from tree to tree. There’s a lot of detailed information on the factors in publications like Summary on Growth in Relation to Quality of Southern Yellow Pine by B. Paul and D. Smith, 1956, USDA Forest Service, Forest Product Laboratory Report No. 1751. That is fascinating reading to me, but when it comes down to it, it’s best if you get a feel for it in practice.
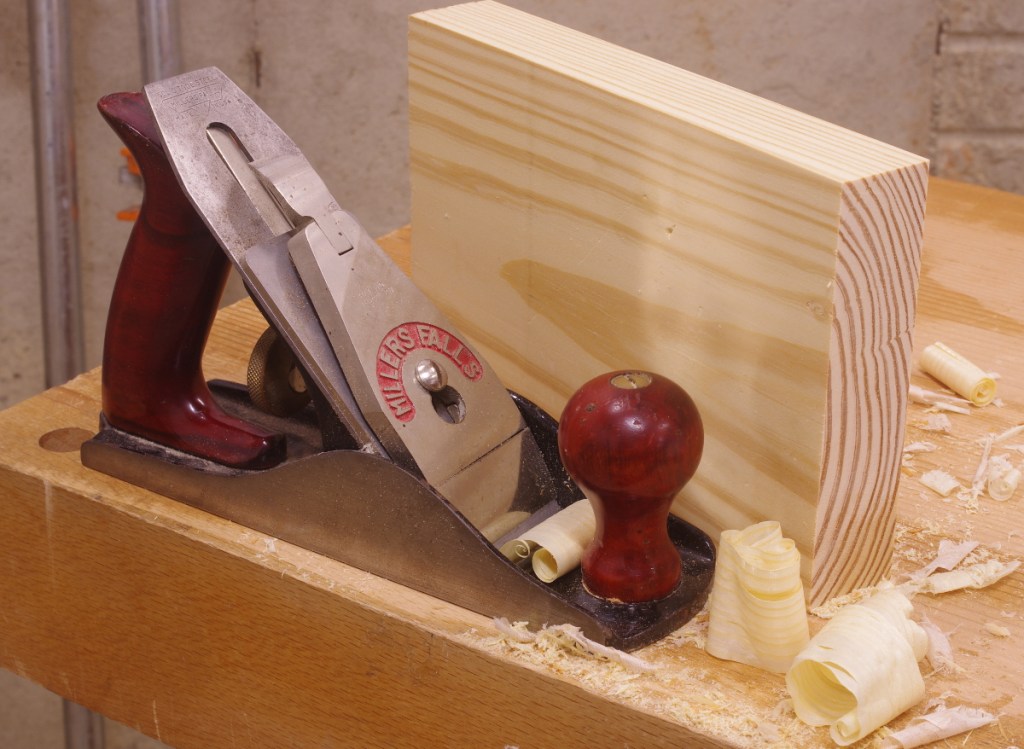
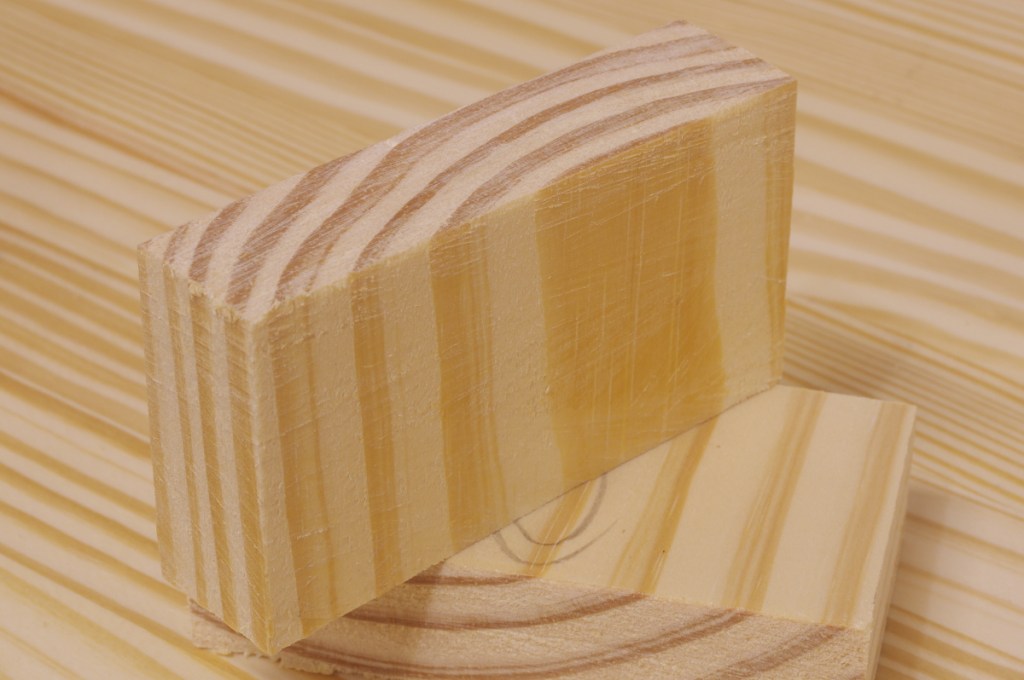
The factor that you’ll feel the most is the latewood, especially when working with hand tools. In some boards, the latewood will be really tough. You’ll also get a wide variety of early- and latewood quantity per annual ring. This view of the side of the new bench should give you the idea:
The pieces with the smaller annual rings (often with the thinnest latewood sections) were the toughest to deal with. Strangely, the third from the left with the very thick sections of latewood was not too bad.
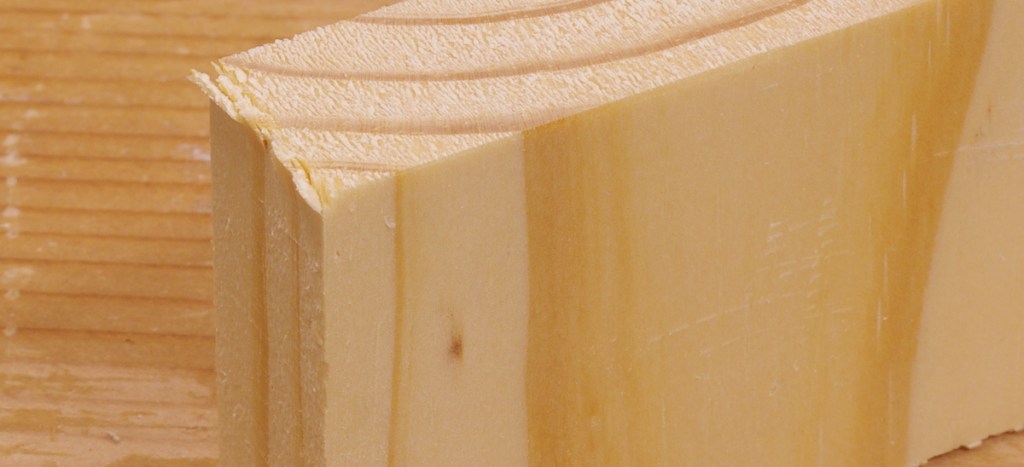
By “tough to deal with,” there are two difficulties, at least that I noticed. One was simply that when planing or chopping or whatever, the tougher ones tell you when you need to sharpen your blade because it just refuses to work. The other problem is that when ripping, your saw can track the latewood grain. Here’s the offcut from a large tenon cheek where this sort of thing can occur:
The earlywood is generally pleasant to work. It’s not as soft as, say, eastern white pine or that radiata stuff, but it’s not a bear, either. It’ll mush and smash up (for example, when chopping) if your tools aren’t particularly sharp, but it’s not a big deal.
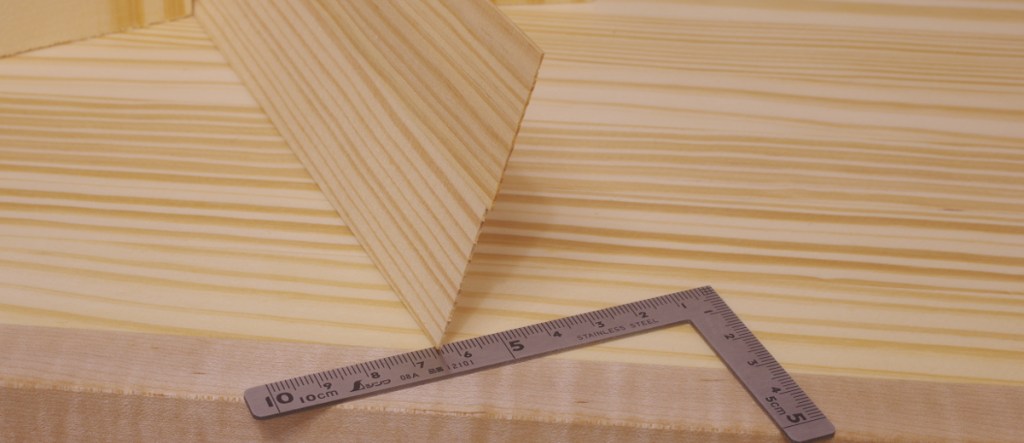
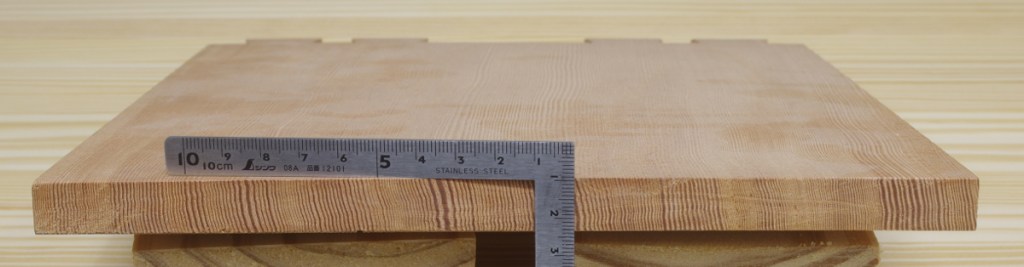
Most softwoods have a higher tendency to “spelch,” that is, splinter out of an end when cutting across the grain. SYP varies across individual pieces, but it’s never really terrible. Though it’s very stiff, the fibers deform pretty evenly. Flattening the new bench (going cross-grain with a jointer plane) was the easiest flattening job that I’ve ever done. It might have helped that the bench was pretty flat to begin with, but it was a smooth, even motion, and the shavings were very uniform.
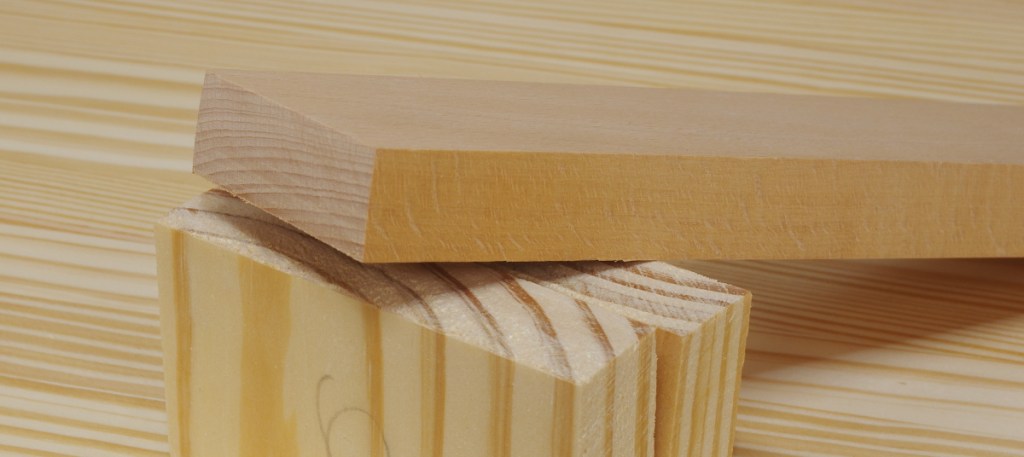
To give you an idea of what you can expect, I took the smoothing plane shown earlier (and later), and just went at some endgrain with its 45-degree blade angle. Going right off the edge about the worst thing you can do to invite spelching. This is the result; it’s pretty close-up; the piece is about 1/2″ thick:
SYP machines really well. Here’s a sub-1mm offcut that I took with the bandsaw; this is actually two pieces glued together:
This was with a pretty aggressive “Wood Slicer” blade.
There is one thing I wonder about yellow pine. Supposedly, the jeffery pine that you see up in the Sierra Nevada is a yellow pine. It gets really big. Could it have properties like this? Not that I have any idea how you’d get any, especially kiln-dried. Maybe someone has an operation up there. Or maybe it would be like (or even sold as) ponderosa pine, as this is also a yellow pine.
Douglas-Fir
Oh, douglas-fir, what a tangled web we weave.
First off, Pseudotsuga menziesii, you are not a fir, and that is why I put the dash in your name. You should probably be called Douglas Weirdofreak, but I suppose that we’d need approval from Pseudotsuga wilsoniana, or whatever that thing is being classified as these days. OK, I digress.
The wood, being very stiff and strong, has many uses, such as wooden boatbuilding, where it can be used for many purposes, including masts. As far as most people are concerned, most of the douglas-fir available for purchase is for construction and framing. This makes it somewhat inexpensive, but it’s still not as cheap as SYP.
And it’s almost invariably sold green. Quite green. For the benchbuilder (and woodworker in general), this is obnoxious for several reasons: It’s going to shrink and move a lot when it dries, so after acquisition, you’re going to have to wait for that to happen, at least a little. It hard to gauge how heavy individual pieces are because they can be sopping wet. The earlywood is even mushier than usual.
Here is a piece of real bottom-of-the-barrel construction-grade douglas-fir, from the 2×4 (stud) pile:
You probably don’t want to build a bench with that kind of stuff. The 2x4s are always from the worst part of the tree. The annular rings are huge. There is a lot of earlywood without much latewood. The good news is that, as is the case with SYP, if you make a foray over to the wide pieces (e.g. 2×12, 2×10), you find better stuff. You’re going to have to be picky, of course. Wilbur Pan built a fantastic Roubo out of 4x4s; he took his time collecting the pieces he needed.
If you’re lucky, you can find another grade of douglas-fir. This is sometimes called “old-growth” (and sometimes it is), and at other times it’s just called “clear.” In the photo below, the three pieces on the left were sold as “clear”. I got them at Minton’s in Mountain View, which has unfortunately been out of business for several years:
The two pieces with the holes in them were stretchers on my very first bench before I replaced them with wider stuff. They came dry and extremely well-dimensioned.
The two pieces on the right may look similar, but they are of much different origin. They were reclaimed from an old warehouse in San Francisco, and came to me by way of Bill K., to whom I’m very grateful. I built the Screwbo out of that stuff, and a friend back out in San Francisco recently completed a cousin bench that he calls the Jacques Roubo from the same source.
But wait–there’s more. What if I told you that there was douglas-fir with even tighter annular rings? Well, get a load of this:
That square sitting on top is metric (a.k.a. “sensible”), and each tick is 1mm. I found this board dumpster diving while a neighbor in SF was renovating. When I pulled it out, it was covered in some sort of contact paper and had been originally used as a shelf. (I’ve been working on making it into some kind of box for years now, but clearly not working terribly hard at it.)
OK, it’s stiff and strong, but will dent, especially while green. So far, on paper, this is pretty similar to SYP. But what happens when you take tools to it?
Mostly, it’s not too bad. Douglas-fir saws pretty well, and planing it works fine, too. If you like to pound nails into stuff, doing that when it’s is green is super easy.
However, there are two properties of this wood that drive people nuts. The first is that it spelches horribly. Observe what happened when I did the same thing on endgrain with the smoothing plane that I did earlier:
All of my woodworking buddies out west know what I mean. Douglas-fir doesn’t just blow out at the ends. The fiber bond fails at a substantial distance from the end, and the wood really wants to follow the shake a long ways down (like being riven). The result is an appalling mess of huge splinters and chunks cracking off of the end. It will do this if you so much as look at it funny. I’m not sure why this is; it might have something to do with how strangely “dry” it feels to the touch. Redwood also pulls this stunt to a certain extent, for whatever that’s worth.
This effect is worst in green wood and gets marginally better as it dries and ages, but it’s still awful. The piece above is 100+ years old. It’s so bad that you have to be extremely cautious even when sawing boards to length–especially with a hand saw. If you don’t take the protective measure of rotating and sawing in from all corners before completing a cut, it’ll snap off badly, invariably in the most ugly way possible.
Still, with this awareness, you can prevent bad splintering, at least until some assclown mover decides to bang the underside edge of your benchtop onto the concrete.
The other thing that I dislike about working douglas-fir is how it has a tendency to wear your tools. Green stuff is OK, but the old stuff is especially cruel to your edges. You just seem to sharpen constantly. I ran into this when using my scrub plane to dimension the pieces of my bench, and that’s not a tool that usually needs a lot of sharpening. Just take a look at what it did to the sole of that plane:
Think twice about taking a woodie to douglas-fir.
It machines OK, just be careful about what kinds of blades (or whatever) you use. I imagine that the carbide-tipped stuff does a lot better against the old stuff.
Overall, this is an extremely versatile wood and should not be discounted when building a bench or in any kind of utility work. It’s very stable when dry, not moving much under different humidity conditions. I wouldn’t think twice about using it for a workbench base even if I were dead-set on a hardwood top. Speaking of which…
Beech
Now I’m going to talk briefly about two other woods that I’ve used in benches. The first is beech, which is pretty traditional for Europeans. It’s moderately hard, fairly heavy, and stiff. As with the softwoods we’ve just talked about, the fiber structure is quite fine, so you’re not likely to get crud caught up in places.
Beech is a go-to utility wood in Europe, where it’s been reasonably well-managed there for a long time. So it’s readily available and inexpensive there, and there’s pretty much no reason not to use it for benchmaking, at least if you’ve got it. The species that grows over here in North America is similar, but it’s rarely harvested, perhaps because we have trees such as the soft maples that are easier to manage. Still, you might find a sawmill that’s sawn one up.
For some unknown reason, beech happens to be one of my favorite woods, and I’m always interested in picking some up. There’s something about the grain that I like, but I can’t really put my finger on it.
That’s not to say, though, that beech is my favorite wood to work. It’s not too bad, but it will put up more of a fight when planing and chiseling than something like cherry or walnut. I also don’t like it when the grain reverses (sometimes old knots telegraph through in weird ways), but that’s at least rare.
I personally wouldn’t use it for a bench unless I had ready access to a lot of it, at least not entirely. I did use an 8/4 chunk for the very front piece of my benchtop, and that’s been great. The dog holes mostly went in that piece.
It’s really easy to machine.
Soft Maple
The last wood that I’m going to talk about for benchmaking is not an obvious one. When people think of a maple bench, they think of hard maple, because, you know… it’s really hard. When I think of hard maple, I think of a wood that’s a royal pain in the butt because it’s so freakin’ hard. It also isn’t cheap.
Soft maple, on the other hand, can be a joy to work as long as the grain doesn’t be a big ol’ jerk and reverse. It’s usually not as hard as something like beech, but it’s no pushover. And it’s also relatively inexpensive for a hardwood, but keep in mind that you can’t quite compare it to something like SYP in that regard. You’re also more likely to find big cuts of at a sawmill than beech.
When I was looking for a hardwood to line the front and rear of my auxiliary bench (just like I used beech on the front of the Screwbo), a board of soft maple immediately caught my attention. I’d picked it up at the lumberyard for odd jobs.
Seems legit (so far).
There are lots of other woods I’d like to explore for utility and benchbuilding work. For example, the “hem-fir” stuff that you find as construction lumber is full of intrigue; I have some of this. There just needs to be a reason to try. Perhaps I’ll never need to build another bench (mine has served very well), but there are lots of other things in the shop that need to be built.
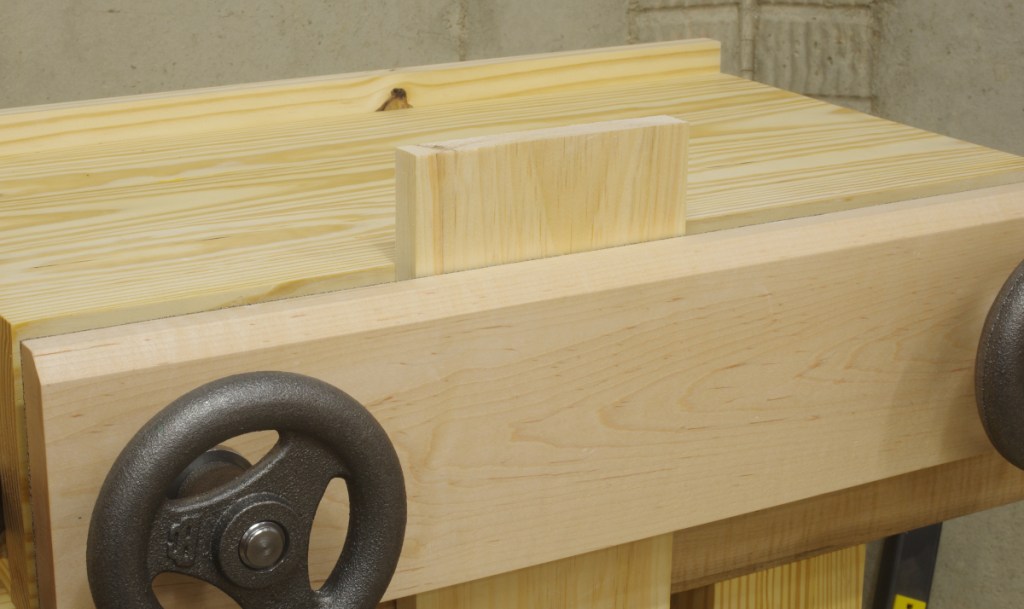
A few final steps after glue-up remained to move the new bench to this state:
Those steps were:
Trimming the ends. I used a long-ish panel saw because it had the finest tooth pitch, in theory. Then I sanded coarse-medium-fine to get a smooth finish on the endgrain.
Flattening the top. This was the easiest thing I’ve ever done a flattening job on. Wish it were always like that.
Applying a quick finish, a varnish and tung oil blend. Yes, the tung oil is real tung oil, and yes, it takes forever to cure. I didn’t have any boiled linseed oil, and I didn’t care.
The two pieces of soft maple that I chose for the sides of the top are curly. I didn’t anticipate that, but I guess it looks fine. In this case, I only really cared if the grain reversed or not. On the front, it did not. On the rear, it did a little, but it doesn’t seem to be of much consequence.
This is the first somewhat large thing that I’ve made with southern yellow pine. I might post my thoughts on that later.
The size is a departure for me. I knew that it wasn’t going to be very long, but I also made it 33″ tall, which is a bit tall for someone my size. Well, at least for planing, but I don’t plan to plane much on this thing (I think it would work fine for small pieces, though).
Another note on the frame is that I made the side stretchers offset from the long ones on the front and rear. This allowed me to use longer tenons because they don’t meet in the middle of a leg, which I like. Wearing illustrates this in “The Solution At Hand,” though he uses through tenons.
I slapped on a temporary shelf and immediately loaded it up:
I hated this situation under my main bench, because the shavings and sawdust were always getting into the nooks and crannies of the planes. I’ll have less of that going on over here, so it should be a little better. I don’t expect the shelf to be there forever, though. I’d like to put a box of drawers in there, albeit one that doesn’t go anywhere near all the way to the top.
But I still don’t like it. I’m doing it now because these things were getting in the freakin’ way all of the time, but my thoughts are turning to the tool chest idea. It seems there’s a lot of merit in that, but I don’t have the time right now.
I probably won’t be working on much of anything wood-related for at least a week or so. There are some other things to take care of, but after that, I do have some plans to use this bench on a few diverse tasks.
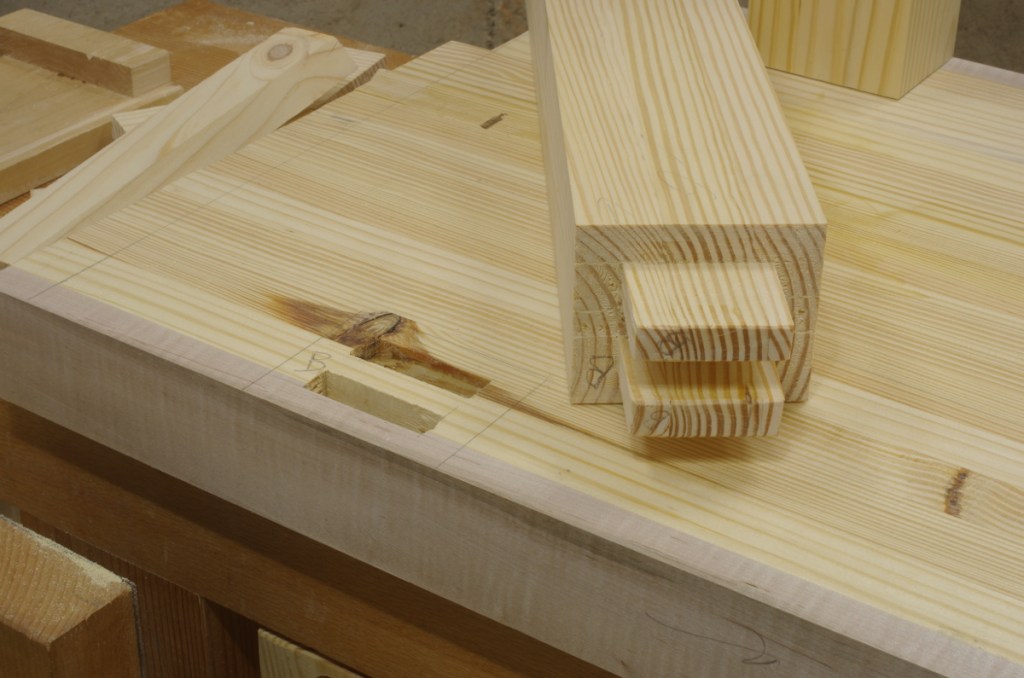
Now I don’t know if it will be 12 joints or 16. Do twin tenons count as two joints? Something tells me no.
Of course, both of the joints on the front just happened to land on the two areas near the shallow knots on the only board of the top that contains a little bit of resin. Yuck, but I guess the one upside is that most of parts that are a little tacky will be covered by the leg.
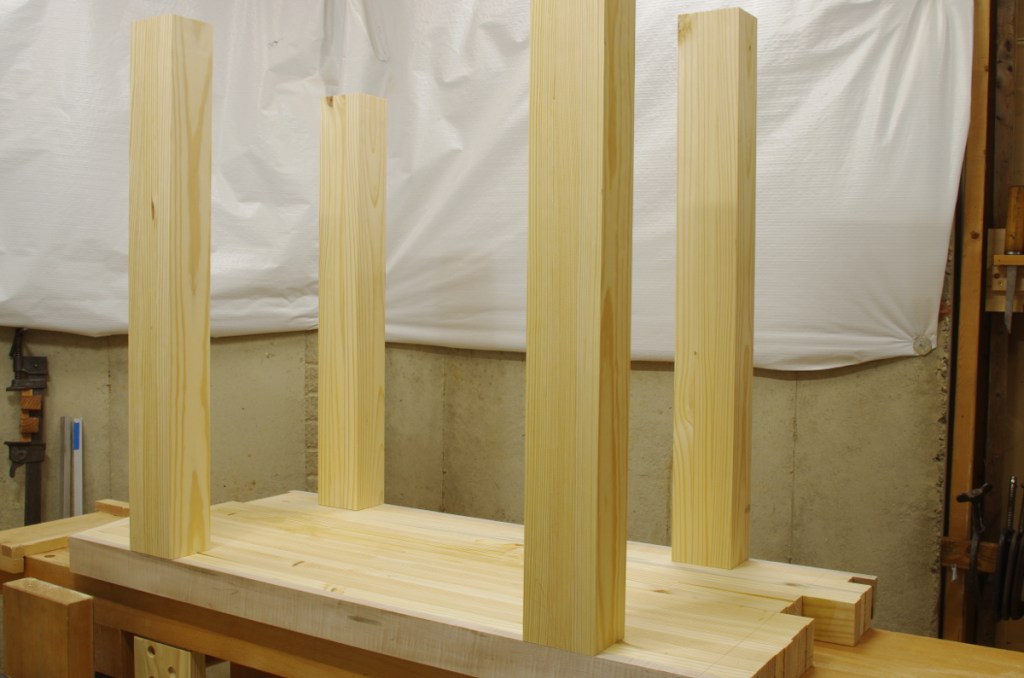
Here’s what we’re looking at now:
In the end, the legs will not be this long, but I’ll trim them to length just before glue-up.
Now for the stretchers. 8 joints. For sure this time; I’m not doing any more twin tenons, and if I do double tenons, those probably only count as one.
When I built my workbench, I did not include a sliding deadman because I was tired, lazy, etc. I said to myself that I’d add one when I needed it (or I actually felt like doing it), and just put some grooves inside the front frame of the bench.
I’d been tempted to make it several times over the past few months, but last week, as I was working on the stretchers for the new auxiliary bench, I found myself trying to square off the top of some medium-sized stretchers and not having a very good time of it. I thought to myself that I’d try the old “prop up the other end of the work with something” trick, and that was not at all pleasant.
So it was time. As I mentioned, I’d been thinking about this and had read the description in the Chris Schwarz book, and that had me worried. See, I had only plowed a measly little 1/4″ groove on both the stretcher and the underside of the workbench:
But the benches described everywhere have a triangular-profile rail (or “track”) on the bottom, and Schwarz says to plow a big, deep 1/2″ or so groove in the underside of the top so that you can clear that thing. He also integrates the track into the stretcher at times. I was worried, because I thought that maybe this was going to be a lot of work, or I otherwise screwed up in some massive way–it wouldn’t be the first time. The triangular-profile rail is a really good idea because it keeps shavings, dust, and small children out of a groove.
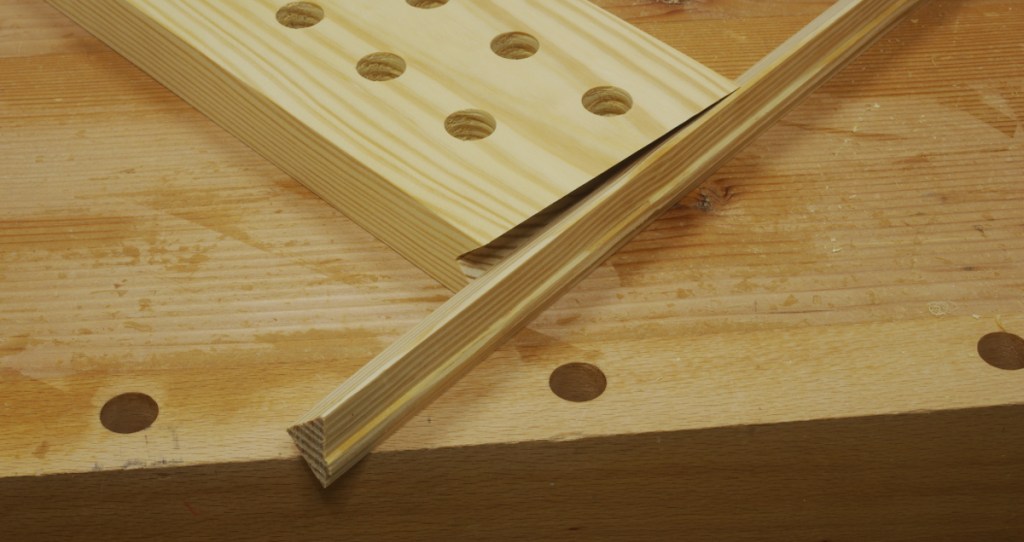
So in a fit of nervous twitching, I looked for a way around this. I made a rail in a triangular profile, and put a tongue on the bottom so that it would fit into the groove on the stretcher. Here’s a photo of how that looks (along with the deadman, showing the mating profile on the underside of that):
The theory here is that when you install the deadman, you do it in a unit with the rail. This way, only the tongue on the bottom of the rail needs to clear the stretcher when installing. Because this is significantly shallower than the really deep thing on the deadman, it would require far less of a groove in underside of the top.
Much to my surprise, this actually worked. Cutting that tongue on the bottom of the rail was a pain that I’d rather not recount (note to self: just tack the offcuts from the other side to my sticking board next time.).
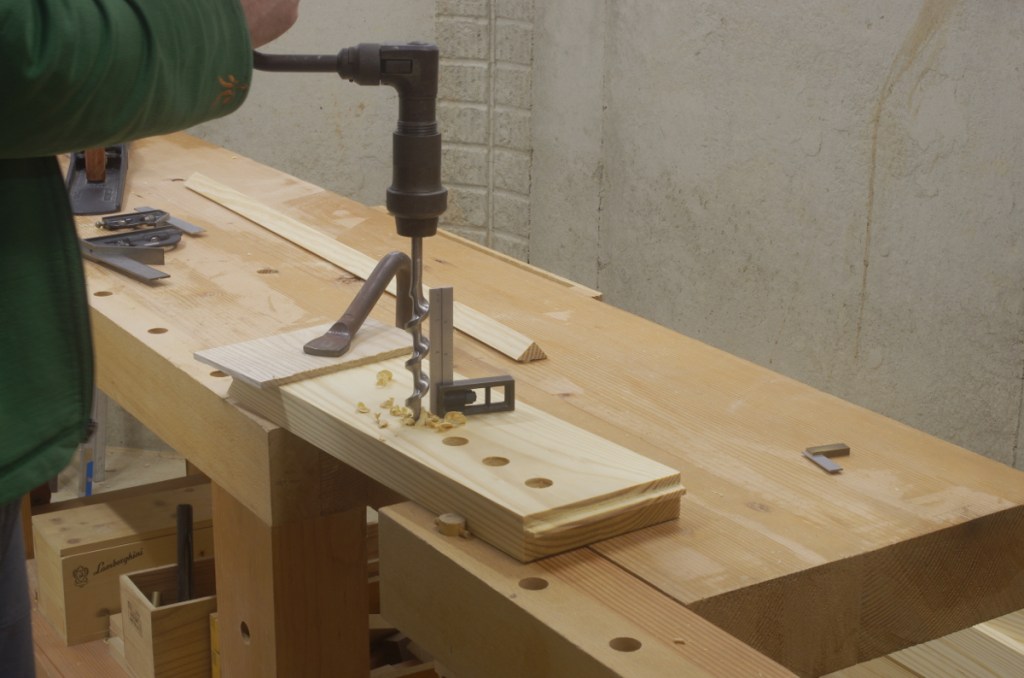
I should mention that though I made the tongue with hand tools, I cheerfully turned to my bandsaw to do the profile on the top of the rail, as well as the channel on the bottom of the deadman. I guess I did all of the holes with a brace and auger bit (despite actually owning a drill press now):
With all of this done, it was time to see if it actually works in practice, and in that respect, it’s certainly an improvement:
There is a lingering question I have, though. In the first Schwarz book, when describing the deadman of the French bench, he says to cut a curve on each side so that you can get a hand between the deadman and a leg when up against a leg. I don’t get this; why would you need to put your hand there? It’s not to facilitate moving the deadman; you can just grab it from the other side and pull it over with zero effort.
In later work (the LVL bench), Schwarz says that a straight board will work but that a straight board is boring. I will admit that the curve makes it look cooler. But I’ve never been very cool. So I’ll leave it as-is until I have a real reason to change it.