Unknown's avatar

About Brian Ward

I have no idea what I'm doing.

Bookshelf: Modified Housed Joint, Part 2

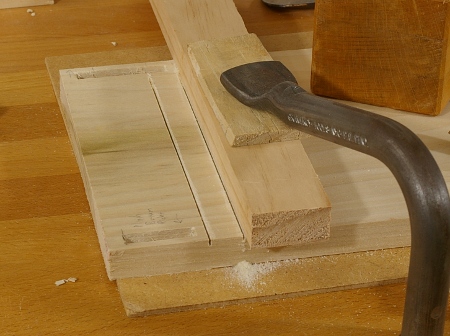
In the previous installment, I cut the dado for the housing, marked out the shelf tenon, and cut the tenon cheeks. The next step was to cut out the long shoulders:

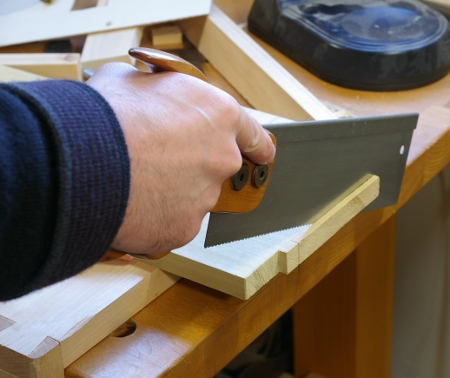
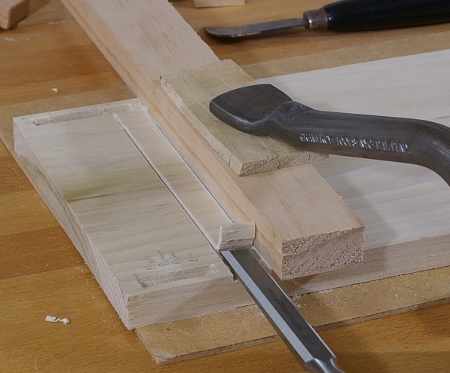
It’s a little bit difficult to do this with this backsaw because it’s not deep enough to finish the cut, but I found that if you go as far as you can diagonally on both sides, it’s trivial to finish off with a coping saw. Something like a ryoba or thin panel saw would also work.

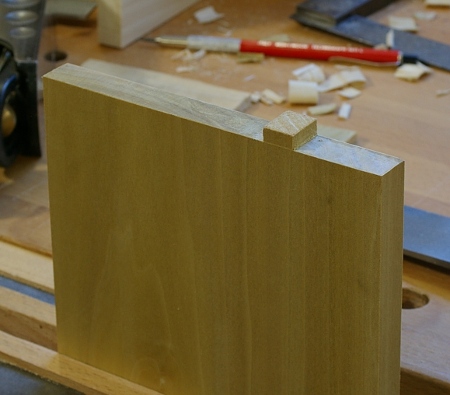
Here’s how the end of the shelf looks when trimmed and finished:

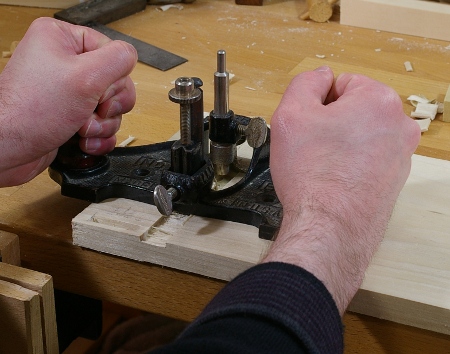
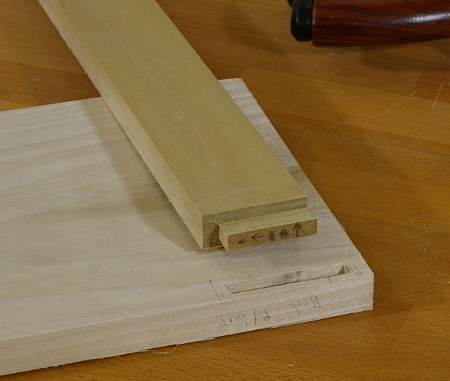
Now the slightly tricky part: marking and cutting the mortise for this little tenon. To mark, I put the shelf into the housing, registered where it needed to be registered, and used a lead holder to mark the lines at the bottom of the housing:

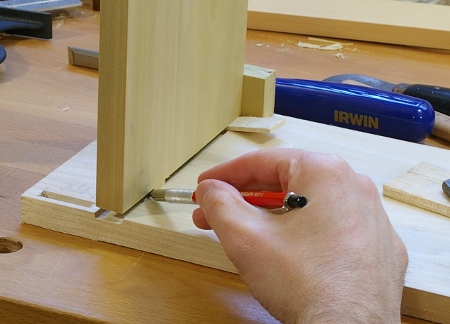
(However difficult this may look, it turns out that taking that photo was the most challenging part of this project so far.)

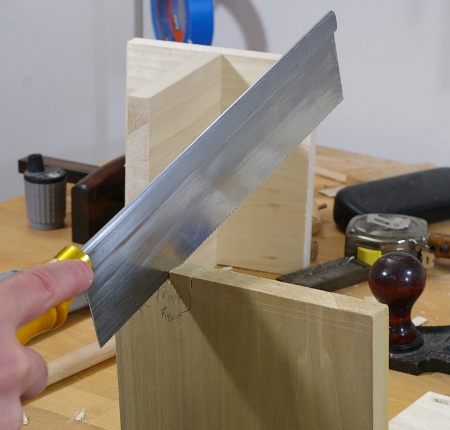
Then I removed the shelf, cleaned up the marks I had just made, got out the pigsticker, and started chopping away (but not too violently, since it’s not a through tenon):

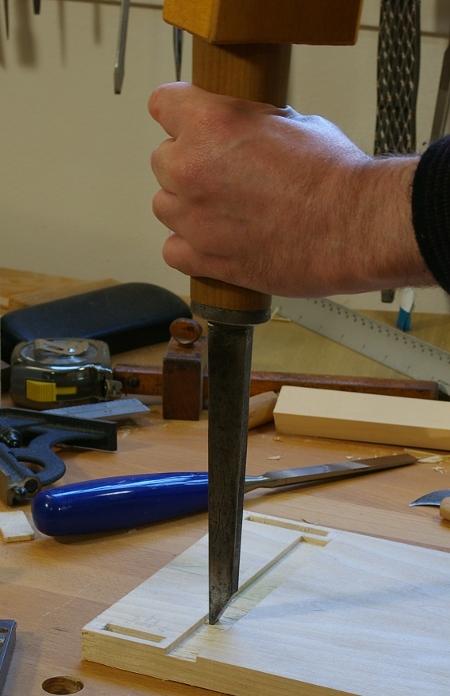
Some paring was necessary to clean up the sides and bottom, as you’d probably expect.

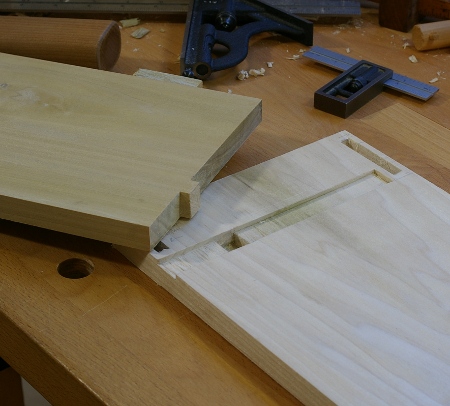
That’s pretty much it. In the end, these were the final components:

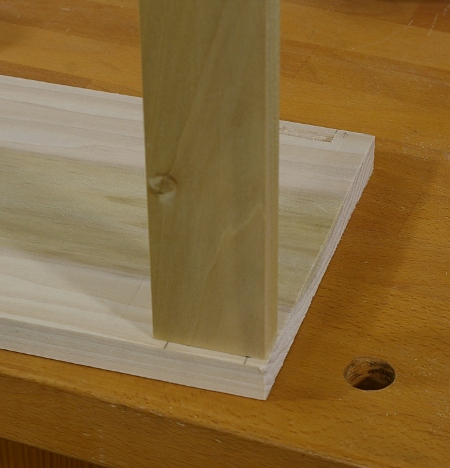
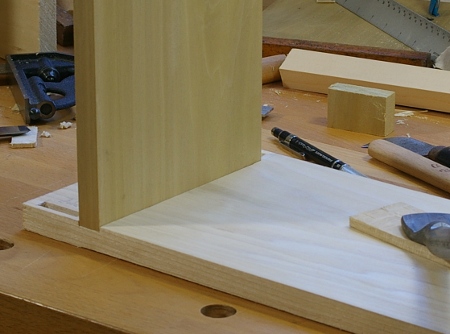
And here is how it looks in a test-fit:

I also made the other three of these joints for the bookshelf prototype project today and did a test assembly. However, I’m not ready to glue up yet. There’s still a matter of the panels.

Bookshelf: Modified Housed Joint, Part 1

I finished with all of the stretchers for the bookshelf, meaning it was time to move on to the shelves. My original plan was to use a housed joint. I decided to make a small modification to the joint, though, to ensure that the bookshelf would resist twisting forces. The modification is basically just a small mortise and tenon hidden inside the joint.

The hitch is, of course, that I’ve never made a housed joint before, so I set off on a test on some of the cutoffs from the projects. Surprisingly, that actually went well, so I proceeded to the first of four “production” joints.

I started with the dado housing. First, I squared a knife line, clamped down a guide strip, and sawed a kerf on the inside of the line. Then I marked out the width from the shelf, put down another knife line, and sawed down that side. This is after both kerfs were cut:

Note that this is a stopped joint in the back. It doesn’t matter if I overshoot a little, but I can’t go all the way to the back. If I’d had a stopped joint where overshoot actually matters, I would have clamped a stop in place.

The next step was to remove the waste between the kerfs. I started with a chisel to get most of it out:

Then I went to the bottom with my router plane:

In this photo, I’ve stopped the board against a couple of bench dogs in the back. (I should have done this when I was chiseling, too.)

After the bottom was reasonably smooth, I turned my attention to the shelf section. I marked out the line where the board would protrude from the side first, then the line where the edge would meet the housing. Finally, I marked out a small tenon about an inch and a half into the board and sawed the cheeks:

And that’s all I had time for today. Notice my test joint making a cameo in the background behind the saw.

In the next installment, I’ll cut out the waste, chop the mortise, and clean up. Then I’ll have to do everything three more times.

Bookshelf: Munging Mortises

I cut the other dovetail joint for the top of the bookshelf and was feelin’ pretty good about it, and I thought that it might be a good time to start on some of the stretcher pieces that will provide the rest of the racking resistance. There will be three of them, two in the back, and one at the front at the bottom that will be a plinth (“kickboard”) piece.

The mortise in the back near the bottom was my first target, and I proceeded immediately to chop in the wrong place. I didn’t realize this until I had been away from it for a while, so when I came back, I extended it upward until it was in the right spot. You can see it here with its matching tenon:

Thankfully, it will not be visible when this project is complete, but I really have to make this lesson count for something.

I chopped the mortise on the other side and cut its tenon without a hitch, so I was again feeling pretty good about myself, so I decided to go after the plinth next. And, of course, I went straight out and chopped that one in the wrong place, too. You see, this piece is supposed to be inset a little into the depth of the shelf, not flush with the front. However, I used my already-set cutting gauge to mark where to chop, and I marked it in a position that would have the plinth flush. Argh.

Well, I couldn’t resort to the same old stupid trick to fix this one, because the mortise was the right length, but at the wrong depth. So I thought about it a little, and decided that since I hadn’t cut the tenon yet, I would modify the tenon location instead. And so here’s the hack I came up with:

Yeah, so I just moved the tenon over to one side of the piece. It’s stupid, but it does work, as shown in this fitted view:

I don’t think I’ll be making that mistake again, because I’ll probably do all of them this way from now on. The reason is that I won’t have to change my marking gauge for it. Though I am sort of happy that I discovered a way to deal with this sort of thing, I am not happy that I wasn’t paying better attention in the first place.

But then again, it is called my prototype shelf for a reason. I already have a few modifications in mind when I build larger examples.

I have three more of the mortise-and-tenon joints to make on this project, then some housed joints, and the final (dreaded) part is making and fitting the rear panel.

Bookshelf: The 60-Year Dovetail

I’m slowly making my way through the prototype bookshelf project. After realizing that my widths were all wrong, I had to spend some quality time with my rip saws and jointer plane to fix all of it, and I was able to do that during what little time I had this weekend.

So then I decided to get started on the dovetail joints for the top, and let’s just say that my dovetails are not the famous five-minute variety. I don’t get a lot of uninterrupted time in the shop these days, so I just cut whatever I can, and stop when I need to. On Monday, I laid out the tails and cut them. Yesterday, I only had time to finish cleaning the waste between the tails and mark out the pins. This morning, I had enough time to cut the pins and finish the joint (and mark out the tails for the next joint). So it may not be the 60-year dovetail, but sometimes it seems like that.

However, the story is not a sad one. For one, the joint is perfect; the only thing left to do here is plane off the proud excess at the ends of the tails and pins:

Another bright spot is that it went off without a hitch, even on pain-in-the-butt yellow-poplar sapwood (the lighter bits on the right). Saw, chop, and test-fit. The pins fit right off the saw; no paring was required on the sides of the pins. Thinking back to the first dovetail joints I made, it took much longer to cut joints that did not turn out as well. My speed is improving.

I’m back to using my cheap Crown gent’s saw, still with the same touching up of the teeth that I gave it when I first got it (slight jointing, filing with a needle file, slight stoning on the sides to remove some of the set, and wax). It works fine, though I can’t imagine how bad it would have been if I hadn’t tuned it. I am still plotting out the dream dovetail saw that I will make one day, but I’m too busy with furniture projects right now to get tied up with making another stupid tool, and honestly, it’s just not that important.

Sometimes I think of what could possibly make things move a little faster, and I came to the conclusion that some operations are actually going quickly but some not so quickly.

The fast ones are:

  • Sawing down the tails and pins
  • Removing the bulk of the waste
  • Test-fitting

The stuff that seems to take a little longer:

  • Laying out the joints
  • Paring down the final little bits in the tail and pin troughs

Now, I know that the paring could go a little quicker if I just bothered to make a pair of skew chisels. I really should get on that case some day.

What about laying out the joints, though? I do this mostly by eye now, marking out “what looks good” (to me, at least) for the tail spacing, then using a square and T-bevel to mark the lines. This works and it is St. Roy- (and others) approved. But it’s not fast for me. I can mark the spacing quickly enough, but lining up the T-bevel to the mark on top always seems to take a little extra time. A dovetail template could save some time, because you can register it to your marks at the top quickly.

But then again, we’re talking about a savings of only about two or three minutes here. And I don’t think it’s worth getting yet another tool for that at the moment. Furthermore, I can’t just arbitrarily pick the angle I want, as I do now. I know that’s been said a million times before, but I do think it counts for something.

Frankensaw; Saw Sharpening Guides

I’m finally done with sharpening the last saw on my to-do list. This and the one in my previous post were both acquired at an estate sale over in the Sunset district last year. They’re both Disston No. 7s, but both have been rehandled. The first one I worked on had some sort of modernish handle on it. The one I just finished has a No. 12 handle.

Someone must have liked these saws. They were both rust-free and had pretty good visible etches. Unfortunately, the sharpening on them was crap. The No. 7/12 Frankensaw needed serious jointing (and therefore, serious tooth reshaping) before it could be pointed.

But once at the pointing stage, things went pretty quickly in spite of it being a 26″ saw with 8 teeth per inch. I used a 10 degree fleam angle this time, and used a roughly 10 degree slope on the gullets as well. Here’s a shot of the sharpening in progress:

This picture shows one of the issues that often comes up when sharpening crosscut saws that I’ve been talking about recently, and that is, that the shape that the tooth appears to be can be misleading. Look at the teeth on the right side of the saw in the preceding image. See how they look kind of spindly? It’s a trick of the reflected light. Here’s a close-up, where you can see the reflections and the full tooth profile:

Obviously, there are some uneven spots here, too, like the second-to-left gullet, but those were taken care of on a second pass. but the point is that you have to be careful about what you see. Just be consistent with the angles you work at, look at the tops of the teeth to see when you’re done.

Here is the saw in its finished state:

You can see my fleam guide in the photo of the work in progress. I worked a little on the code for this before starting this saw. My previous version required you to use two different cutouts to sharpen each side of the teeth. That was kind of stupid, because you can see only one side of it at a time. So I reworked it.

Update: I now recommend that you use the versions that are on the Plans and Guides page rather than the following, but I’m not going to remove these any time soon.

Here are PDF versions for:

  • 10 degree fleam (fleam10)
  • 15 degree fleam (fleam15)
  • 20 degree fleam (fleam20) (whoops, need to regenerate that sometime)

If you know how to use PostScript, ask me for the source code; you can put in any fleam angle you like. (I haven’t figured out how to trick WordPress into letting me upload a .ps file without doing something stupid like archiving yet, sigh.)

Also, I have a PDF tooth pitch gauge (toothgauge) that you might be able to use at some point.

My Sloped Gullets

Leif over at Norse Woodsmith did a recent post on sloped gullets. Strangely enough, I’ve been working on restoring a couple of saws lately, and about the time he posted, I was starting to sharpen one of them, an old Disston No. 7. I finished this morning and decided to take a photo of the result. Unfortunately, I don’t have a macro lens, so I can’t get much better than the following shot, and also unfortunately, I don’t think the angle is very good, because you can’t really see the bottom of the gullets too well:

In any case, take a look at the bottom of the brightly reflected edges, and you’ll see that the rear is higher than the front, especially on that tooth all the way to the left. This shot was taken straight from the saw coming off the file, so you can see some burr here and there. You can also see how difficult it is to judge the height and shape of the teeth here. In this shot, it looks like the teeth set towards the camera (the all-dark ones) are a little bit lower than the ones set away, but in reality, they’re all the same. It really is easier to tell by jointing the teeth and filing until the flats are gone.

I’d mentioned in a comment on Leif’s post that the angle I used for fleam and slope was not that great. On further inspection, it seems to be moderate. The fleam angle is 20 degrees and the slope is about the same. I think a 10-15 degree fleam and slope would be easier to file, and I plan to try it out on the other saw I need to sharpen.

All of this theory is useless if it doesn’t work in practice. Here is a test cut in beech:

It’s about what you would expect from a 6TPI saw that’s 26″ long. The important part is that it belches sawdust profusely when sawing, and with a controlled cut, you don’t get much tearout. And it’s always nice to get a 110+ year old tool working again.

New Dog Holes, More Milled Wood

I’ve been doing a lot of milling and resawing lately. My prototype bookshelf will use the following pieces of yellow-poplar that I dimensioned:

Yeah, I know, it’s not too exciting, it’s just some wood.

This stuff was quite cupped when I started out, so I had to do a lot of work with the scrub plane to get it flat. To do so, I decided to put a second row of dog holes in the workbench so that it would be easier to plane across the grain:

To use them, just add some dogs in the appropriate holes, as shown here by this evil piece of beech:

It’s been working well so far. I’m considering adding one more at the corner so that it really doesn’t have any room to move around, but it’s not important right now.

Why, you ask, is that board evil? Well, it’s from a piece of 8/4 stock, about 11″ wide. To get to the point of resawing it, I had to flatten one face. No problem, except when you don’t hammer in the scrub plane wedge enough. When that happens, the blade can pop out when you’re doing hard work. The overall consequence, then, is minor carnage. Ouch. I lost a few days of shop time from that.

In any case, this board is for another project that I haven’t talked about yet. I’ll post more details on it later.

Frame Saw: Resawing panels, repairs

One of the projects I’m starting now is a small bookshelf prototype that I’ll use to guide my way through building later versions. I’m in the process of milling the wood, and to make efficient use of the wood, I decided to resaw 4/4 boards so that I can use one slice for the sides and shelves, and the other slice for a panel in the rear of the bookshelf.

So it’s the first real-life use of my frame saw. It does fairly well; here’s a roughly 1/4″ slice that came off one board (this is Yellow-poplar/Liriodendron tulipifera):

The upper left looks slightly ugly in this shot, but it’s actually just two passes of a plane from totally flush. The result is actually quite good–very flat, no wandering of the saw. I seem to run into difficulty at the end of of the board, and I’m still trying to figure out ways to make that easier. Unfortunately, what didn’t help was the tension on my frame saw being too great for the hardware that I made to hold the blade in place, causing it to tear apart on one side:

Yikes. Well, okay, so I just chopped it off and remade the piece. I think this part is a little weak because of the recesses I filed for the itty bitty screws that I no longer use. I’m still not entirely happy with the arrangement, but if it holds, I’ll change my attitude.

Speaking of attitude, mine towards my front vise has been one of complete irritation for the past several months. I’ve had the endcaps held on at the very tip with screw inserts in the center with a machine screw to hold the whole thing in. Unfortunately, the insert kept coming out (because inserts don’t work well when inserted parallel to the grain, duh), the cap would come loose, and the handle would fall out of the vise. Of course, it would always fall out at an appropriately inconvenient time.

This was happening on only one side of the vise, and I finally fixed it for good today by relocating the insert to the side of the handle instead of the tip (you can see the hole in the tip at the right where the screw used to be):

I suppose that it’s fixed “for good” until this happens to the other end of the handle and I have to do the same thing there. Sigh. Why it took me so long to fix this is beyond me.

Taiwan: Final Tool Survey

Here’s an inchannel gouge I got in Taipei. This is how all of the “local” carving tools there I saw were designed:

It’s fairly long, maybe about 9″ or so. But that’s not the first thing you notice about it–the lack of a handle is. They typically aren’t used without mallets.

These things are struck with a long, rectangular mallet made of a single piece of wood. They are somewhere around 2x2x9″, with one end rounded so that it’s comfortable. Due to the small hard area that they hit, the mallets quickly form concavities on their faces. So soon after you start using a new mallet, it tends not to slip.

Although it looks cheap, this gouge was not particularly cheap. The red at the end means that it’s made with “quality steel,” and I think the cost was about $8. I’ve tried it out and it works fine, but I think I’d prefer to make an appropriate mallet before doing too much with it.

The plane below is a little block-esque plane made by “Hsieh Hsing:”

This one actually came with packaging, which advertised it as “Japanese-style,” despite the fact that it’s no different than any Taiwanese plane I’ve seen. It’s short (maybe about 4″ long), and has a thick, quality blade that was very easy to flatten. Its throat is rather wide open, which lends it to uses of more rough block plane, but it does a good job and I can’t complain about that.

The final Taiwanese tool I’ll describe is a little special due to the person who gave it to me. One of the reasons for this whole trip was to meet my future inlaws, and as scary as that may sound, it turns out that they were all really great. One uncle in particular is also interested in building stuff, so I showed him this blog and we talked a bit on the subject. He’s also the one who took me to the store where I got most of these tools; it would have been difficult to find without him. And finally, he gave me this little smoothing plane:

Thanks, Uncle!

I think I’m finally mostly caught up with updates from the trip, so it’s time to get focused back on my various projects; I’ve already got some stuff started and can’t wait to get back to business on that. I’ll have some updates shortly. In the meantime, enjoy this view from Mugumuyu near Hualien (those rocks are marble):

Taiwan: More Tools, Sitou

Continuing with the survey of tools that I got in Taiwan, here’s a funky rabbet plane:

The body is pretty clearly some sort of white oak, the only such example that I picked up. The blade is laminated and decently thick. This was one of the more expensive tools that I got; I think the cost was about $15.

The big characters on the blade and on the red part of the sticker comprise the brand name. On the rest of the sticker, it says something like, “very good quality,” and it seems to hold true. Everything mates perfectly, the mouth is tight, and it produces good, smooth shavings. I managed to do some panel-raising with it.

Next up is this wooden spokeshave:

This is a little larger than most western wooden shaves (maybe about 60% larger), and it was not their biggest model, which was enormous. The “37” is the production number (apparently out of a run of 100). The blade is hand-forged and decently easy to hone; you can straddle a 2.5″ stone with it. It works well. Cost was about $8.

Next up is a rounding plane. We’ve seen a bunch of similar tools under the brand Mujingfang, but this Taiwanese version uses a metal plate rather than the wooden wedge found in most of the others (I didn’t see a single wooden wedge in any Taiwanese-made plane while I was there):

The size is printed on the top near the toe. As with all of the other tools I bought, it works spendidly. I think the cost was about $10.

So switching away from tools, let’s look at some tree stuff. One of the places we went was Sitou, which is home to the Sitou Forest Recreation/Nature Education Area. It’s an experimental forest run by National Taiwan University, and you can see many different kinds of trees that they’re playing around with. They even have a California redwood or two there, which is kind of fitting, since we have a Dawn redwood in Henry Cowell Redwoods Park here.

In any case, there are a bunch of things you can look at, and one of the most interesting is the Skywalk, a walkway on a trestle that extends from the side of a hill that goes right into the forest canopy. It’s not every day that you can just walk around the middle of a bunch of Japanese Red Cedars:

(Yes, there are birds, bugs, spiders, and all sorts of stuff up there.)

The forest is hardly old-growth, though. It was once dominated by the Formosan Cypress (Chamaecyparis formosensis), but like so many good trees, it grows slowly and is far too valuable for people to actually want to conserve in any reasonable fashion until all of the trees are gone. But there’s one cypress of note there, a giant 2800-year-old cypress considered a “sacred tree:”

Of course, the only real reason it was spared is because it is too hollow and crummy to be used for timber, so they called it “sacred” instead. Hmph. In any case, it’s pretty amazing.