There seem to be several little camps when it comes to stock preparation methods. There are those who rive arrow-straight oak with a froe and plane it down, the hand plane exclusivity evangelists, the hand plane to flatten/thickness planer on rest, the “hmm, maybe hand planes and a big bandsaw” types, the machine heads who won’t use anything but jointers and planers, the various router sled types, and then, of course, the people who mostly do hand work, but keep a huge jointer in a separate area as a dirty secret. You know who you are.
Doing it completely by hand taught me a lot of things, and switching to a hybrid approach with a thickness planer saved me some time. I’ve never really been religious about stock preparation, so this discussion might start to seem a little out of place on this blog, which is mostly about hand work.
But something inside of me wasn’t satisfied with a few things. First, I wasn’t thrilled about flattening stuff by hand anymore. Second, I didn’t want a jointer. Finally, I wasn’t enthusiastic about my thickness planer being such a one-trick pony. I’d read about planer sleds that could flatten boards, but when I looked into them, I wasn’t too impressed. There was one overriding problem: Holding the work conveniently, yet securely.
Still, the sled idea sat in the back of my mind. I kept thinking to myself that there must be a reasonable way to get a board to stay in place, and that some sort of traditional approach to workholding might work. Maybe double wedges? But how? Finally, about a year and a half ago, something went off in my head and I had a basic design. I built a prototype. Surprisingly, it worked. I was then able to refine it some more.
So without further ado, here is my video describing the multiwedge planer sled.
A video might seem a little unusual for me, but I really felt that it was the best way to illustrate the sled.
I really hope it will be useful to someone else as well. It’s been great for me.
This was going to be my year for getting enough clamps: I was to troll the tool sales and estate sales to get what I’ve been lacking. Then you-know-what came around, and that plan whimpered and died. As fate would have it, I’ve got an upcoming project that requires more clamps than I have.
Perhaps I was fortunate that I was reading the Roubo translation from LAP recently, and of course Roubo talked all about clamps. He described a panel clamp made from two boards that he called “twins.” He said that “the use of these tools is excellent,” and his recommendations are not to be taken lightly. OK, whatever, it looked reasonable, so I wondered if anyone in the 21st century had made them. I should have guessed that Don Williams had done it; here’s his blog post. There’s a snippet of the Roubo plate in there. Also, keep in mind that even though we’re calling them “Roubo clamps,” we don’t really know how the form evolved over the years to the form he described.
The construction of these is simple enough that it was definitely worth trying. I grabbed some southern yellow pine 2x4s and put a bunch of holes in:
Hand tool disclaimer: I used my drill press. Sure, I could have used my brace, but it would have taken a lot longer, and this is one thing that a machine actually does really well.
The holes are alternately offset like Williams did. It seemed like a good idea at the time. He used a mortising machine to make 1/2″ square holes. I planned for 3/4″ pegs, and I didn’t like the idea of using round pegs, so I needed to square up the holes. With no mortising machine of my own, I just went at it with the biggest mortise chisel that I own:
Thankfully, these don’t need to be appearance-grade. And yes, I chopped halfway in from each side, and yes, there’s something underneath the wood to keep from putting (any more) nicks into my bench.
This was something of a chore, but not awful. After that, it was simply a matter of resawing, making the pegs and wedges, and before long, I had three twins:
I tested them on some boards that were lying around:
These seem to work well. I pounded the wedges in pretty hard. Using them requires some acclimation, so I guess another reason to use liquid hide glue is so that you have enough time to put them on. Although I’m using double wedges here, I might change to single ones for the simplicity.
Being southern yellow pine, I think they’ll be strong enough. Roubo describes beefier things: roughly 4-5 inches wide, and 2 inches thick (but is this per side or for both twins?). His described mortises and pegs are 1.5 inches wide–four times the volume profile. But from what kind of wood would he have seen these made? Oak would be very strong for the pegs, but its tendency to split cleanly might be something of a concern for the twins. Beech wouldn’t have that kind of problem. Or what if it were a wimpy sort of thing?
Oh well, I don’t think that’s something I need to concern myself with that until I manage to break these.
In my previous post, I briefly mentioned that I’d filed the plate of a new saw. I have now completed that saw; it’s a large tenon saw.
This particular project has been lagging for a long time. I’d gotten the plate and back from Mike Wenzloff several years ago, but they sat in a box for years. Finally, I filed the plate back in April. It’s 19″ long, and I filed it at 10TPI rip, with zero degrees of rake. Then it sat for a few more months until an informal gathering with some friends in June.
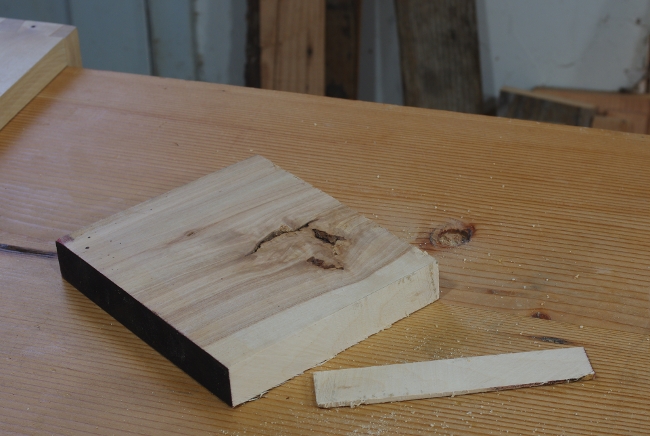
I decided to get started on the handle then. The wood is allegedly “Peruvian Pepper Tree” (Shinus molle); it comes from a piece that a local brought to a BAGathon several years ago and has been bouncing around several subsequent gatherings. I don’t really know if this is actually the wood here or not, but whatever; here’s a photo of the roughing-out process at my friend’s (awesome) shop:
(Later on in the day, I would get to use his Versa Vise. Very nice!)
This wood isn’t the worst thing I’ve ever worked, but it’s certainly got its quirks, namely wavy, reversing, interlocked grain (much to our amusement, as we initially tried to rive it with a froe). It’s about as hard as beech. I found it easiest to smooth it out with a scraper. Even then, I didn’t take a whole lot of care smoothing out the final surface, figuring that it would get dinged up anyway. (This hypothesis was quickly confirmed when I dropped it on the floor as I was just completing the rubout of the finish.)
I was initially going to use a Kenyon pattern for the handle, but decided on a Disston pattern at the last moment because I’ve been very happy with the comfort of the Disston-based patterns I’ve used in the past. I modernized certain parts (as I always do), but left this one mostly alone.
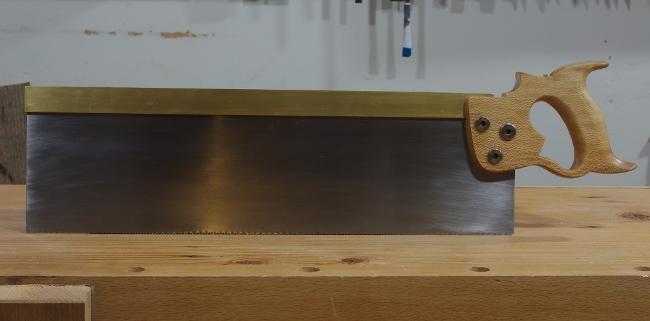
As usual, the finish is varnish. I used about five coats this time. The wood has some strange inclusions, but you can redefine those as “character.” Here’s a closeup of the completed handle.
The saw hardware is my usual (see herewhoops, cross-reference broken for now). Here’s the whole saw:
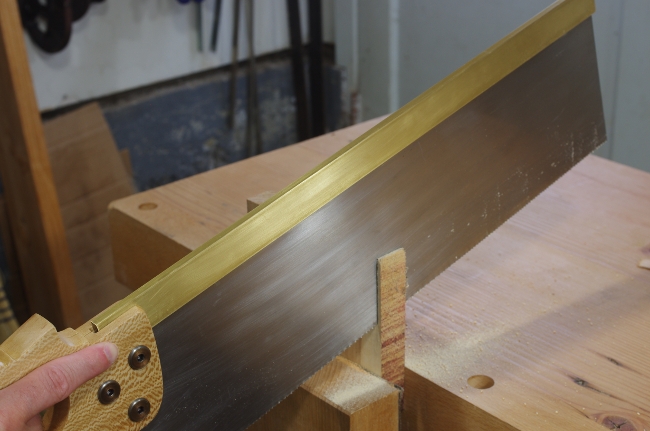
All of this is fine and good, but does the saw work? I picked up a piece of the wood that I like to hate the most (some really hard birch), and checked to see if it could saw straight and quickly:
Hey, it wasn’t so bad at all. I came to my senses and switched to a bench hook to finish off this test cut:
Then I tried it on some less horrible woods. It slices through yellow-poplar like butter.
So it’s done. It would have been nice to have had this saw for the big tenons on the workbench project last year, but that’s the way it goes.
It’s been saw season around here lately. A few months ago, Lee Valley introduced their saw filing holder (or as I like to call it, “a doo-hickey that you put on the end of the file”). I bought one almost as soon as it came out. Unfortunately, an injury to my finger (not induced by woodworking) and other matters have kept me from doing much in the shop this year. However, I did get a chance recently and because I had a number of saws that needed help, I thought I’d start there.
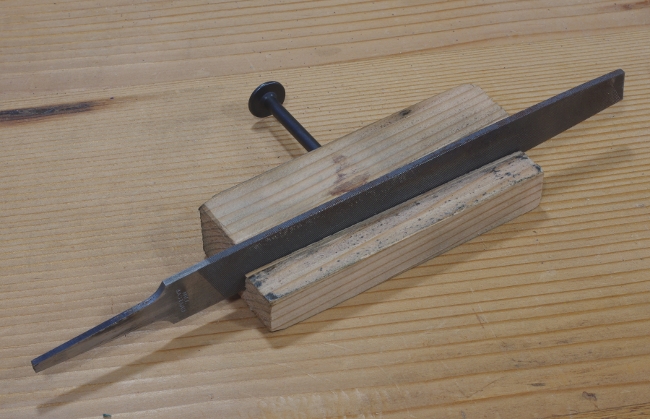
Strangely, the last thing I did in the shop in the previous year was also to sharpen a pair of saws that ended up in Ethan’s workshop in Taiwan. I did those with the old “block of wood on the end of the file” method. For those, I also made myself a quick-and-dirty saw jointer:
This is another one of those things I should have done a long time ago. It took maybe 20 minutes.
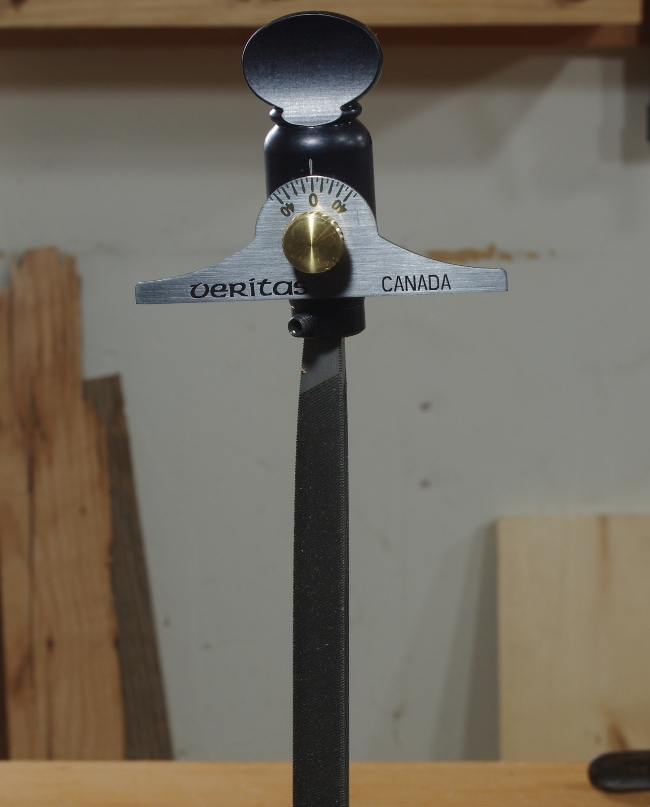
Now, the only real reason that I bought the Veritas holder was being fed up with the million little saw file blocks that accumulate over time:
Not only do those blocks take up a lot of space when I’m not using them, but it’s hard to keep the angles consistent on both sides, and trying to keep track of them all is irritating.
The first saw I worked on was a small crosscut saw for a friend. I said that I would do this saw last year and thought I’d better get it out of my queue first. This saw also featured another first: The first time I ever hammered out a kink in a saw. I’m amazed that it worked. Then I jointed and shaped the teeth. The shaping was the first time I used the handle, and because I just used it straight across to establish a halfway decent tooth geometry, there isn’t much to write about other than that it seemed reasonably comfortable.
Then I set the teeth. Here’s another departure from the norm. I’ve been using a Millers Falls saw set for a long time, and although it works fine, it’s a little uncomfortable to use for a long period. I thought about a replacement such as the famed Stanley 42X, but that has the same kind of grip as the MF. For whatever reason, I decided that I’d try to figure out a Disston Triumph saw set (Stephen Shepherd has written about them here):
It turns out that these things are not bad at all. It’s got the height and depth adjustments that you want on a set, and has a little “gripper” to grab the saw plate just before the plunger presses the tooth into the anvil. One size doesn’t seem to fit all, though; the plunger on the one I have is much too wide for fine-tooth saws (there are smaller versions, and I think you could file down the plunger, too).
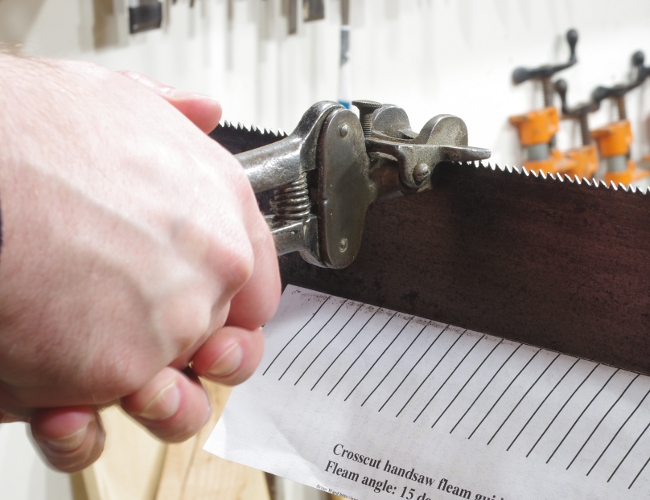
With the set done, I could apply a final light jointing, and sharpen the teeth:
The Veritas handle was still reasonably comfortable, but now that I was filing to create fleam and sloped gullets, I noticed that the rake angle setting on the handle was really no longer realistic (the protractor that sets the fleam angle guide was slightly better, but read on). So instead of trying to figure out the correct angle, I just placed the file in the gullet with the fleam and slope that I wanted, and rotated the rake angle setting until the protractor guide was parallel to the saw. However, I did take note of the rake angle setting that resulted on the file holder, because I reversed it when I filed the second half of the teeth from the other side.
The resulting saw worked as well as any I’ve filed before:
Of course, it only worked well once I glued the beautiful apple handle back together after I’d cracked it trying to take the picture above (sigh).
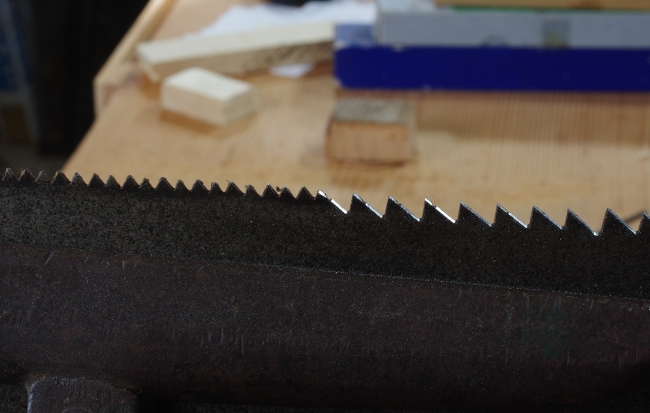
The next saw to work on was a new rip saw that I had on my list for a while. A while back, I had found yet another Disston No. 7 with quite a lot of blade left (but not in the greatest of shape rust-wise). After removing the rust and waxing the blade, I set about making the large teeth by removing every other tooth, converting a 7TPI saw into a 3.5TPI saw. I was a little worried about setting this saw, because I might be trying to bend every other back against its original set, and that could break a tooth. But it turned out that once I’d filed out all of the new teeth, there wasn’t much set remaining anyway, so it worked out fine:
It was during the filing of this saw that I determined that the Veritas handle was helping me file a little faster. This had nothing to do with the angle adjustments. It was because I could pull the file with my left hand as I was pushing with my right. This was possible because the file holder grips the file tightly (as opposed to the block of wood, which does not). It made a difference on this saw because there really was quite a lot to file away to create the new teeth.
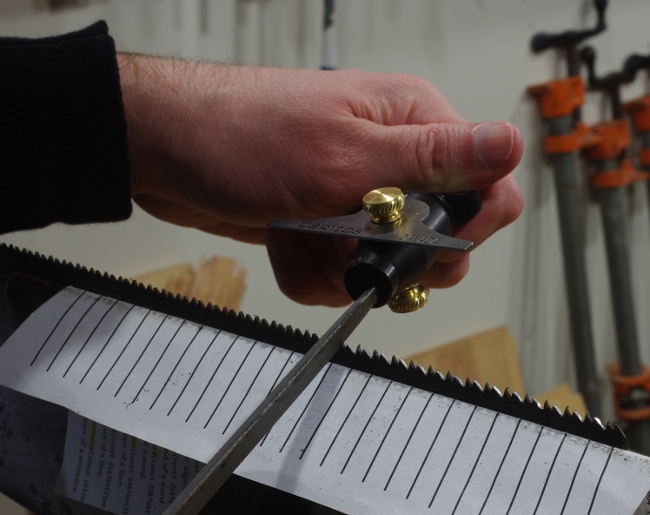
But I also determined that you really do have to take the measurements on the saw file holder with a grain of salt and make adjustments as necessary. The large teeth on this saw require a large file, and this is what it looks like when the file holder is on the end:
Because there’s an increased taper at the end of the file, the file holder grips slightly askew from the file’s line. So if you want to keep this file perpendicular to the saw plate by using the protractor, you have to adjust the protractor off the zero mark. There is less of an effect on smaller files, but it’s still there.
In the end, I don’t think this matters much. It would be a tricky (but not impossible) engineering problem to fix it, but the worst part would be an additional adjustment on the handle that would be far more confusing than the ones already there.
The third saw that I filed was my Winchester crosscut saw. I did not need to shape the teeth because I wasn’t starting from scratch. I lightly jointed the saw, set the file holder angles by eye for the first half of the saw, then reversed the angles for the other half. It went quickly.
I also used the filing handle on a fourth saw, a brand new one. That one isn’t finished yet; I’ll post when it is.
A summary regarding the Veritas file handle is as follows: I don’t think that the accuracy of the rake and fleam angle measurements are important. Consistency is more important, and it works fine for that, but not any better than a paper fleam guide and blocks of wood (and remember that practice trumps all). It also won’t help you with the most important part of saw filing: keeping the tooth height uniform (just use a jointer; if you want to throw even more money at them, Lee Valley can sell you one).
For me, it does what I want it to do. There are no more blocks of wood cluttering my saw sharpening supplies, and it’s fairly comfortable to grip. The extra force that I can apply to the file stroke when shaping new teeth is a welcome bonus.
My trusty mallet, Thagomizer, has really been taking a beating in the last year. I think I’ve had to glue it back up about four or five times now. With some extra time on my hands, it was time to build a replacement.
I liked a lot of things about the mallet, but did some silly things when I made it. The handle turns out to be a little too short, and for whatever reason, I put a finish on it. I guess I was on a varnishing kick back then; come to think of it, I really didn’t have anything else to varnish at the time. (I used rottenstone on this? Really?)
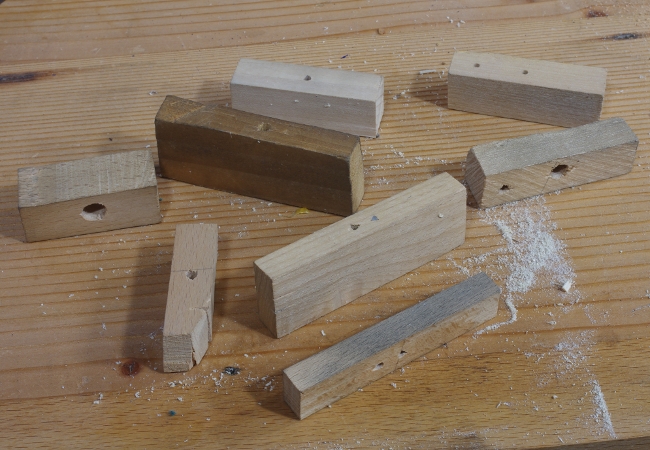
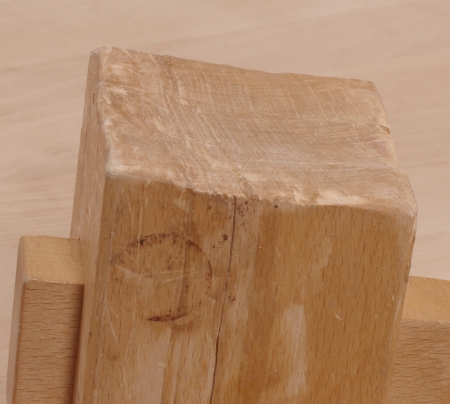
However, what interests me most is the question of if I could make a new one last longer. Everything on the original was very durable, except for the top of the head. It picked up a habit of splitting late in life. My first step was to take a good look at what had happened:
Notice that the face has become concave after repeated pounding. The fractures are all mostly in the top 1/3 of the head. I suspect that what’s going on here is that smacking something (like a holdfast) on the upper part of that concavity put a lot of shear force along the top, and that’s why it did what it did. Back in this post (way back when no one ever read this blog), I explained that I wasn’t going to put a bevel on the top because I was being lazy. So perhaps those bevels aren’t there just for show, and I knew one thing that I needed to do in the new one.
Because I didn’t have any really thick stock at the time, I built the old mallet by face-gluing pieces of wood. That turned out to be pretty durable, so I did the same thing this time, using the same trick to get the hole in the middle, except that I was considerably less meticulous about it:
I used a bunch of scrap wood this time (but from the same board as the old Thagomizer!), and decided that I cared only to (sorta) align the pieces on the bottom of the head because I’d just be chopping off massive pieces anyway. This might look a little stupid, but not nearly as stupid as what I did for the new handle:
I had the perfect piece of scrap, but it was just a tad too narrow, so I glued another piece of scrap to the end to get what I needed (and sawed most of it away in the end).
So I had the head and handle parts glued up, and it was time to shape everything. Here again, I was considerably less meticulous than last time. I sawed most of everything on the head, did the final passes on the top of the head with my jack plane with the deep camber, and chamfered the sides with that plane as well. As far as the handle goes, on the last one, I’d been all enthusiastic about using a spokeshave. Well, that spokeshave enthusiasm doesn’t happen nearly as often to a man who has a Shinto saw rasp in his hand. (Save the spokeshave for more delicate tasks.)
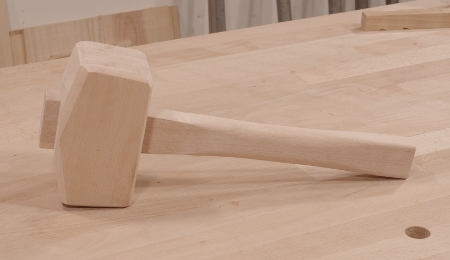
When everything was said and done (in a far less amount of time than the original), I had Thagomizer Jr.:
The top of the head is beveled down, the corners at the top are considerably chamfered, and the handle is a couple of inches longer. The head weighs a little less than the original, but the extra handle length probably brings it to about the same weight, but with a different balance.
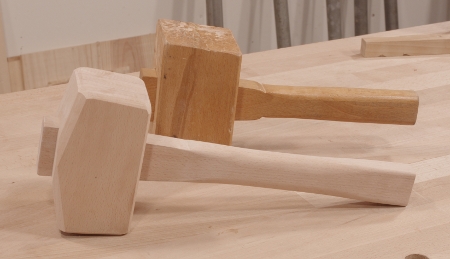
So I’m ready to start beating on stuff now. Here’s a comparison of the original and new one:
Time and use will tell if the alterations do what they’re supposed to do.
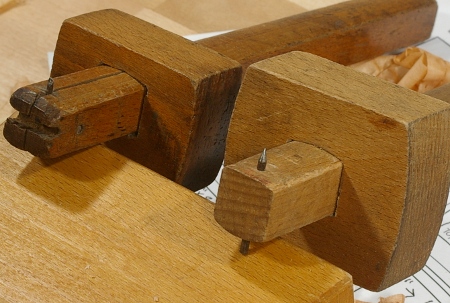
One annoying gap in my tool set has been the panel gauge-sized hole. I’ve gotten really frustrated with normal marking gauges from time to time, because they get significantly more difficult to use after you extend the arm more than a couple of inches. It’s not so much a matter of the length of the stock (especially in the case of my gauges), but more of a problem with registration. Keeping the stock at a steady height when you’re worrying about a long arm is a bother. Proper panel gauges include a rabbet to register on the edge of a board or panel when you need such a thing.
I decided to make my gauge out of scrap, and after scrounging around, I found this cherry offcut from the second nightstand project:
It was already 4/4, which was about the thickness that I desired (I’d originally thought about laminating two contrasting species, but decided not to waste my time jointing faces and waiting for glue to dry). After cutting it to length and approximate height, I jointed the bottom edge and cut the all-important rabbet:
In hindsight, it would have been a better idea to cut that rabbet until after I’d mortised the hole for the arm, but it didn’t end up mattering much.
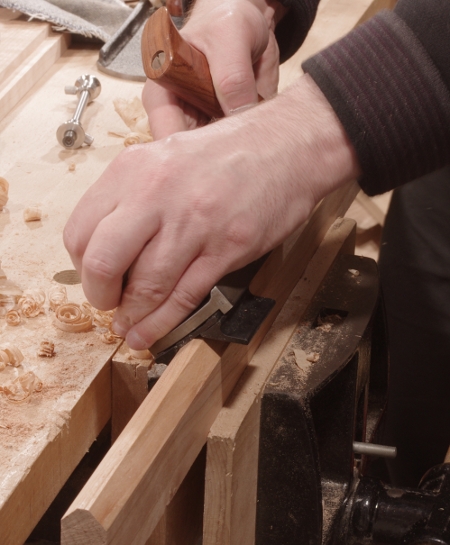
Next I cut the arm’s profile. After my previous experience with arms flopping side-to-side and fixing them, I decided to take a more radical approach to really locking the arm in place. The Lie-Nielsen panel gauge and a version of the Stanley #65 marking gauge rotate the arm 45 degrees so that there is a triangular profile on the bottom of the arm to really lock it into the stock. It’s the same concept as the ol’ “wedge crowds the arm into a corner” trick, and I thought it was worth a shot because people do seem to rave about the design.
So I marked it out a little on the arm that I’d chosen (another piece of scrap cherry), and roughed it out with my jack plane:
When I got close to the lines, I switched to my Veritas low-angle block plane with the chamfer guide attached:
You can see the profile starting to come through at the end.
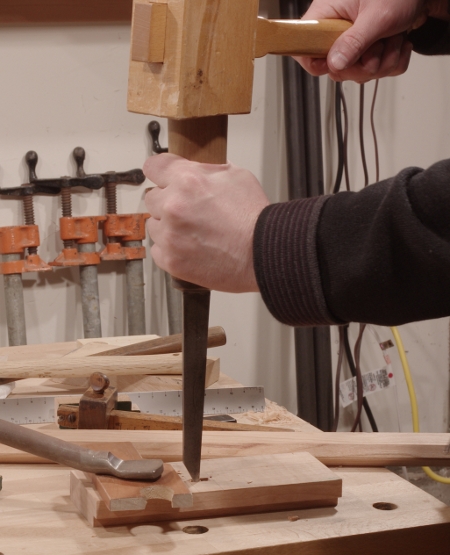
Next, I turned to the mortise. I just banged it out with a pigsticker as usual:
Then it was time to test-fit the arm and to see if this profile really did what it was supposed to do. I slipped a couple of wedges in where the thumbscrew would eventually go, then tried to get the arm to wiggle around:
Much to my delight, it worked. Keep in mind also that I wasn’t even being terribly accurate in chopping the mortise (call it “mostly sorta accurate”).
With everything fit, I shaped the top of the gauge (entirely with a coping saw and Shinto saw rasp), then bored the hole for the machine screw insert with a brace and auger bit:
The brass screw inserts have slots for driving them with a screwdriver, but brass is so malleable that the slots are next to useless. Instead, I use a screw with a nut threaded on to drive them in. In this case, I was using a hex-headed furniture connector to ensure that my driver bit wouldn’t slip:
This works well for driving the insert, but cherry being what it is, there was a little bit of spelching near the top. Yeah, I should have probably driven this thing in before shaping, but whatever–I just filed off that layer.
(Here, I must again remark that I would love to use wooden screws and threads for this. It would work wonderfully.)
To finish off the stock, I made a “saddle” for the thumbscrew and arm as described back in this post.
Now it was time to turn to putting the blade in the arm. I used a Millers Falls #5 to drill a couple of holes in a line at the end to make the mortise for the blade:
That miniature square I got in Japan really comes in handy.
To hold the blade in place, I used a smaller screw insert in the end (who knows how well this will hold up) and a stainless steel cap screw to go in the front. I made a saddle for this as well.
The blade itself is yet another small strip of spring steel. I’ll be honest here–I don’t particularly like using spring steel for this because it does not hold an edge as well as tool steel. However, it’s such a pain in the butt to sharpen the blades that I figure I’ll keep using spring steel until I can come up with some sort of honing guide for the marking gauge blades.
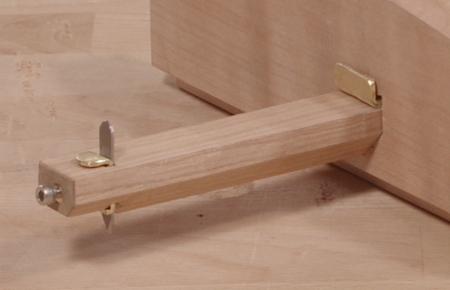
And that was pretty much it; the process only took a couple of hours. Here’s the finished product:
And a close-up of the business end, showing the cap screw and various “saddles:”
With all of that said, the important question is, “how well does it work?” I had to admit that I was a little bit doubtful on how much of an improvement the arrangement with that triangular/inverted-house-shaped mortise and arm profile would bring. It turns out, though, that it’s really something. The arm simply does not budge when you tighten the thumbscrew. It’s so impressive that I may do a retrofit on my previous marking gauge.
I’m still unsure about the blade-holding mechanism, though. I just hope that it doesn’t split the end of the arm.
This year’s annual transpacific trip included Japan as well as Taiwan. Unfortunately, I didn’t get to see too much in the way of wood/woodworking stuff; there was just too much on the agenda.
However, I did get to go to the Meiji Jingu shrine, and the second gate (torii) on the path there is one of the largest wooden ones around, and happens to be made of Taiwan Yellow Cypress:
(The sign says “hinoki from Taiwan”–They consider the wood to be interchangeable.)
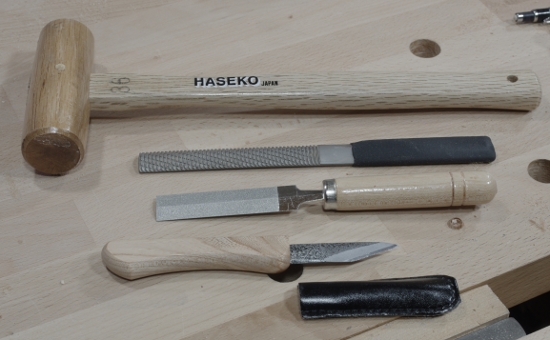
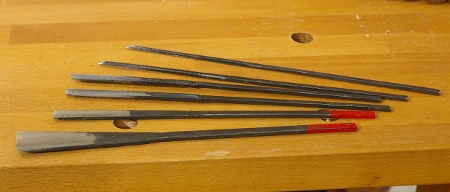
I didn’t have enough time to research tool shops in Japan, much less visit them, so I limited tool-buying to the home center-style stuff. To be honest, little odds and ends are all I really need right now. That’s a lucky thing, too, because the tools you get at the home center there are about a million times better than the ones you get in the US. Here’s the first batch:
At the top, a small mallet (wanted to see what it would do as a plane adjuster, plus I break the Thagomizer on a regular basis now–need to make another). Then there’s one of those milled-tooth files, that I’m going to try out as a half-round complement to the Shinto saw rasp that I like so much. Next is a diamond feather-edge file, because it looked like it might come in handy. And on the bottom is a general-purpose knife that I’m going to try out in my seemingly endless search for a marking knife that I like. That knife is nothing special, just the kind that a schoolkid might have used for sharpening pencils as described in Odate’s book.
Next is a couple of small squares:
The 4″ Lee Valley double square is at the top for size comparison. The 10x5cm square seemed like a handy size to me, and the tiny try square (made in Sanjo City) was too cute to resist. Note that even though these tools were not bought from a specialty shop, their accuracy is still guaranteed, and indeed, both are right on. You just can’t get that kind of thing from a home center in the US, and the price of these squares really isn’t excessive. We’re talking about $10 here.
I wish I could have gotten one of those larger framing squares that have the beveled face, but it would have not survived the airport baggage-handling gorillas. I suppose I can get those here, anyway.
Next up is a couple of sharpening implements:
I really have no idea what that thing on the top is, but it was cheap and it’s really coarse, so I figured that if nothing else, it could maybe be used to rough up the surface of my Sigma Power #120. I got the diamond plate on the bottom primarily for conditioning my waterstones.
Oh yeah, I got some shoji paper, too.
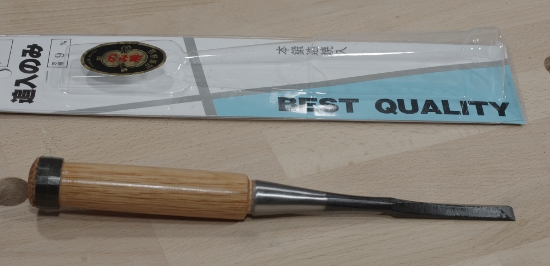
After leaving Japan, I went to the now-familiar tool shop in Taipei, and it turned out that I wasn’t quite done with Japan yet. I decided to buy my first Japanese chisel there for the hell of it (and to make Wilbur Pan gloat or something):
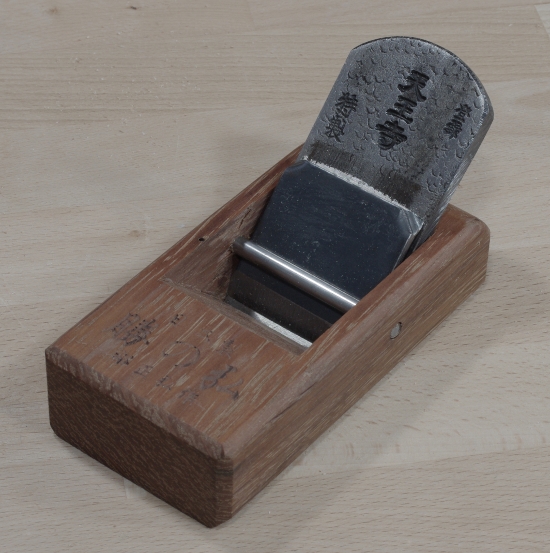
And I was looking for a smallish/medium smoothing plane, and got this typical Japanese-blade/Taiwanese body hybrid:
Annoyingly, the face of the blade on this thing was not flat when I got it–it had a very (very) slight convexity on one half of the edge. For those of you familiar with this kind of steel, though, you know that lapping it away is basically an exercise in futility, and it took me an embarrassingly long time to remember this.
So I tapped it out. I’d never done that before, and it was as nerve-wracking as everyone says it is, but I have to say that it worked like a charm.
Finally, the tool I was most looking forward to buying was a plain-jane Taiwanese-made rabbet plane:
Why? Because I’m fed up with my Stanley #78–a torturer of left hands since 1885. The one here doesn’t have a depth stop, though I could make one or clamp one on. And it seems that the convexity demon from the blade on the preceding plane infected this one, too. So I tapped out this one, too, this time with a little more confidence. Yay!
The maybe-not-so-strange thing about this plane is that it’s designed to be used left-to-right. I’m not sure it’s going to make much of a difference, but it might give me an excuse to buy an antique Western rabbet plane to complement it.
I’m going to start a new feature that will appear irregularly, meaning “whenever I have material.” Essentially, when I have enough explanation for something that I messed up, I’ll write about it. I was originally going to call these “mistakes,” but I realized that they aren’t that serious (and Kari Hultman agrees). It’s an important distinction because I don’t want to give the impression that you can’t get anything done if you goof up, goof off, or whatever. I’ve completed several projects while doing the “wrong thing.” The contradiction is that in woodworking, completing a project is essentially never the wrong thing to do. Just ask your significant other.
So here we go with the most obvious one: I bought too many stupid bench planes, and didn’t know what to do with them. You’re going to see a lot of confessions like this (if you haven’t already) due to the release of Schwarz’s The Anarchist’s Tool Chest, where he goes into detail about this. It is a recurring thing, though–seems that everyone has to go through it because otherwise, you really don’t know for yourself.
Let’s start with jack planes. I knew that I needed a jack plane and I got a pair of metal Bailey-style models early on because they were not expensive. I got one working well as a general-purpose plane and I was really happy that I was able to get the thing to take nice shavings. So far, so good, but that didn’t stop me from buying more. I ended up with four #5-size ones. I don’t know why, because I use only one of them. I’m currently thinking about adapting a second to shooting-board use, so that would still leave two extras. And that #5 1/4-size plane I picked up? I’ve used it maybe once, but it sure is cute.
What’s probably worse is that I didn’t put a serious camber on my jack plane until, what was it, three years after I got it? That was almost a year and a half ago. Stock prep has never quite been the same since. I’d made a scrub plane, which is great for getting really icky boards into shape, but it never occurred to me that I should have something somewhere between that and a straight edge.
What was I thinking?
So I’m happy with that thing, but am I finished with jack planes?
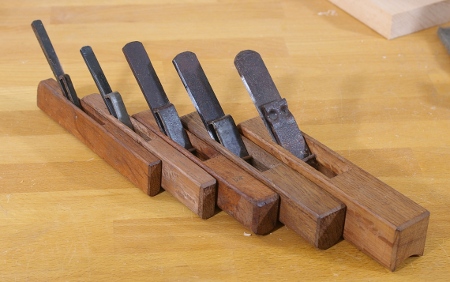
Oh well, the answer doesn’t matter. Let’s talk about smoothers now, because we have to. At my peak, I had five metal #4-sized smoothers. I’m down to three: one that does what it’s supposed to do when it’s sharp, one that I don’t use so much, and another that I’m prepping to give to a friend. I have a wooden Taiwanese plane that works wonders as a smoother, and I’m thinking about rehabbing a coffin smoother because wooden planes are awesome. And there’s the #3 size that I’ve got, too. It works great but I never use it.
This would be a nice set. The coffin smoother isn’t tuned, though.
At least smoothing planes are small, though. I don’t have as many as a hardcore addict, so they’re easy to stow away and sort of forget about. Unlike jointer planes.
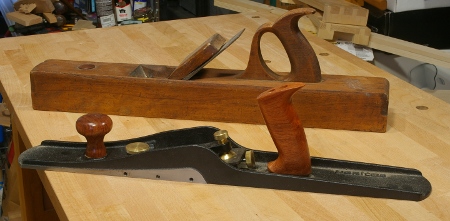
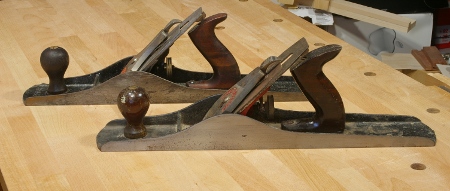
I’ve owned five jointer planes. I had two metal Bailey #7-size examples and they worked okay, but I was never terribly happy with them. I gave one to a friend. I also had a #8 that needed some work. I gave that one to a fellow BAG when I realized that I hadn’t gotten it to work yet because I never really wanted it to.
And I was still in jointer hell. The one that remained and I actually used, I didn’t like very much. There was just something about it that bugged me, so this year, I bought two more at about the same time. One of these was a woodie that a friend picked up at the flea (thanks, again, Kirk!). The other is Veritas bevel-up jointer (BUJ). Now that there is a serious plane–and I think it cost more than all of my other bench planes combined. I flattened the sole of the woodie with the BUJ, set the woodie for a thicker shaving (kind of like a fore plane), the BUJ for a fine shaving, and maybe, just maybe, I’ve escaped jointer hell. I found stock prep on the nightstands v2 project to be much less of a chore with these. Remember the phrase, “coarse, medium, fine?” The woodie is medium and the BUJ is fine. On thin boards where the blade is wider than the stock, you don’t need to use a smoother.
If I’m lucky, this will be the end of the jointer debacle.
Oh yeah, and of course, I have two Bailey #6-size planes. I never use them because I’ve found that I prefer the jack plane size as a fore plane. Why? The #6 is too heavy for my weight. When I make a diagonal stroke with one, it’s too much effort to lift it back toward me. I’ve noticed that guys who like the #6 size for this sort of thing tend to outsize me. So, would a wooden plane be better, or should I just stop fooling around and be happy with my jack plane?
Too heavy.
That final question is why I’m still in the goofing-off stage with bench planes. There are two sides to this. On one hand, goofing around with tools can seriously detract from projects that you’re supposed to be working on (and believe me, those are my top priorities). On the other hand, there are certain tools that can save you a lot of time on your projects if you spend enough time goofing around with them.
I have slight excesses of other tools, but the plane surplus is the one I’m embarrassed about. So this will probably be the only goof episode about too many tools.
Back when I made this marking gauge, I thought I pretty much had it all figured out with the mistakes I made there (see the bottom of the post). But it turns out that one of them was kind of unresolved; how to get the arm to have no play whatsoever (as it was, the arm would swivel a little horizontally because its hole wasn’t a perfect fit). I’d thought of a bunch of stupid ideas, from making the arm trapezoidal to mounting the tightening screw diagonally, but mostly, I forgot about it because it still “kinda” worked and that’s all I cared about.
Then when I was milling the frame components for the new nightstands v2 project, I needed more than one gauge, so I grabbed one of my old Stanleys and noticed that the arm didn’t budge at all. Neither did my other old Stanley. Both of these were rectangular-like arms tightened with a screw from above, like the one I’d made. What did they do that I didn’t?
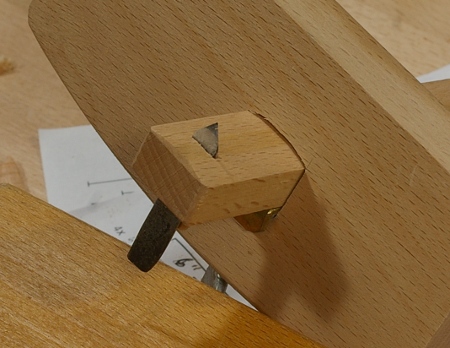
I flipped them over and found the answer.
The bottoms of the arms are slightly convex and the hole in the marking gauge stock is slightly concave. The gauge on the right is a Sweetheart-era Stanley and is a really good fit.
Upon realizing this, I immediately knocked the wedge and blade of out the arm of my shopmade gauge, pulled the arm out of the stock, and used my Taiwanese shave to put a slight radius on the bottom of the arm. Then I put a rasp into the stock and made a mating surface, and the result looks like this:
The fit doesn’t look terribly appealing to the eye, but doing just this much instantly solved the problem, and I’m really lovin’ this gauge now. At that point, I figured that I’d better get back to milling rather than try to make this dorky tool look better. That was a couple of days ago. I finally got around the taking the photos today. It took about five times as much time to take the photos and write this post than to actually fix the problem. Peh.
(And maybe someone else out there has already figured this out and posted something that I haven’t read.)
[Edit (17 June 2011): OK, so I finally bought The Anarchist’s Tool Chest by Christopher Schwarz, and unsurprisingly, on page 118, he talks about this problem. His solution is to do the wedge-jams-the-arm-into-a-corner thing. That works, but he gives short shrift to thumbscrew-tightened models, which is, of course, an injustice, because they work fine after you do what Stanley (and whoever they stole the idea from) did. Also, he says that the thumbscrew is knurled brass. Well, I couldn’t source any brass for mine, and a lot of new ones sure aren’t solid brass, if they contain any at all. I think a wooden thumbscrew is best (Stanley used these), but I don’t have a tap and threader, so I couldn’t do this. Anyways, it’s another datapoint.]
When preparing for this year’s trip to the tool shop, I decided to try to concentrate on purchasing tools that I believe I actually need (imagine that). I had a few ideas already, and I started out with a pile of Taiwanese carving tools–primarily outchannel gouges, but also a V tool and some other stuff:
I also got a big pile of hollowing and rounding planes:
Of course, right away, I might be straying from the “buy what you need” mantra, because I’m not sure I really need all of these. However, they’re so much fun and so cheap (less than $10 each) that it’s hard to resist. And as usual, the blades are great: forge-welded cutting steel on softer metal with hollowed faces that take just a minute or two to flatten. I sharpened and tested all of these in almost no time at all.
When I saw this compass plane, I realized that I didn’t have one and that this was probably a good time to get one:
This plane exhibits a very common scenario for the better planes sold in Taiwan: a blade made in Japan (supposedly) and a body made in Taiwan. There is also a double-convex version of this plane, as seen a blog that doesn’t seem to exist anymore.
It’s a wicked fun plane to use. I had to try it out; I first gouged out a curve in some wood and then smoothed it out with this thing. It’s really remarkable how easy this goes when everything is tuned correctly. Although this wasn’t the cheapest tool in the shop at about $30, it’s really hard to beat the performance at any price.
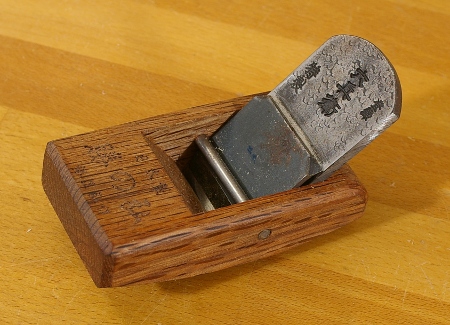
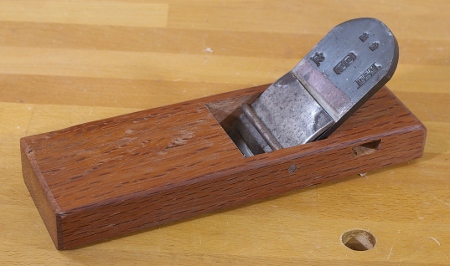
The final tool that I’m going to talk about for this year’s trip is another plane. I got to wondering what a full-sized Taiwanese bench plane would be like. However, as I mentioned before, most bench planes in Taiwan are either wholly from Japan or have a Japanese blade with a Taiwanese body. The shop had one bench plane with all-Taiwanese components, though, and at $35, it was about a third of the price of the hybrids, so I bagged it:
I didn’t have to wait long to use it, either, because while I was still in Taipei, Uncle had a cabinet door that didn’t fit. So I sharpened the blade with the same sandpaper that I used for the chisel on the old cabinet.
It worked fine for this purpose, but it was a job that didn’t need finesse–I wouldn’t have had the time for that, anyway. Not only was the sandpaper (“Matador” brand, 1200 grit) not quite as fine as I had wanted, but the body was new and probably needed some tweaking. I also set the blade for a rather thick shaving.
When I brought it back home, however, I had time to tune the plane. So because it’s somewhat similar to a Japanese bench plane, I dug into Odate’s book and looked at Wilbur Pan’s blog for his experience first, then looked at what I had in front of me.
The first thing I did was to sharpen the blade on my waterstones, and I got a wonderful edge in no time. However, I also noticed something that I still need to think about–this blade was fairly well-cambered, so its initial grinding had it set up as sort of a jack plane.
The type of plane is important because you’re supposed to set up the sole differently depending on its purpose. The rougher the cut, the more you’re supposed to hollow the sole, or so the story goes. However, I don’t need another jack plane, and because the mouth on this one is ultra-tight, I decided that I might want to keep my options open and proceed with caution.
However, something needed to be done to the body because it appeared that the wood had moved slightly since production, causing some of the sole in front of the mouth to protrude a little from the level of the mouth and end. I suspected that I was having trouble with this because my shavings were not of a consistent thickness. I verified this with a straightedge using the method that Odate describes, and quickly marked the high spots. He says to use a scraper plane or something of that nature to take down the high spots (and form a hollow). Wilbur Pan likes to use a card scraper, and I would have done that as well, except that I am silly and haven’t actually gotten around to making one.
I ended up carefully using my Veritas low-angle block plane to knock off the high spots. I didn’t really hollow the sole because I would rather use a scraper for this. But it was enough for a semi-serious test of what the plane can do, and it does make a delightful shaving. A little more work on flattening out the camber on the blade, and this thing could easily be my go-to smoother.
This brings up an important question: What exactly am I doing? After all, I have more bench planes than I can shake a stick at. It seems to be, though, that the more I use wooden planes, the more I like them. It doesn’t seem to matter if they’re western or Asian planes–I simply like the way wooden planes feel, and I’m really starting to appreciate how easy it is to adjust them. Perhaps I will downsize a few of my metal planes sometime.
Someone (who?) once said, “Wood on wood–sure feels good!” There’s a lot of truth to that.
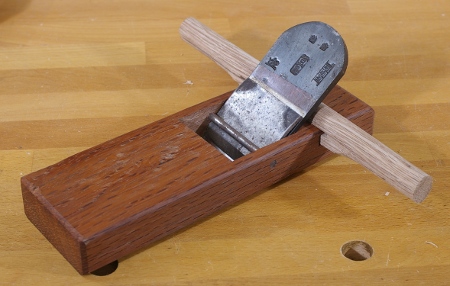
PS: In case you’re wondering what the rectangular hole underneath the blade is, for, the plane comes with a removable handle. When fit, it looks like this:
I believe this is for getting a sturdy grip to pull when using the plane for tougher work, but I’m not too sure. I don’t think it’s the sort of thing you’d use two hands on because it’d be hard to control like that. I likely won’t be using it.