
Warning: What I talk about in this post is not considered standard practice in any way, shape, or form, and may be completely wrong.
I’ve been wanting an old wooden western-style smoothing plane for a while, and a couple of months back, I picked up an Ogontz/Sandusky coffin-style smoothing plane at the Alameda flea. It’s nothing special–beech body and a big laminated blade a little more than 2″ wide.
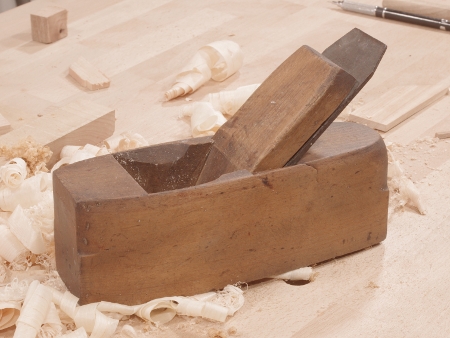
It had been used to a certain extent, and the most annoying thing about it was the way the blade face had been sharpened–it was rounded over. It was the “ruler trick” gone mad, I suppose. It may have been done with a grinder. A lot of old blades turn out this way and they’re not particularly easy to sharpen when in this condition. Because there’s often no set angle you can use on the stone, you can’t register it on anything. In this case, it was especially bad because it was quite convex, both across and up and down the face. Oh yeah, and it was pitted, too. Yuck.
I didn’t have time to deal with it, so it sat on the shelf until recently, when something occurred to me. Because the blade is thick and laminated like that of a Japanese plane, it might be possible to use the technique of “tapping out” to create a new flat for the face edge. I recently had to do this to a couple of blades and it seemed to me that it might be worth a try.
The problem is that I’ve never heard of anyone doing this to a Western blade. It could be just totally wrong.
So I tried it first on a blade from a big jointer that was suffering from a similar situation. To my surprise, it worked. But that was a large, brutish plane that I don’t use for delicate tasks, and I didn’t want to go blabbering about it until I’d tried it on something else, such as the smoother.
I’m not going to describe the process of tapping out because Wilbur Pan has already done that. I used a small ball-peen hammer and the silly anvil on the back of my cheap machinist’s vise (I tried tapping on a block of wood at first, but that didn’t work–I might speculate that the soft steel in an old western blade is harder than the (typically) wrought iron used in the Japanese blades). Because the blade was rounded along the complete width, I had to tap it nearly all of the way to the sides. The result was that the high spots on the face were now the edge (as desired), as well as a spot in the center (we’ll see that later).
Before getting any further, I must give you this warning: If you’re interested in tapping something out, don’t try it on a thin Bailey/Stanley-style blade, or any blade that’s solid hardened tool steel. It will most likely crack or chip, because steel that takes an edge and is designed to cut wood is brittle. I’m going to guess that if you’re really crazy about the idea, you might be able to temper the blade first, then tap it out, then harden it again.
Now it was time to sharpen the blade and see if it worked. The bevel was in terrible shape, and there was a big nick, so I had to take it to my (horrible) grinder first. Then it was off to my Sigma Power #120 stone. First I worked the face to what I thought was a pretty good surface, then I put the thing in a honing guide, reformed the bevel at 25 degrees, and finally worked my way up through the grits on both sides. Thinking that the blade seemed sharp enough, I tested it out.
That first test did not go particularly well. I couldn’t manage to take a thin shaving, shavings kept getting jammed in the throat, and the surface left behind was ridged, not smooth. Much not to my amusement, the edge also seemed to have gotten kind of messed up.
I found the shaving thickness problem pretty quickly; the bottom of the plane wasn’t even remotely flat (it was bumpy). A couple of passes with my Veritas jointer fixed that, and I was able to get a good shaving. I popped out a little crud in the mouth, and that fixed the jams. But the surface on the planed wood was still crummy.
Perhaps my sharpening job wasn’t as good as I’d hoped it was. I took a photo with my macro lens; here is about 3/8″ of the edge:
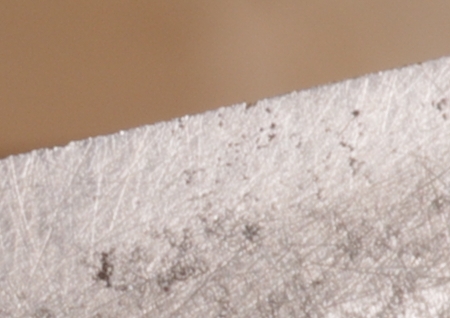
Basically, the edge wasn’t really sharp to begin with in some spots, and there was still some pitting across the edge.
So I hit the Sigma Power #120 again to remove the pitting, and also to try to get a better bevel shape. I ended up with this after working through my stones:

There was still a very tiny nick-like thing for that one deep pit in there, but would it matter? Well, of course it would sometime, but at this point, I was more interested in seeing if all of this wasn’t a waste of my time, so I put the blade into the plane and tried it out:
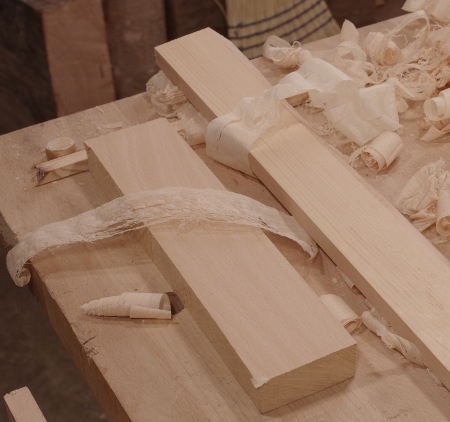
Bingo. Translucent shavings, polished surface, yadda yadda. The wood on the left is beech, and the one on the right is some mystery softwood (spruce or fir, most likely). The softwood actually had some figure that the plane brought out:

Yeah, that’s a little birdseye that’s trying to come out. Strangely, I didn’t find the ridge from that little nick in the edge, but I’m sure I will sometime, so I still have to take care of that.
In the end, the face of the blade looks like this:
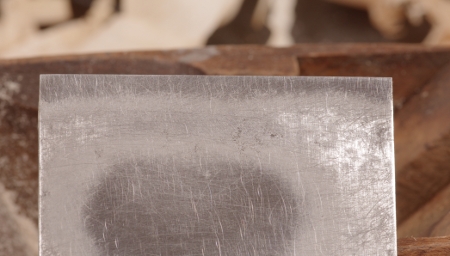
So in the center, it’s kind of the opposite of a Japanese blade–whereas those have the hollow in the center and are high on the edges, this one has a big annoying high spot in the center. However, that spot still gives you something to register upon when honing the face. It’s as easy to sharpen as a Japanese blade, too, because there’s much less surface area to float on top of the stone.
Well, we’ll see how this works out. As I hinted at the beginning of the post, this could possibly be one of the most idiotic things I’ve done to a tool.
