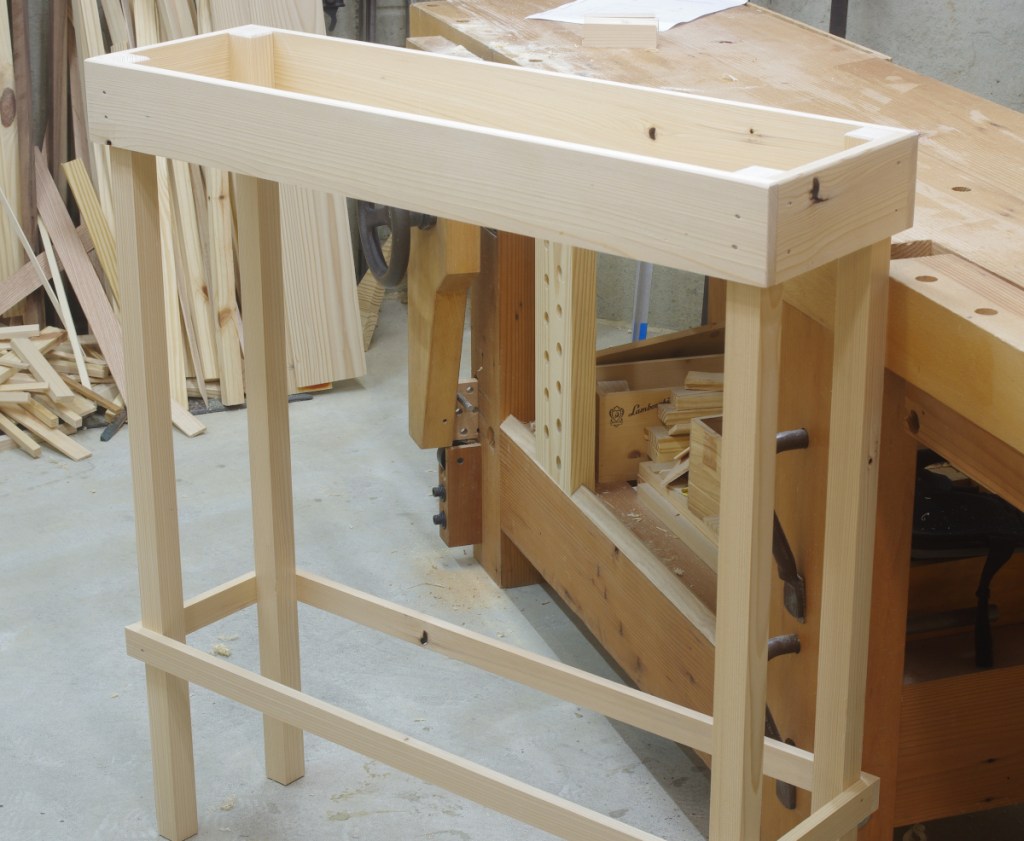
Among my various tasks for the past couple of weeks was making a stand for some pots and planters. This isn’t a raised bed meant to hold dirt by itself; it’s more of an enclosed shelf. It was not a complicated project, and it’s done:
I used cut nails to attach most of everything. I’d originally intended to completely eschew glue, making this a very nail-ridden project, but alas, I used glue to make a wide enough shelf, and to attach the shelf supports to the bottom insides of the long rails (the shelf lifts out for easier cleaning, or something like that). It just seemed easier to do it this way.
This is cheap construction wood that I had lying around (one “hem-fir” 2×8). There are several knots that I just banged out rather than wait on them to fall out–I didn’t feel like planing over them. Probably the most time-consuming part of this was just getting all the bits and pieces cut out and milled to profile.
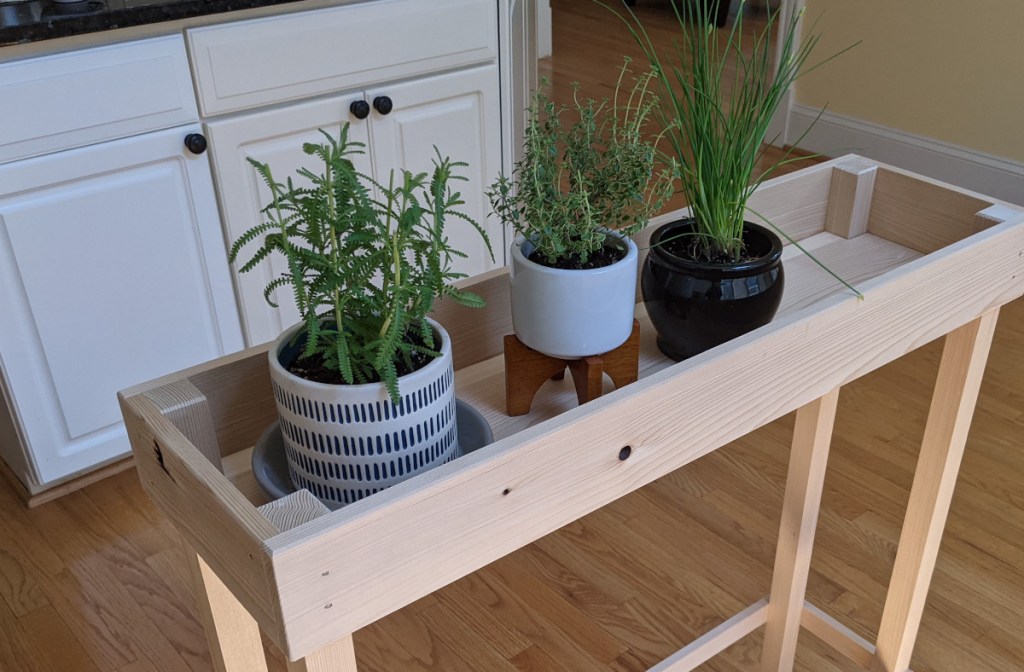
It’s now in use, with plants inside as intended, and I consider this out of my hands now.
I’ve been making a stand for the shop that will hopefully get most of the boring tools in one spot. The idea is that there will be shelves or drawers or something below that I can use for stuff like auger bits, forstner bits, countersinks, and that sort of thing. On top, I can put my small old drill press. Think of it as a boring hand-and-machine combo.
I’ve been making it out of southern yellow pine because it’s cheap and I have enough on hand. The downside is that some of my stock is really tough. I chipped my mortise chisel so badly that I had to regrind. Twice. And it’s not like I was doing “frowned-upon” levering or anything.
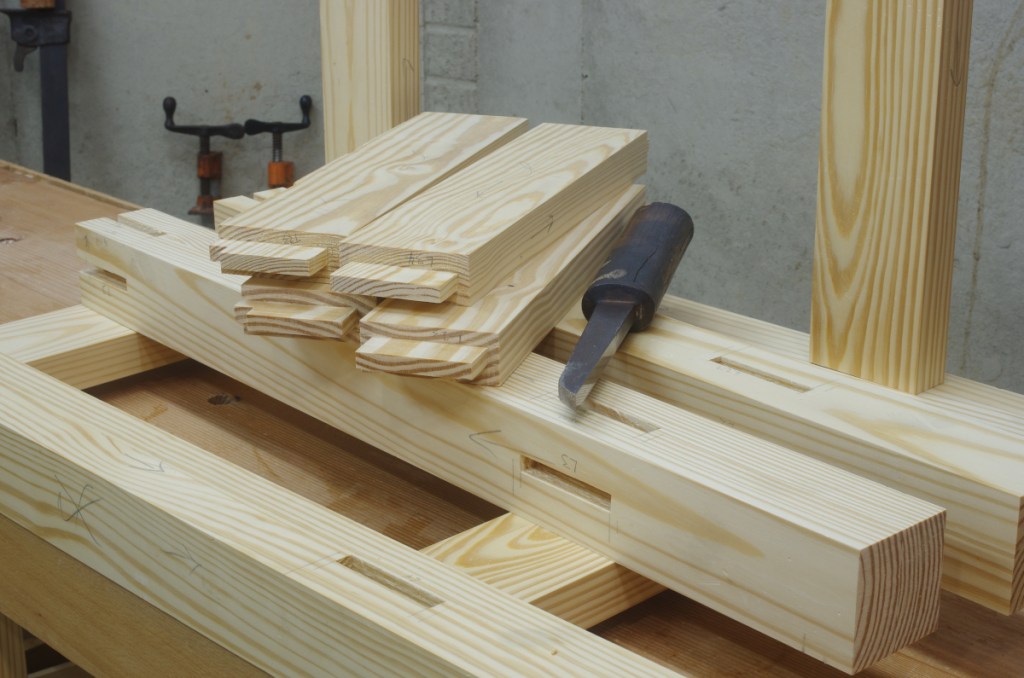
All of the mortise-and-tenon joints for the frame are done as of today, yielding this:
The victimized (yet ultimately victorious) mortise chisel is in view here.
Confession: After slugging it out through six tenons with my tenon saw, I did the remainder of the tenon cheeks with the bandsaw. Eh, nah, I’m not sorry about that. Some of the latewood in that stock was just ossified granite, and I needed to get this thing done.
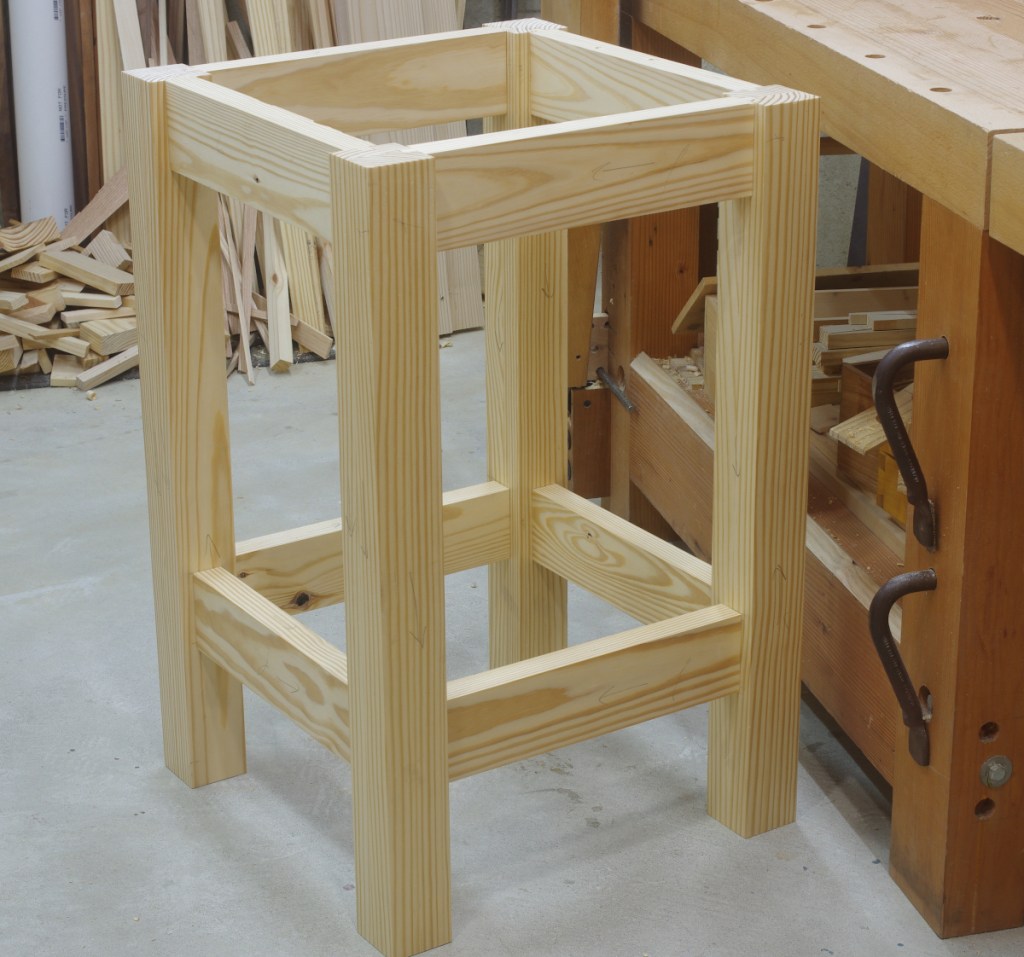
In any case, test-fitting everything seems to yield a thumbs-up:
It’s in clamps now, in the glue-up stage. I still need to make the top. Time to scrounge to see what I might have lying around.
This is actually the second in a line of stands like this that I’ve made, with the first done not too long after I first moved to this shop. That one is not quite as “refined” because I didn’t really bother to prepare the stock uniformly, and the legs are just 2x4s instead of the square posts that I made by laminating 2x stock for this new one.
Perhaps if I didn’t have a bunch of yellow pine lying around, I would have gotten some lighter-duty construction wood to make this from–it probably wouldn’t matter, except for weight.
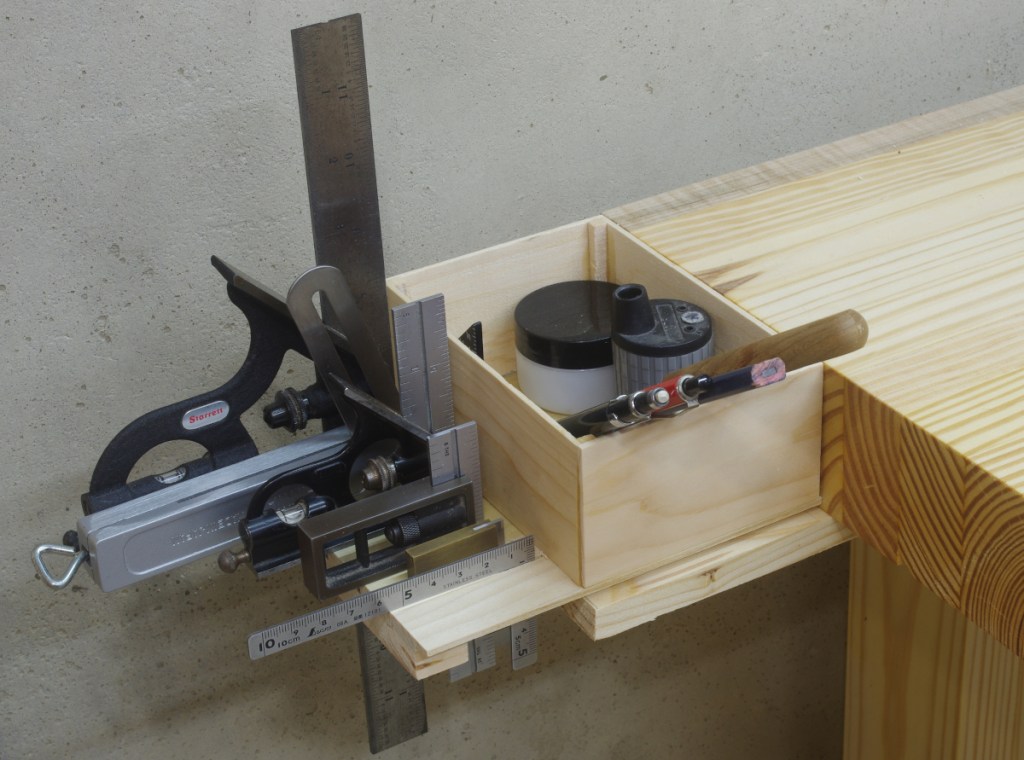
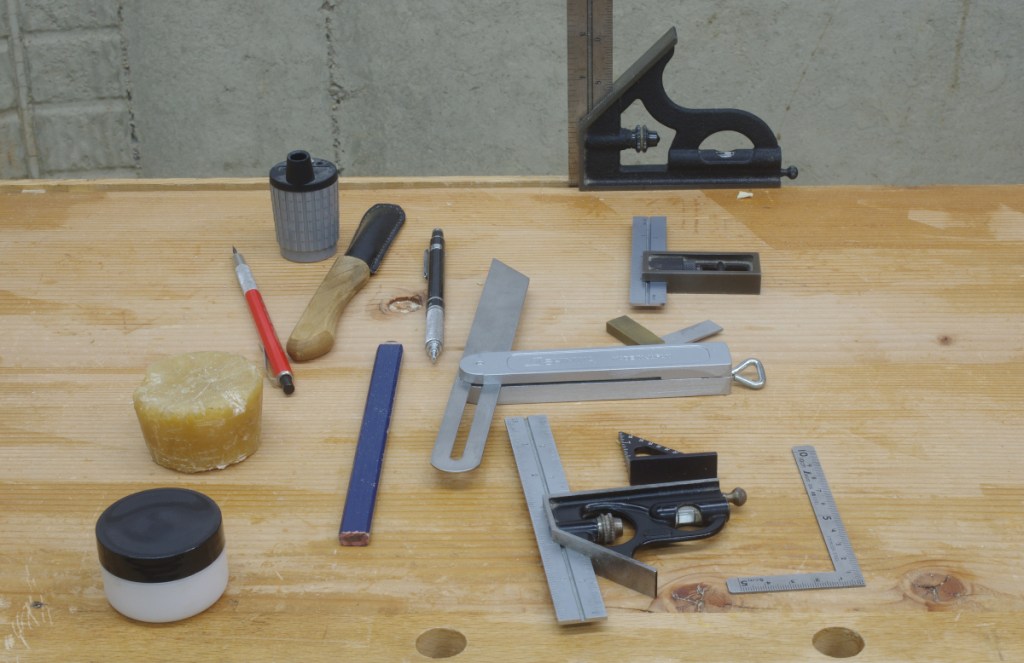
This may not be the most exciting conclusion in a two-part tool organizational feature, but here’s what I cobbled together:
Referred to by a friend as a “bench hanger-on-er,” I’m going to call this the “tool corral” on my auxiliary bench. It’s really just a platform with two areas for tools. The first and most obvious is the box, which was hastily assembled and glued to the platform on the near side only (take that, seasonal wood movement). I have no idea if this is going to be even halfway durable, but at least it looks somewhat better than a plastic bin screwed down to the platform, which was my other idea. As you can see here, the box does not protrude above the benchtop, so in its unloaded form, it doesn’t get in the way of anything big that might overhang the bench.
The space to the left is a little less obvious when empty, and consists of a bunch of expanded kerfs that I (hastily, of course) made with the bandsaw. Then I “closed up” the edge by just gluing a strip of wood (in the same grain orientation) to the underside. This is for bladed measuring tools. I modified the near one by stuffing most of it with a strip of wood. Otherwise, one particular square would always tip and drop through.
I could have gotten more adventurous by adding a few spaces for chisels to hang in the front, I guess. Maybe I’ll still do that; I certainly don’t have any qualms about bolting on something else to this already-questionable affront to workbench aesthetics.
So here’s what it looks like in use:
I was originally going to build something to hold the pencils upright, but laziness got the best of me.
Except for the wax (for which I found another home), It sucked up every last tool that I’d previously complained about. Built using only scrap wood, I think this should suffice until I build a chest. If there’s anything I do like about it, it’s the way that the squares fit neatly and mostly out of the way. When I use the traditional-style tool rack on the back of my main bench, it always seems like the squares are either getting in the way of something, hogging space, or in danger of dropping through because the opening on the rack is too wide.
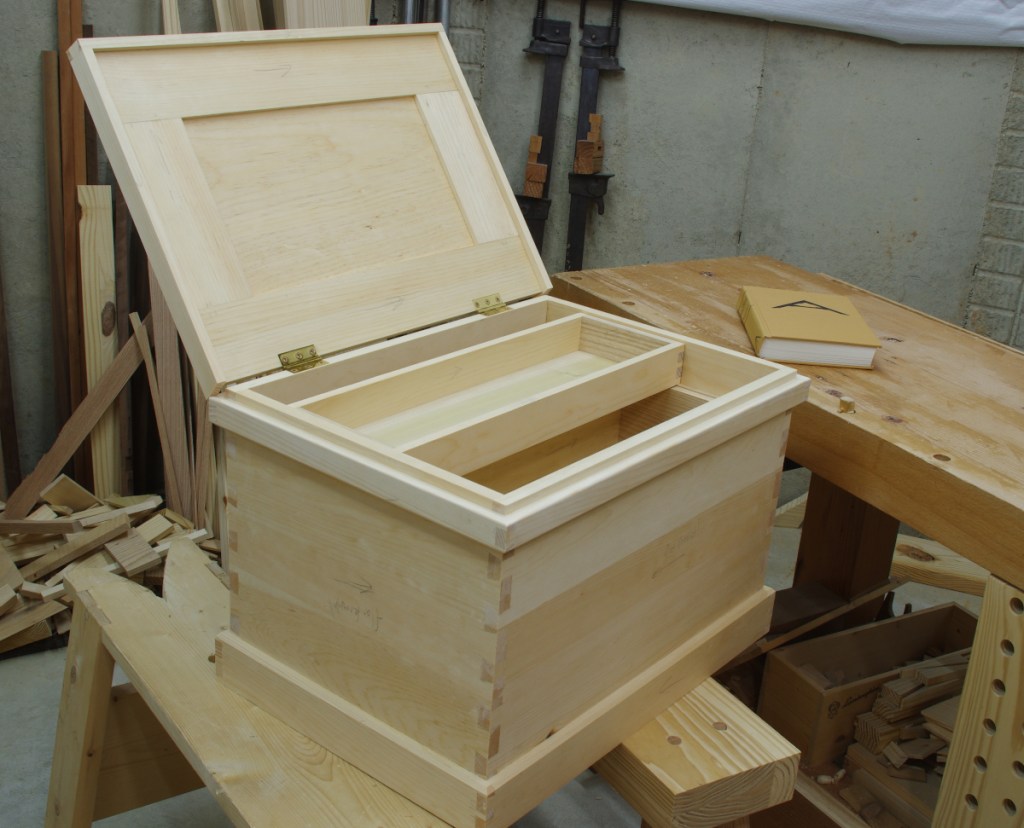
With the shell pretty much done, the three main tasks I had to complete on the chest project were the till runners, the sliding tills, and minor lid tidbits (hinges and attaching the upper dust seal).
The till runners were easy enough to make, but when it came to attach them, this was one of those times when I really had no idea what I was going to do. ATC and other sources say to nail or screw, then glue them on, and I guess it makes sense to use nails or something to serve as clamps (it’s not like they’d be useful for mechanical strength). But in my case, I wasn’t sure which nails or screws would work.
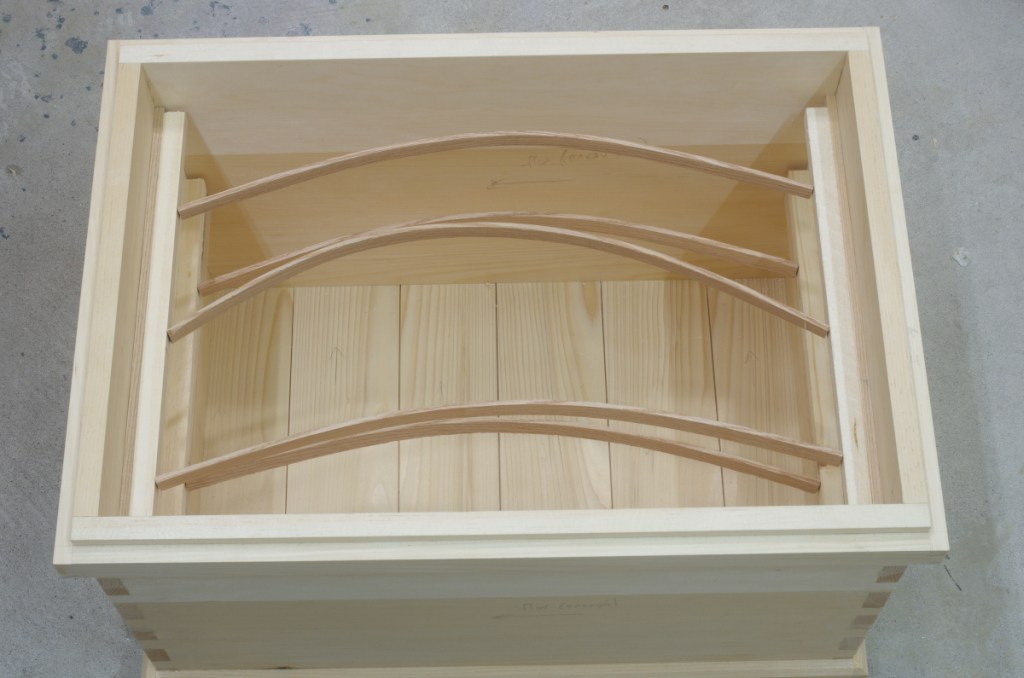
And then I somehow remembered the idea of a “go-bar” that’s often used to hold surfaces in place when gluing. So I made some spacers to reference off the bottom, cut an oak scrap strip to appropriate length, and tried it out on the lower till, first as a dry run, then with glue:
This worked, so I did the same thing on the upper runners. This time, though, I needed to use more strips and some battens because there was a much larger surface to glue:
I should mention that the runners are made of ash, except for spacer sections of the upper runners in white pine. The only real reason I did this is that I didn’t have wide enough pieces of ash ready to go in order to make them entirely with ash, so I figured that I’d try gluing up what I had on hand to some white pine to see what happened.
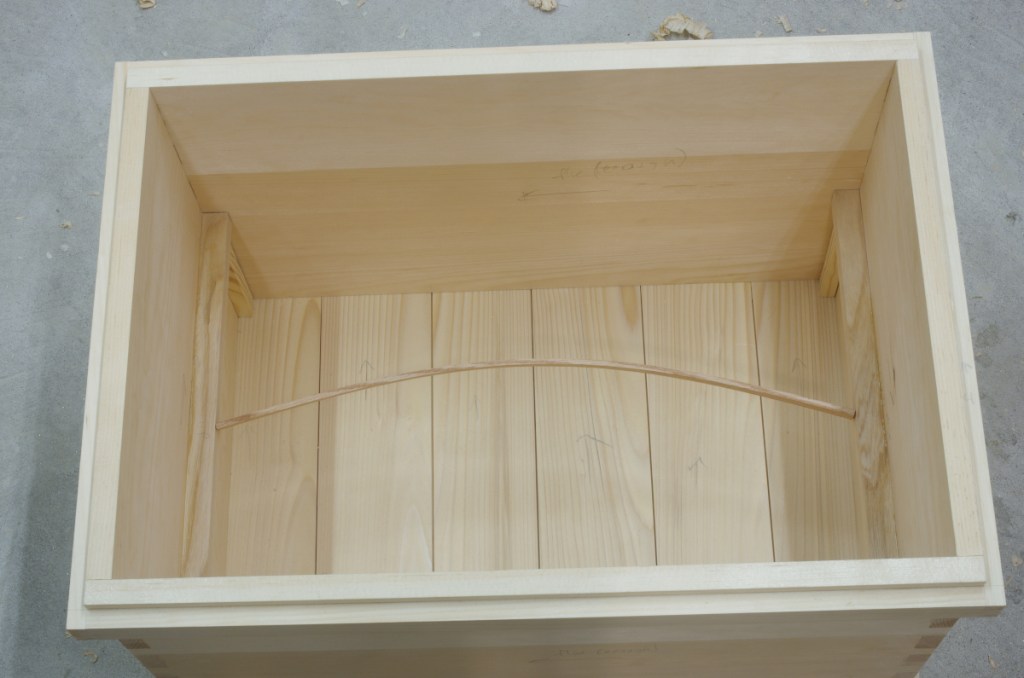
There are only two sets of runners because the plan was for only two sliding tills on this chest (recall that it is not intended to hold tools; I have specific ideas for what should go in here). The larger lower till is around 5″ in height, and the upper is around 2.75″.
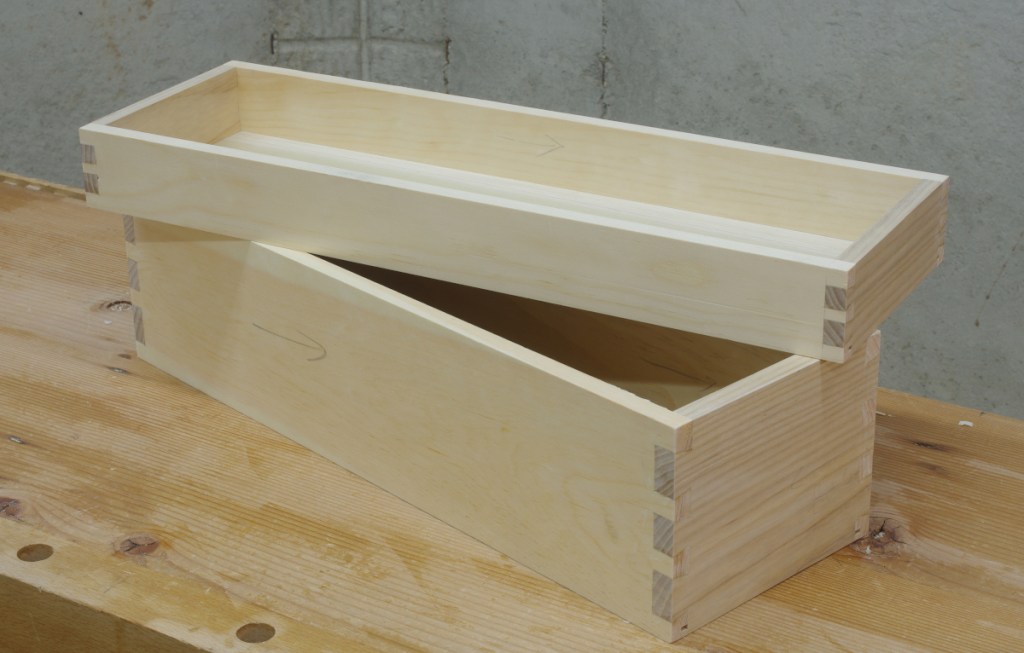
Tills are just dovetailed boxes, and dovetailed boxes are straightforward:
They have ends made of ash (for wear resistance), with the lengthwise sections in white pine. The bottoms are 1/4″ yellow-poplar. I disobeyed ATC and other sources, going with panel-in-groove bottoms. Nailing or screwing them would have probably been OK, but again, these are a little on the small side. However, I did use 1/8″ grooves and cut a rabbet on the bottom so that the bottoms would still sit flush and not waste any space:
I also didn’t care to close up the grooves on the ends of the tills. These are invisible when installed in the chest, so I care as much about that as I do the rears of drawers.
The final little bit of construction was to fit the hinges:
The bench-on-bench strikes again. It was really nice to be able to slide down the rear (the first time I’ve done that since I built it), put this thing flush on the top, and work at this height. This went fine, and just to annoy everyone who needs an annoyin’, I used Robertson-drive bronze wood screws. (I don’t think anyone will actually notice, though.) The only real complication with the hinges (the British-made ones from Lee Valley) were that for some reason, the countersinks were too small for the screws (despite being advertised to work), and I had to expand the countersinks. Glad I had a HSS countersink.
With the lid hinged on, I was finally able to attach the upper dust seal to the lid, round off the top of the mating lower part, and put everything together:
Yep, only two hinges. That’s fine for something this size.
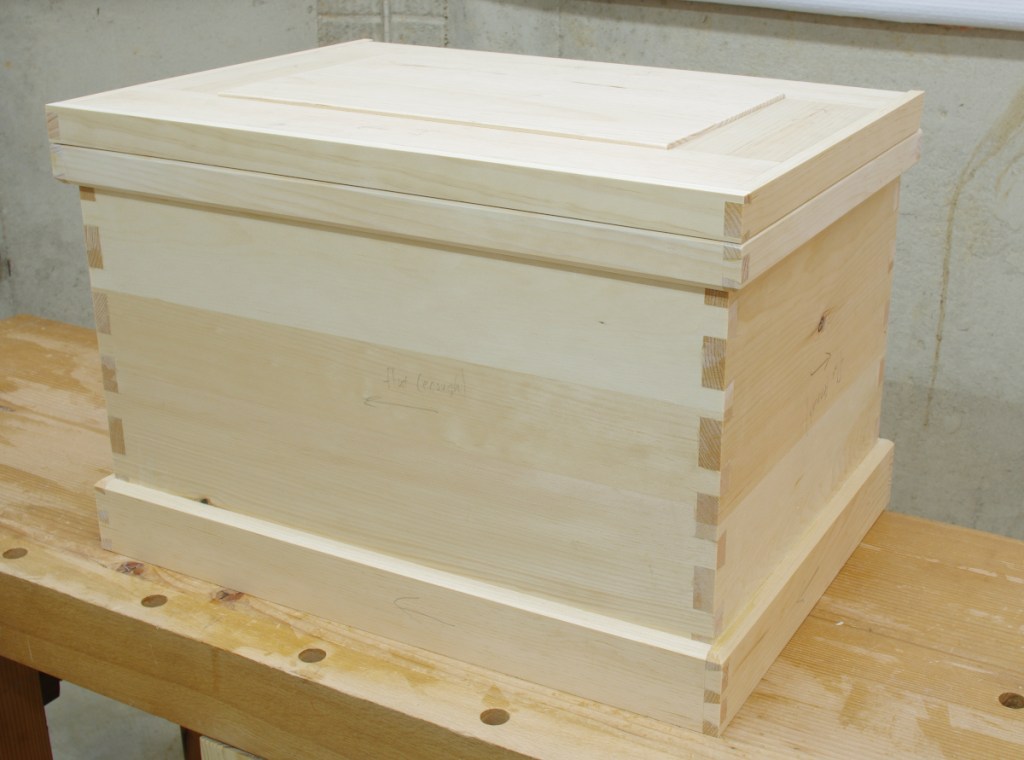
Closed, it looks like this:
So now pretty much all that remains is to prep it (sand), paint it, and put some stuff in it. I suppose that I might also put some batten strips on the bottom. Stay chain? Eh. Huh, would nitrile-infused cork be a possibility on the rear of the stops?
I’ve got a dumb problem that’s been lurking for years (with the exception of when everything was in storage). It’s this:
I use these tools regularly, yet I have no regular places to store them. So they inevitably end up lying on the bench. I only managed to isolate them because I just finished most of the small chest build, and cleaned up everything else.
I’ve decided that I should fix this. The long-term plan is to make a “Dutch tool chest” that should end these kinds of shenanigans once and for all, but I’m waiting on the Fitz Treatise because I haven’t thought about how to approach it. Besides, waiting to see what she writes seems like a lame enough excuse to put off building it for a while. In the meantime, I’ve started building a stopgap thing that will hopefully take care of it in the interim. It will not be a “drawer off on one side” that you see in some old illustrations–I promise that it will be far more idiotic.
What I wonder is, how does this even happen in the first place? It’s not like these are uncommon tools. I’ve just had a really hard time finding the way I’d like to store them.
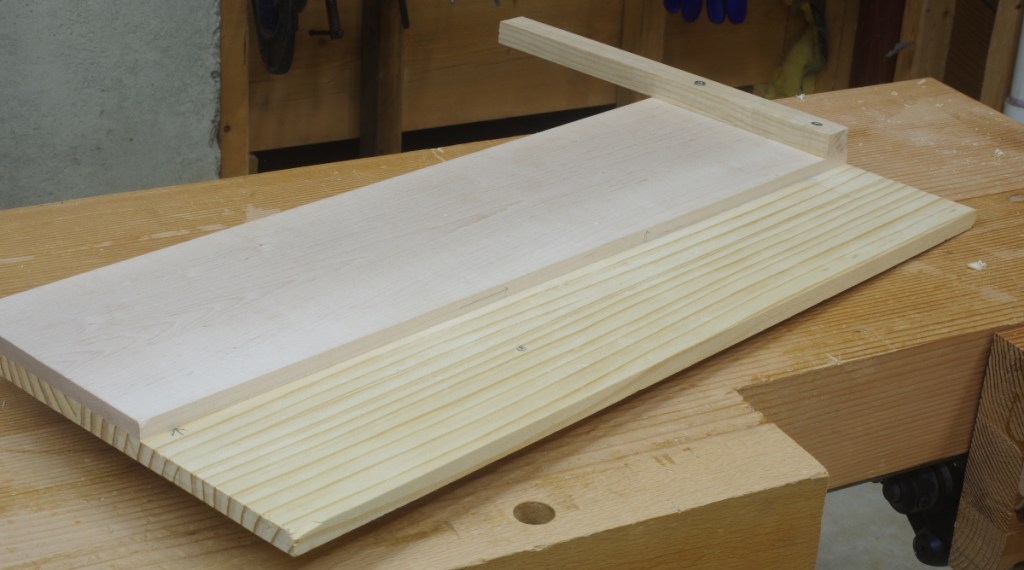
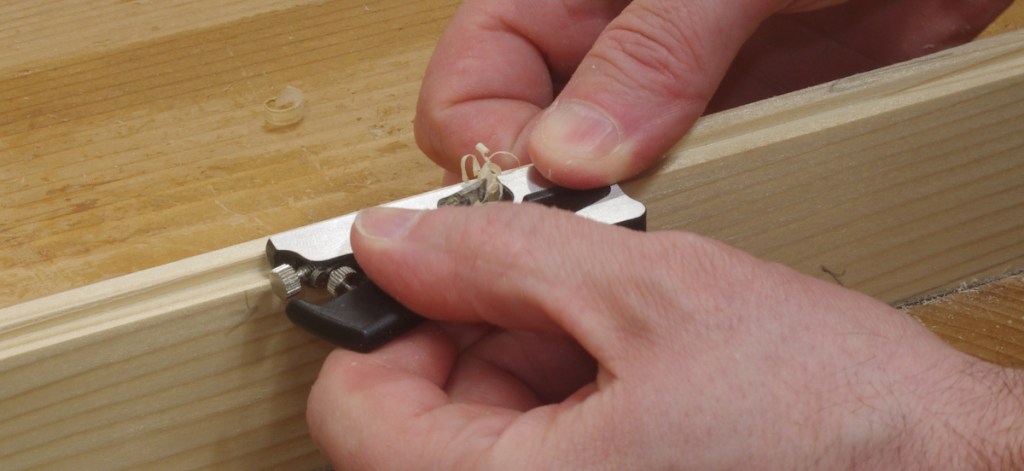
Earlier, I’d spewed some psychobabble about making a new shooting board, and I finally followed through on it. After reading through all of the relevant articles in “The Woodworker Volume IV” book and thinking through the inadequacies of the board I made a long time ago, I got to work and came up with this:
The articles all generally said to build it out of a “hard wood.” This makes sense for the stop, and the attachment to the top, because you can easily flex it out of true. However, most of the hard woods that I have on hand are flatsawn and I am worried about seasonal movement. So I made a base out of quarter(ish)sawn yellow pine, and laminated a thinner piece of maple to the top. I don’t know if the base will be durable enough for all the metal that will be sliding on top of it, but we’ll see.
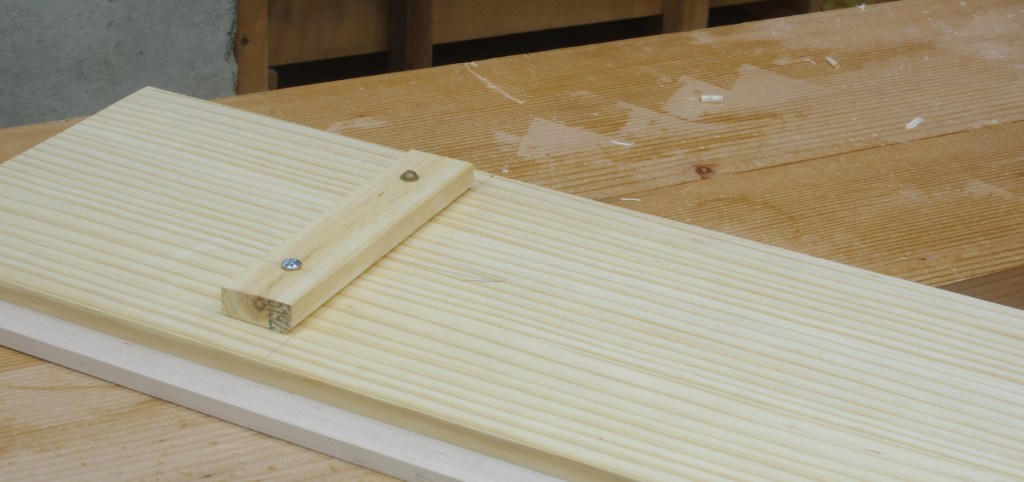
The bottom has a stop for butting up against the bench, and I made that bench stop just a bit smaller than the gap that my tail vise can open, so that I can lock it in place with the vise. I attached this with threaded inserts, with the thought that I could easily change the location if it didn’t work out:
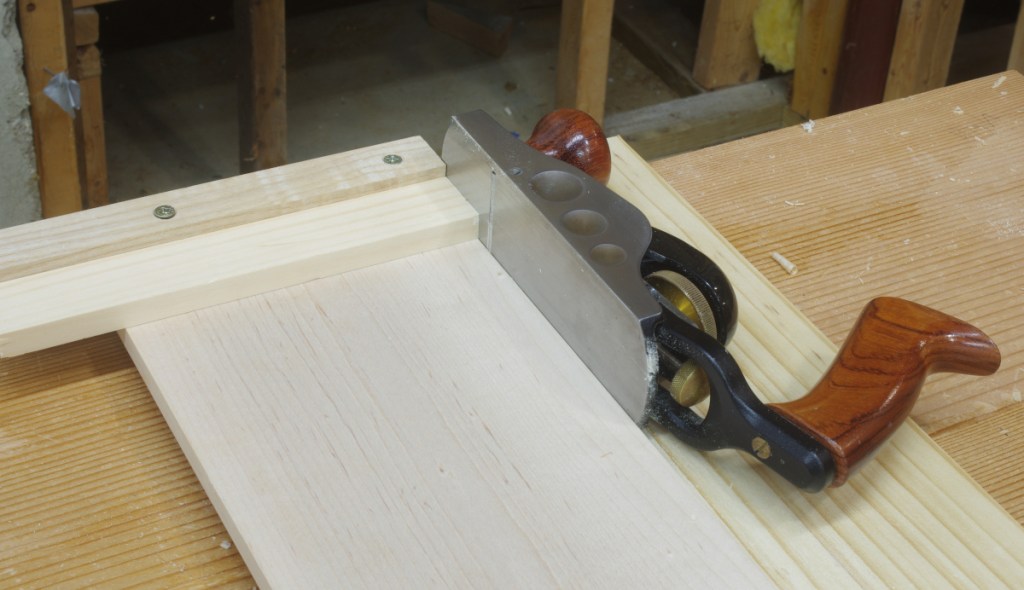
Here’s the shooting board in the vise position on the bench:
So far, so good. Here it is in use:
Yeah, I’m still using a low-angle block plane for shooting. Maybe I’d like to get a specialized chute board plane or miter plane sometime. For now, this works.
The “eagle-eyed” may have noticed the small chamfer that I’d planed to the bench stop’s interior face:
This allows for hanging the shooting board on a french cleat:
I retrofitted that modification to my bench hook on the right.
I made another shooting board, this as described in “The Woodworker” for (basically) jointing smaller work. Having no experience with that kind of board, I decided to make a quickie prototype in “hem-fir” to see what I could learn from it. I have nothing to share about this at the moment; I’m planning out improvements for the next version.
After doing that tongue-and-groove stuff, I nailed on the bottom of the chest:
I guess I sawed off the ends with a panel saw. I don’t remember. In any case, I’ve been looking through not just the “ATC,” but also “The Woodworker” articles on traditional chests, and noted that some of the articles in the latter had said to use screws on the bottom. I went with cut nails, especially encouraged by the fact that I actually have some cut nails on hand.
Then it was on to the plinth and lower dust seal. These are just dovetailed bits and pieces and are pretty much standard fare. Pictures of those are a little later down.
The lid frame and panel presented another typical situation: determining which boards to use for the frame and panel. You normally want frames to be rift- or quartersawn because they’re more stable, and of course, those cuts are difficult to find if you’re just looking superficially (which is close to what I was doing when I bought most of the white pine that I have on hand). Fortunately, I had this one:
At first glance, this looks like a board with a lot of knots and an obnoxious cup. But slice out the center part, make some cuts here and there, and you get this:
That kind of riftsawn cut is what I was looking for.
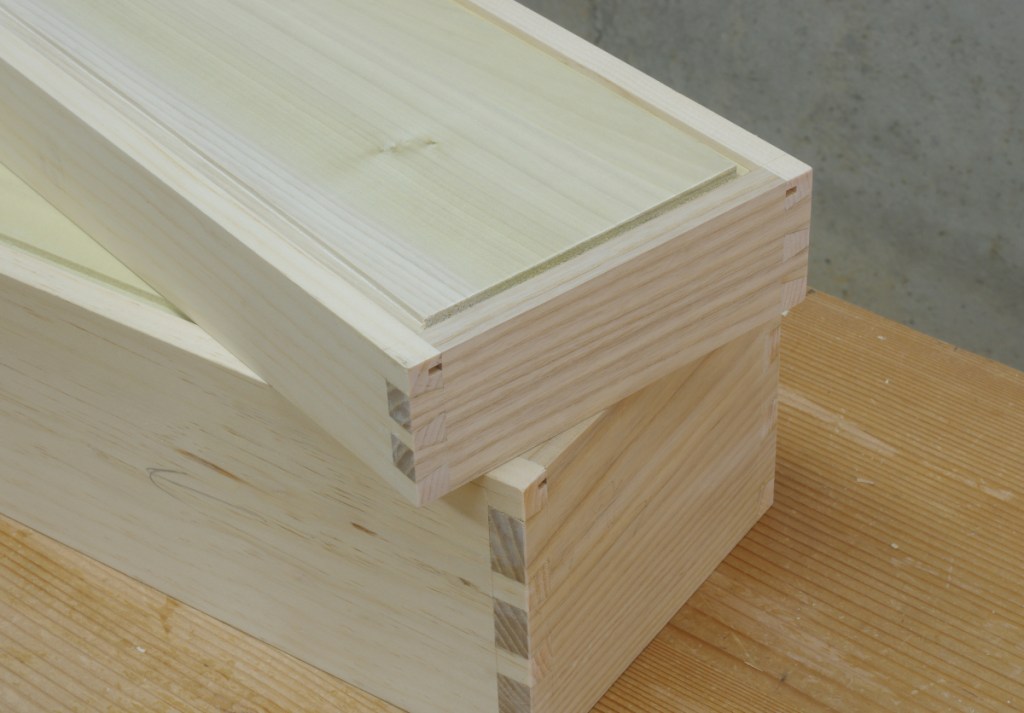
I made the frame using through mortises (something I rarely do), did the joinery for the upper dust seal, and am now close to finished with the outer shell:
In a case of not following directions, there’s a small knot on one side here. It doesn’t show much sign of wanting to fall out, but if it does, I could repair it, or something. Because this is not a tool chest, it may not be important.
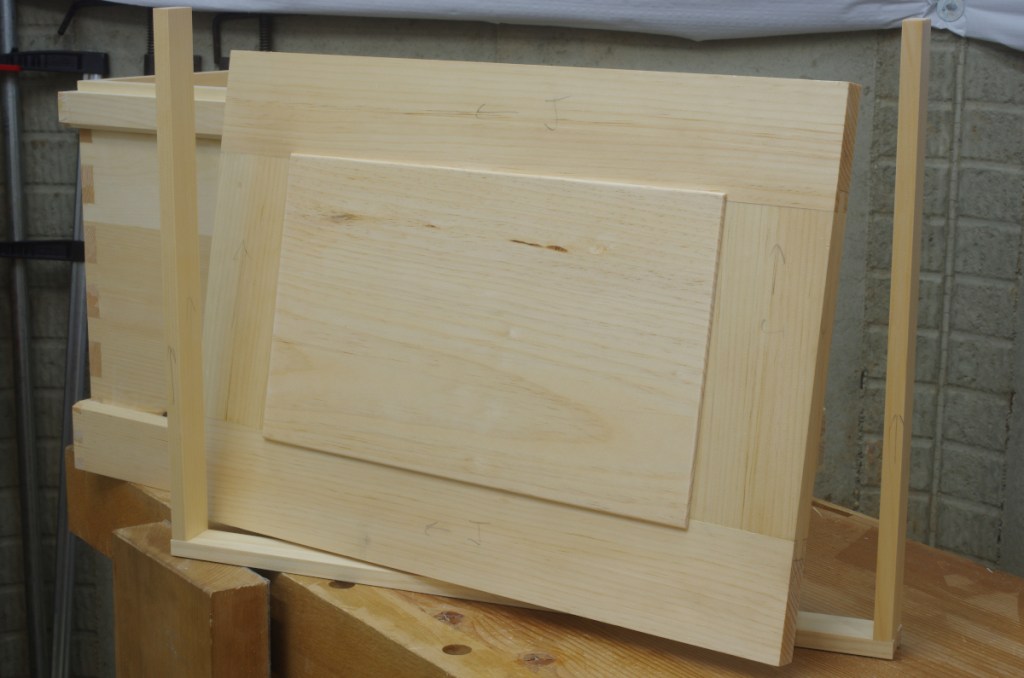
A look at the lid:
The upper dust seal is not attached or trimmed to final dimensions. This is because to really finish off the lid, I need to install the hinges, which I do not have at the moment. These are allegedly in transit.
I’ve already selected the wood for the sliding till runners and the sides of the tills themselves. I haven’t decided if I want to make some kind of divider in the bottom yet. Again, this isn’t for tools, so I don’t know if that kind of compartmentalization is appropriate here.
But it looks like I’m getting somewhere. In theory, this project shouldn’t take much longer.
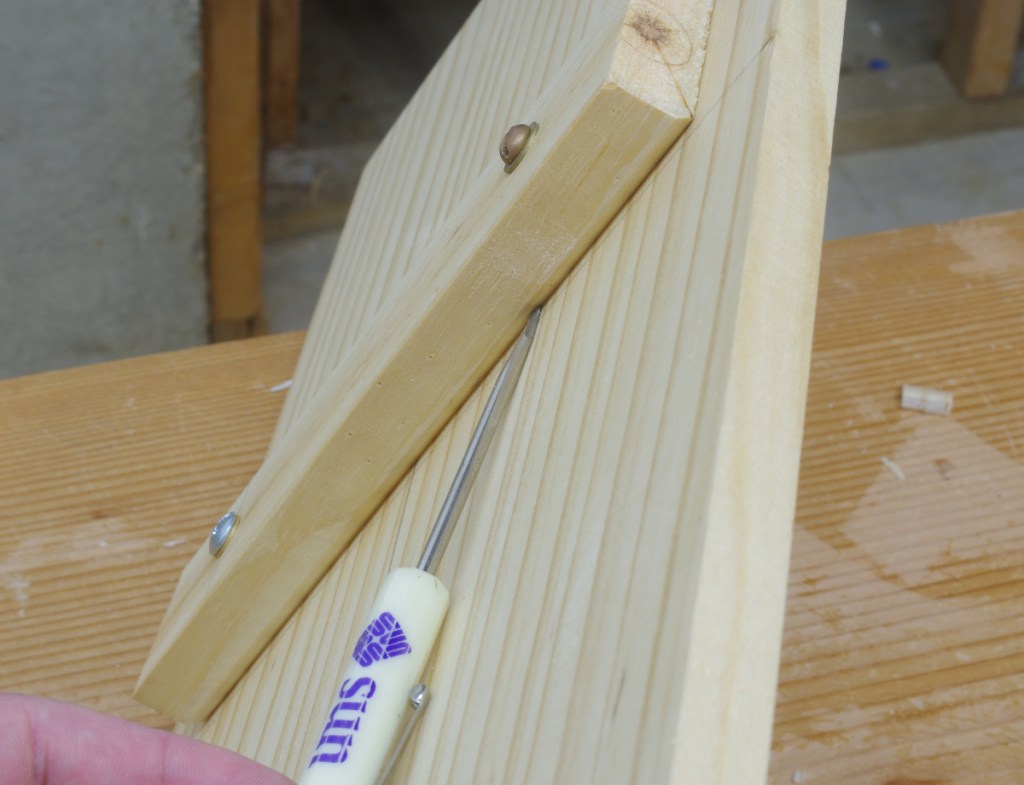
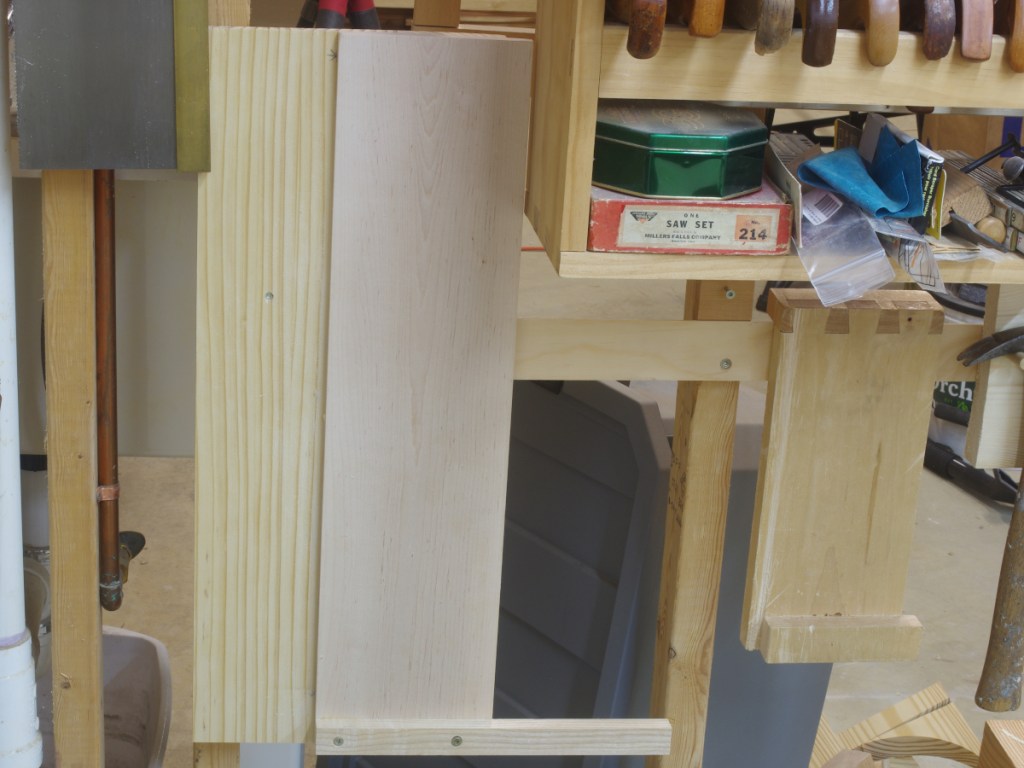
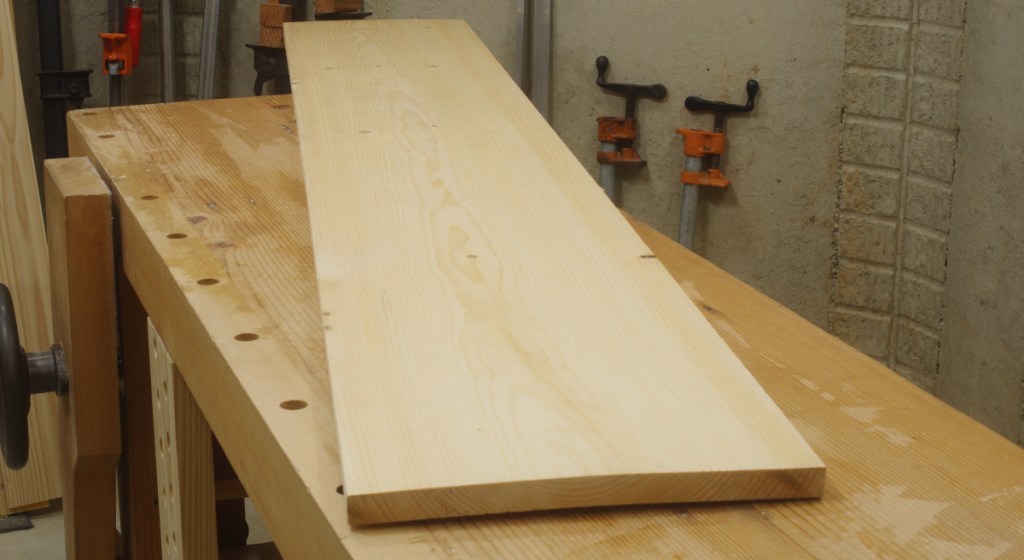
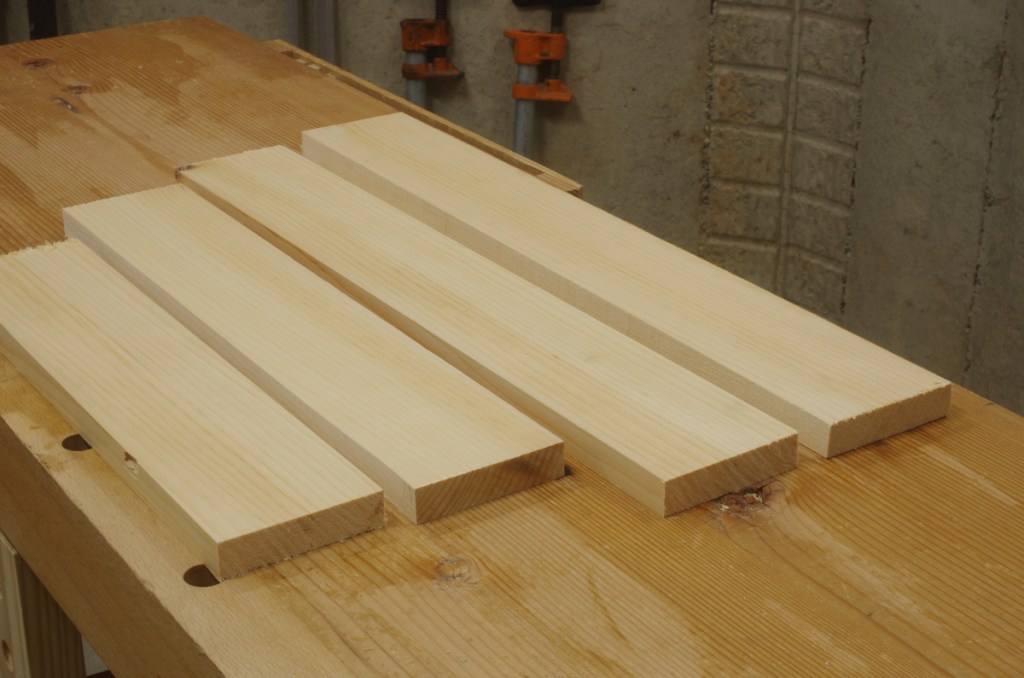
In my small chest build, I started working on the bottom. This is usually done with a series of tongue-and-groove or shiplap joints. I prefer tongue-and-groove, but although I do have a set of match planes (and a Stanley 45), they are for 1/4″ grooves, and I’m working with stock where 3/16″ would be more appropriate.
Match planes are great for pumping out a lot of tongue-and-groove joints. To do it at almost the same speed, I could spend $30 on the Veritas tongue-cutter for my plow plane in that size. But none of this is necessary, and I didn’t feel like waiting around for that cutter to arrive anyway. So I set out to do it with the plow plane. Doing so requires three cuts instead of the two that you’d need to do with match planes; the tongue is nothing other than two rabbets.
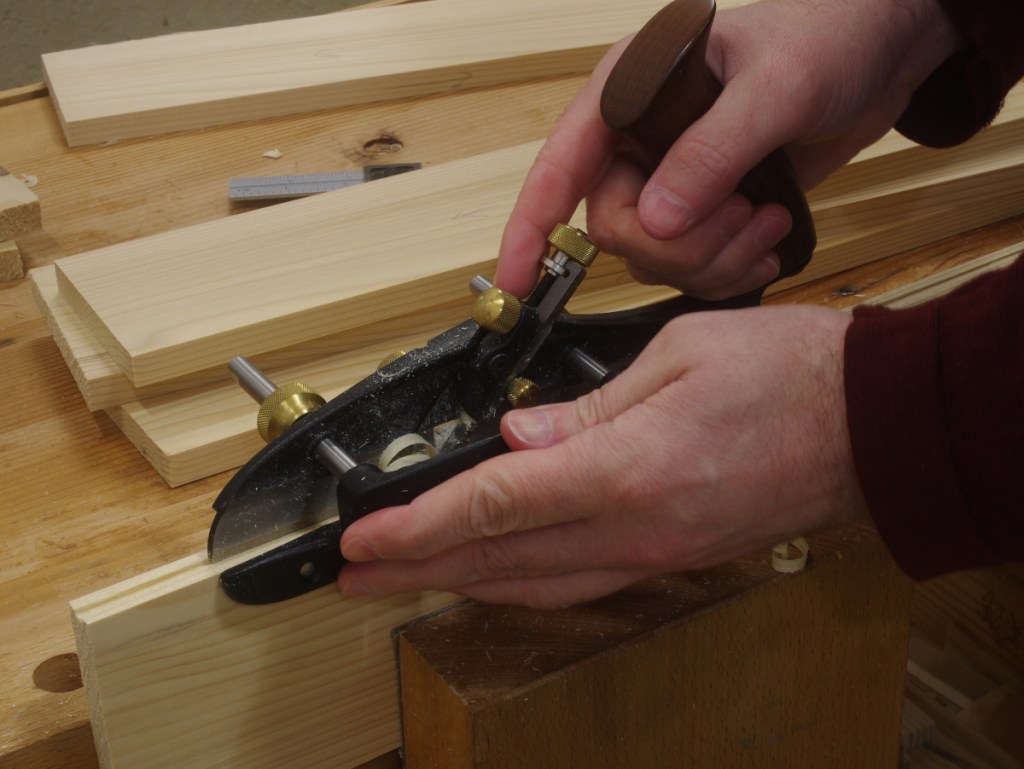
You start by plowing the groove side, which is the same no matter what:
It’s best to plow all of the grooves at the same time, so that you don’t have to constantly readjust your plane.
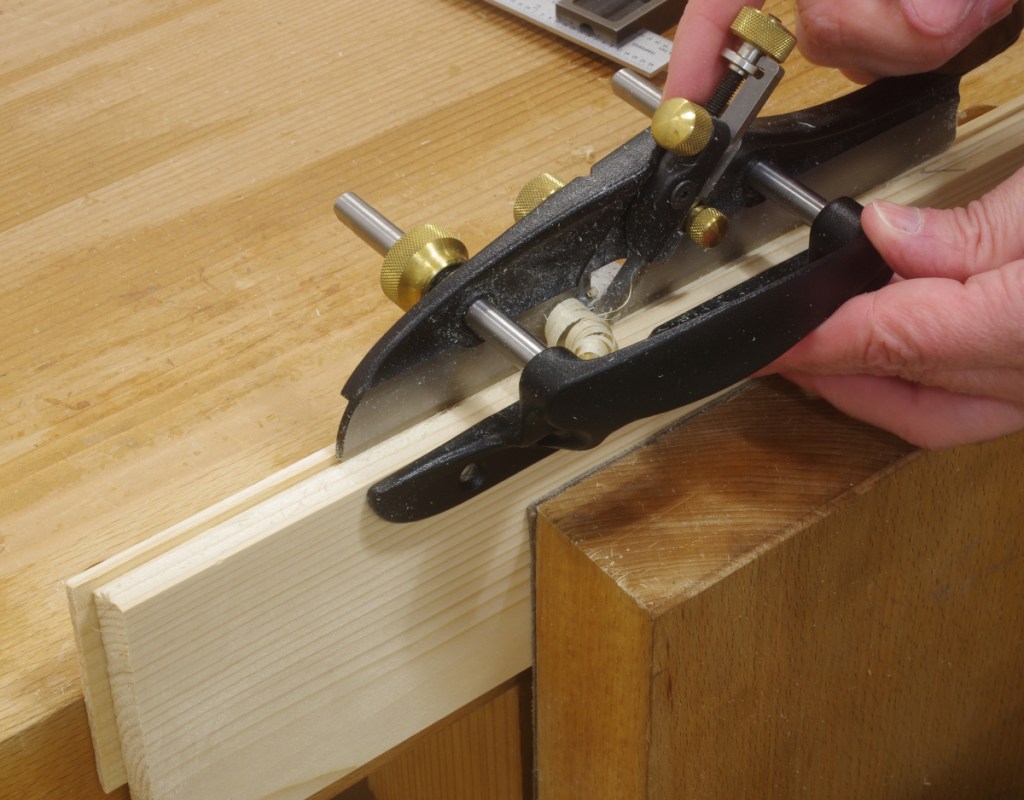
Then, with the groove side still up, adjust the fence so that the cutter sits right on top of the “outer” side of the groove (the side opposite the fence), with the sides of the blade and groove flush:
This is where I have to say that I really like the Veritas small plow. I could do this with my Stanley #45, but moving and locking down the fence on that thing is finicky and difficult to do with precision.
Now, flip to your tongue side of a board, and (here’s the important part) clamp a scrap to the side that you’re going to cut, flush to the top. Then cut this side of the tongue:
The reason for the scrap is so that your depth stop (which is usually on the side opposite the fence) has something to hit when the cut is complete. Yes, I made the mistake of forgetting to do this on my first attempt.
Again, it’s best to cut all of your boards at the same time. Then, put a board’s groove side up again, and set the fence so that the cutter rests on the “inner” side, like you did before:
This one is more difficult to see, so feel free to use any optical method of cheating that comes to mind.
Then flip back to the tongue side, and cut this second rabbet that makes the tongue:
You probably won’t need to include the scrap this time, because the depth stop should register against the tongue itself.
It’s possible that you might feel that the fit is too tight when you’re done. In that case, just adjust the “inner” side with a rabbet plane. I’m using my miniature shoulder plane because I recently said that I seldom use it, and I feel guilty for that. Or something.
If you’ve got a lot of these to make, one possible time-saver is to reset the fence to the trimmed side after you adjust the first tongue.
That’s more or less it. And I now have everything ready for the bottom of my small chest:
My next project is a scaled-down down version of the traditional English tool chest, for use in my office as a place to store the junk that always seems to pile up on my desk. Call it “The Conformist’s Doodad Chest” or whatever. Though it will resemble the original form, let me be clear: I don’t intend to use it for tools. It’s not big enough for that purpose, at least not for woodworking. It’s half the length of the ATC as originally published, but has only 1/6th the volume. The stock I’m using isn’t quite as thick; it’s not intended to be beat around a shop.
Coincidentally, Joe just finished a tool chest about the same size, of which he will be detailing the build process soon.
As I was preparing the stock for the shell, I realized that I probably ought to make a new shooting board because I was doing stupid improvised stuff like this:
I started on the shooting board, but it will be a topic for another day, maybe.
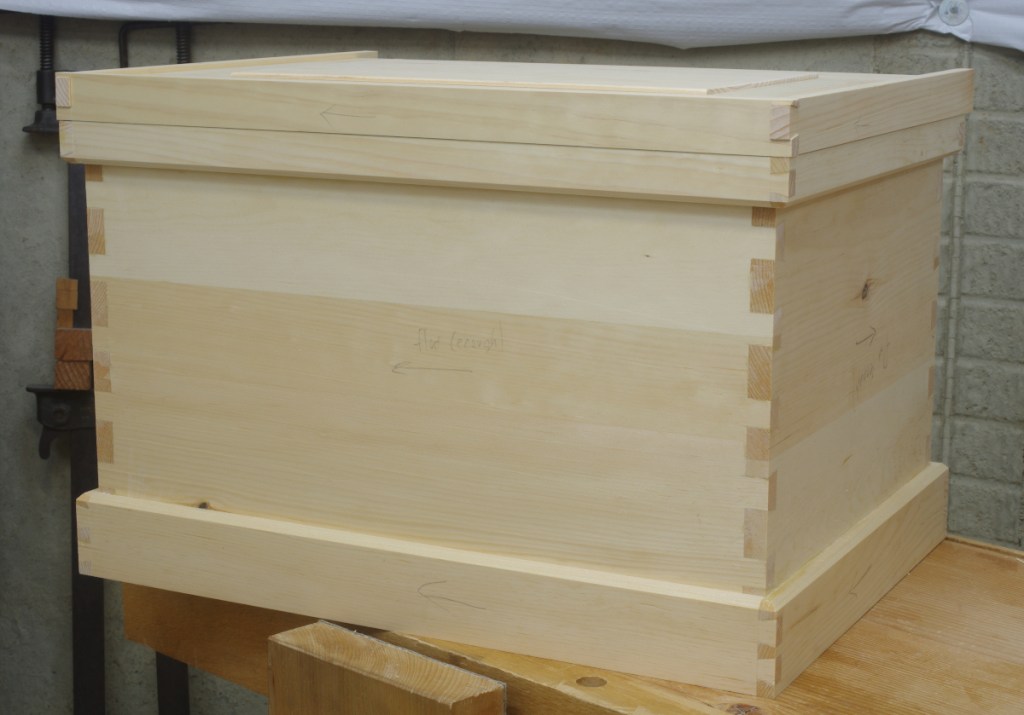
You have to make a lot of dovetails for these chests, and I used my new bench-on-bench to make them. So far, so good, and I soon had the sides of the chest made:
I glued them up yesterday, so now I have the shell with untrimmed dovetail ends:
That scribbling reads “flat (enough).”
Now, I suppose that since I have to make a bunch of skirts and tills and stuff, it’s time to stop kicking the shooting board can down the road.
[Edit: I’ve now made a video explaining this bench.]
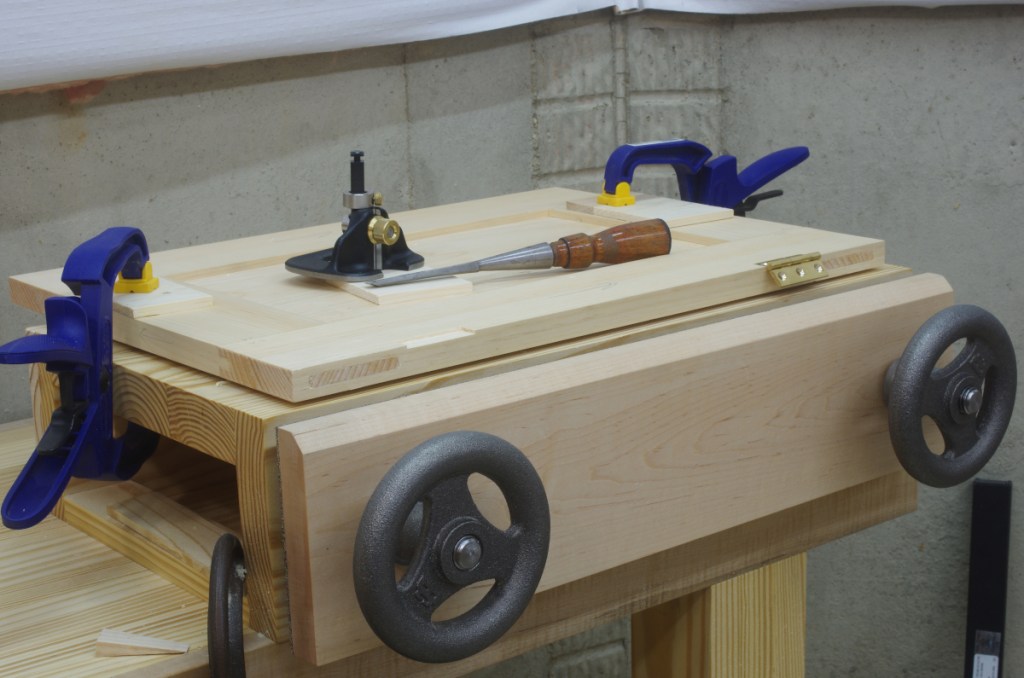
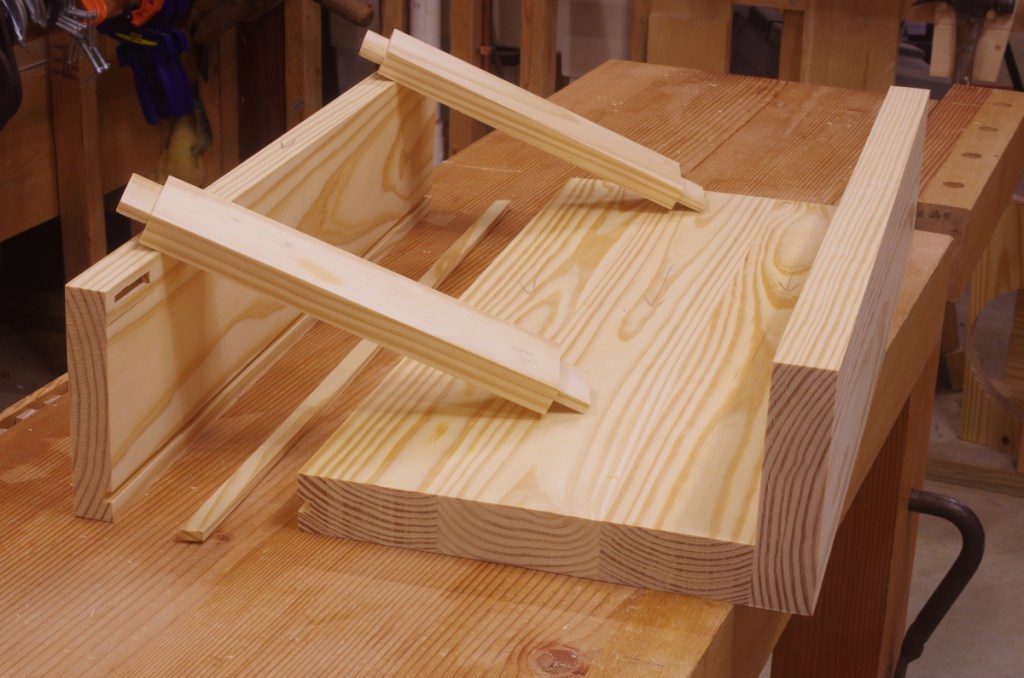
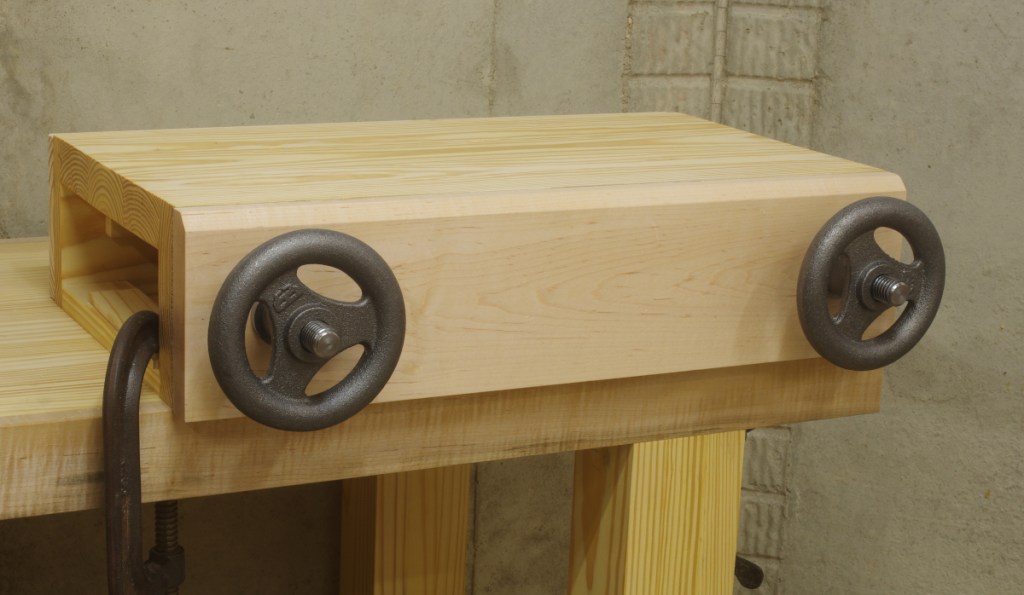
I’ve been interested in the idea of a so-called “Moxon” vise or bench-on-bench setup for a while, but there have been many other projects that have taken precedence. The idea of a higher sawing position for smaller cuts just seems like a good idea. Over the summer, I asked a group of woodworking pals what they thought of it, and I got some feedback including “just do it, you won’t be sorry.” Also included was a bookbinder’s finishing press treatise/rant from our friendly neighborhood bookbinder who stated that (among other things) if I really wanted to make something specialized for woodworking, I should go for bench-on-bench. Since there’s a near-zero chance of me wanting to get into bookbinding (sorry, Tom), I decided to go for bench-on-bench.
Unlike Joe’s elegantly-finished vise, I decided to go with the ever-sturdy southern yellow pine for most of the construction, and ordered the Benchcrafted hardware. As usual, the hardware sat for several months while I dealt with other projects.
There doesn’t seem to be much consensus on the construction of bench-on-bench, so I decided that I would stick to the “every one of these is different” rule and make a solid inverted “U” shape for the top and front/back, with some stretchers along the bottom. The stretchers are not for support, but to provide a way to clamp it down. Here are the parts ready for final glue-up:
This is, of course, upside-down. I waited to glue on the rear because I felt the need to do that along with the stretchers. In addition, I used a loose tongue there (with the appropriate diagonal-grain configuration) not for strength, but to keep the top aligned with the rear during glue-up. This might be the first time that I’ve used this kind of joint.
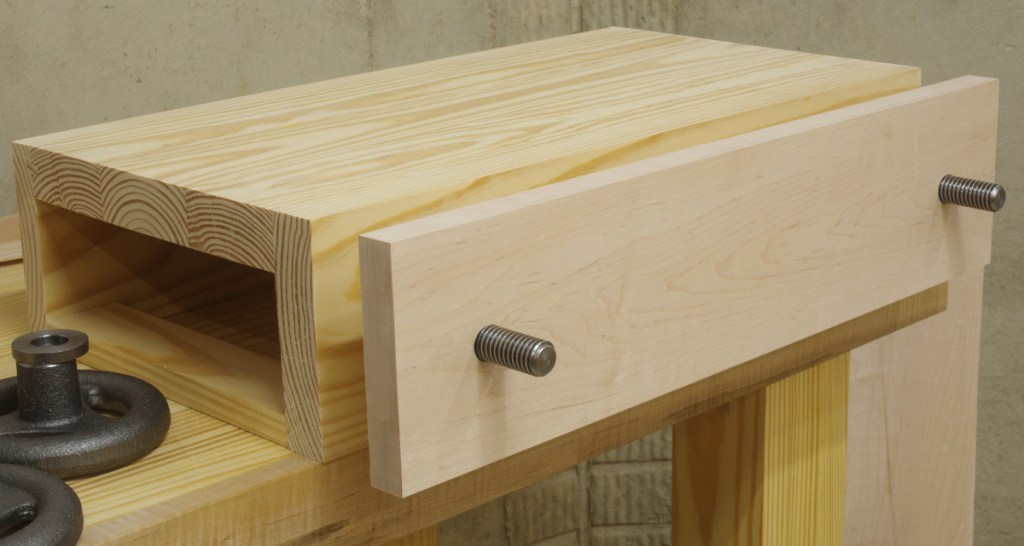
There wasn’t too much to do after that. The next step was fitting the chop:
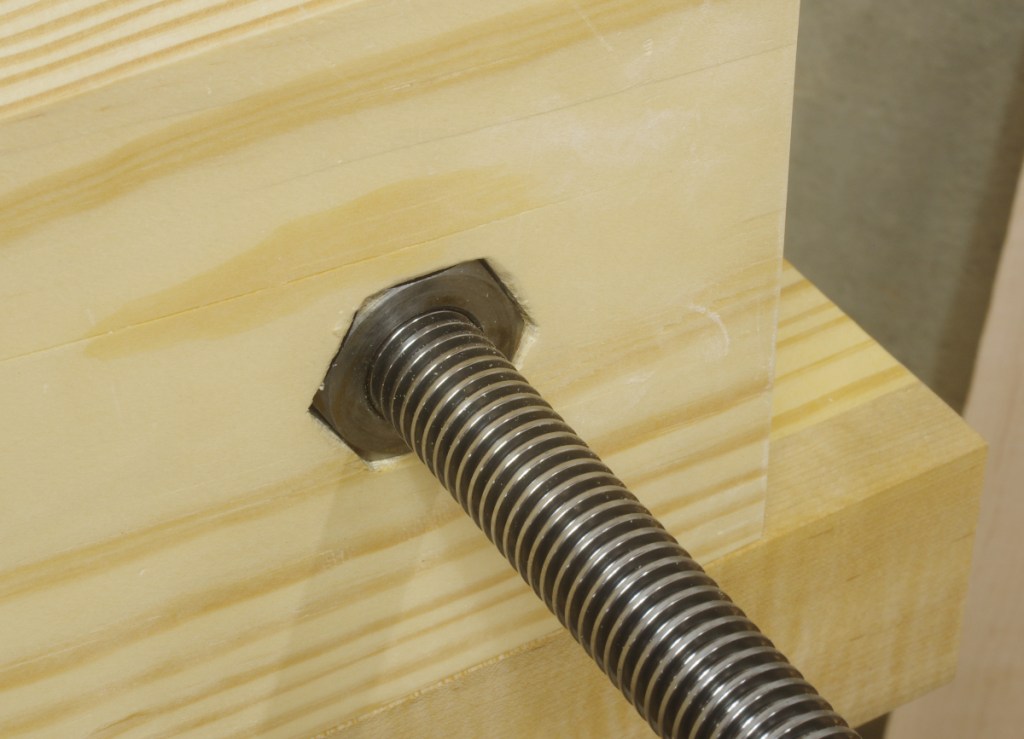
The chop is a 4/4 piece of soft maple. The Benchcrafted instructions suggest a configuration with the vise nuts for the fixed chop recessed inside, so for no good reason (other than stupidly not doing it the quicker way on the drill press before gluing the front on), I traced the nuts on, and chopped out the waste:
Then, I chamfered the top of the front chop, added the “crubber” (the cork/rubber gasket material that BC includes with the hardware), and did a quick rubdown with some tung oil:
You can see that this is currently clamped to the bench with C-clamps on the stretchers. I suppose that I could add dog holes in the bench and use a threaded rod or something. but this seems OK for now.
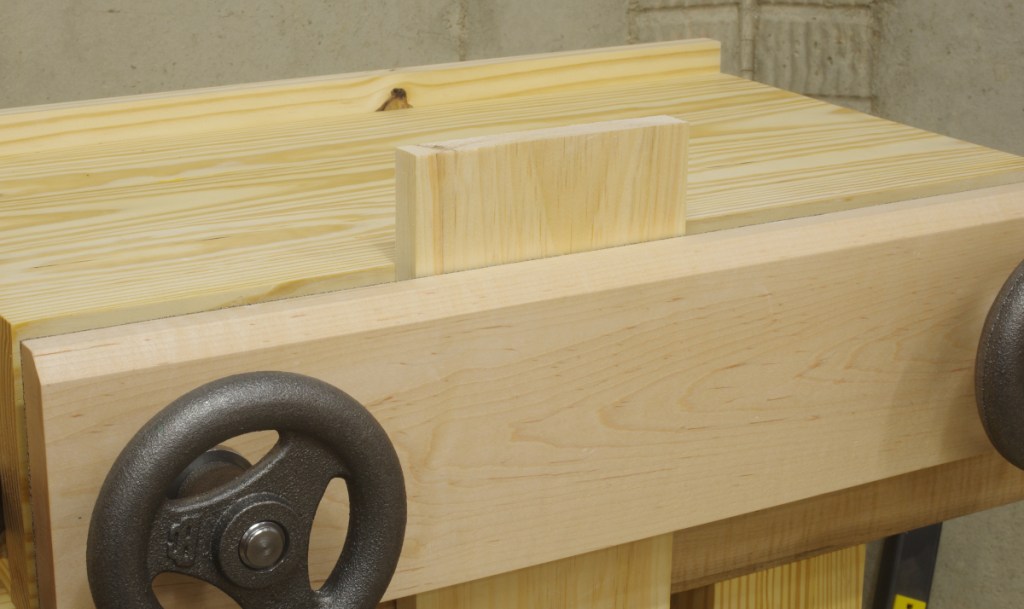
I added one more component: a slide-up stop at the rear. Here’s how that looks in the “partway up” position:
It can extend higher, and is held in place with a couple of threaded levers. I’m not sure if adding this was a good idea or not, but the main reason I put it there was to try to get some bench hook functionality. For example, when doing the crosscuts to remove the waste from tenons, I thought it might be handy to take the work out of the vise and lay it along the back. Ditto for using it to stop a piece when cutting a small groove leading to a knife line with a chisel.
At worst, if the stop doesn’t prove to be useful, I can just stow or remove it.
Here’s one final view, with the vise holding a board in “dovetailing” configuration:
This seems to hold securely. I did several test cuts and nothing appeared out of the ordinary. It does seem much more comfortable than stooping down to my (low) main bench to cut stuff. The auxiliary bench that I’m using here might be a little on the top-heavy side now; I do want to add more weight to the bottom. Happily, this should be soon, with one upcoming project that will use this new tool.