Nightstand: Frame Pieces Milled

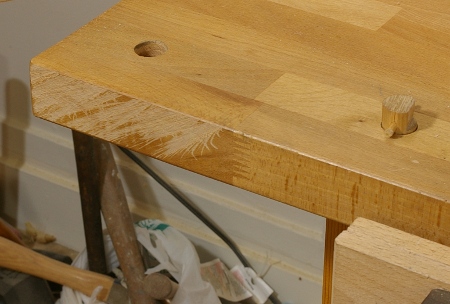
After a lot of resawing, scrubbing, and milling, I finally have all of the frame components milled to size:

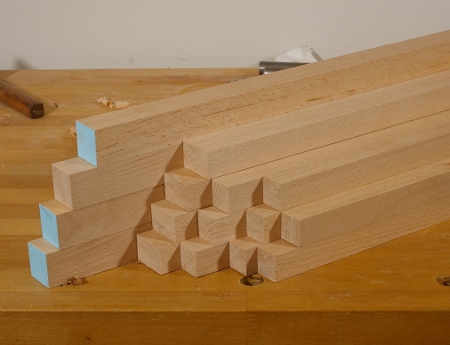
It was a moderate amount of work–less than I thought, but still non-trivial. One of the biggest problems that I’m having is that the board I’m using has quite a bit of tension built up inside. Flatsawn 8/4 beech will do that to you. In any case, whenever I resaw (and sometimes when I rip), the board moves and I end up with some cupping. My reference face would be flat before the resaw, then afterwards, it would get cupped again–sometimes almost as much as 1/32″. By the third time this was about to happen to me, I wised up and took a slightly different approach so that I minimized the amount of waste and work that I had to do:

  1. Use the scrub plane to get the reference face flat.
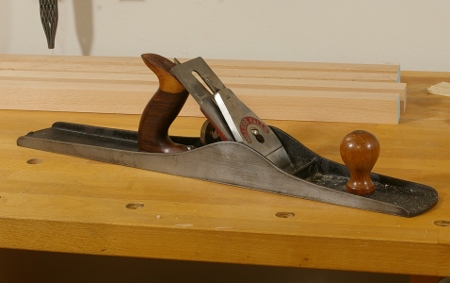
  2. Use the jack plane with the heavily cambered blade to even out the scrub marks. A fore plane set up the same way would work fine, too. After this, the board should be pretty flat. Don’t break out the jointer yet.
  3. Scribe a line around the edges of the board from your reference face. Set the gauge 1/8″ thicker than the thickness that you’re ultimately aiming for. The line probably won’t be super-straight, but it will be straight enough.
  4. Resaw along that line. If you’re using a hand-powered saw instead of a bandsaw, do not forget to grunt and/or growl occasionally. The least you can do is scowl.
  5. Your reference face is no longer flat because some of the board’s tension was released; sigh if necessary.
  6. Reflatten your reference face, using the scrub first if necessary. This time, use your jointer, winding sticks, and all that jazz to get it totally flat.
  7. Scribe a line around the edges from the reference face, this time to the intended thickness, and mill down the opposite face as you normally would.

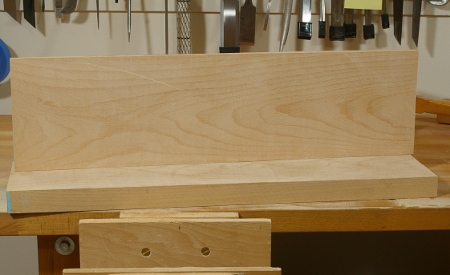
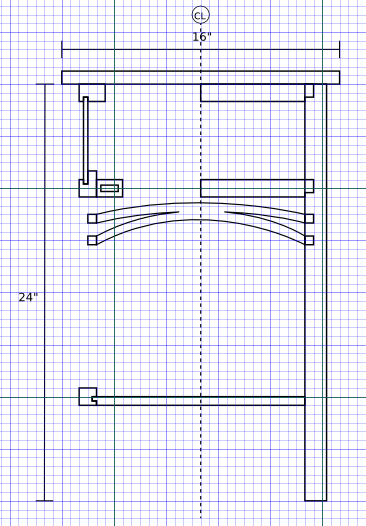
So in theory, I’m ready to cut some joinery. However, before I go crazy and start chopping mortises in the wrong place again, I have the the drawer, panel, top, and shelf components to mill. I’m using the wood left over from the resawing for the drawers and panels so that they match the frame:

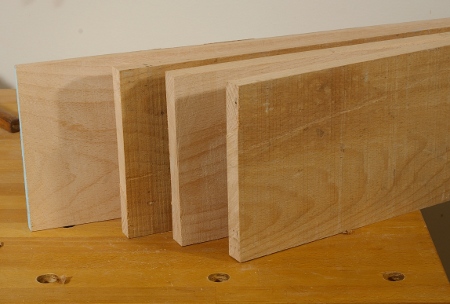
There’s enough wood here for all of the drawer and panel parts. Unfortunately, I have to do a lot of hogging and flattening on these pieces, too. The good news is that I don’t have to resaw any of these.

With these pieces all earmarked, that means I have (practically) nothing left from this board for making the top and the shelf. I’m a little surprised; I thought that one 6′ 7-inch-wide 8/4 board would be enough, judging from its weight and what I was visualizing. What I didn’t count on was how much all of the cupping and re-cupping from resawing would use up so much wood. This is fine, though; I grabbed another board from my stash and cut off a piece today. Perhaps it’s even better this way, because now I know that the top will be have consistent-looking wood, because its components will all come from the same part of one board.

Nightstand: Legs Milled, Bench Scraped, Etc.

Today, I thought I would have the opportunity to get a lot of stuff done on the nightstand. It turns out that I didn’t get quite so much accomplished, at least in terms of the project. The legs are now milled to profile, which is great, because they’re the longest pieces in the project:

Further evidence that I should really make a saw bench sometime is that I managed to scrape up part of the bench while ripping the board:

Yeah, oops. It’s cosmetic, of course, but it begs the question of how I managed to do that in the first place. Well, I had the board held down over the edge of the bench while I started the cut. On cuts like this, I tend to do the first 1/3 of the cut over on the left side of the vise, and then move the board over to the right of the vise when finishing the cut.

This would be a lot easier on a sawbench, especially without a stupid vise in the way. Unfortunately, this is one of those things that I just don’t feel that I have the time for at the moment because I have to concentrate on the current project. On the list of other things that I should do sometime is really redo my bench top–move it flush to the legs according to the Gospel of Schwarz, get the rear vise jaw flush with the front, and maybe thicken up the top. Maybe I’ll have time for the sawbench at least when I’m finished with the nightstand.

But after the legs were milled, it occurred to me that there was one little thing that I really did need to address at the moment, and that was my jointer plane. The one I’ve been working with up until now is a frankenplane of sorts–an unknown early-type Stanley with a type 6-8 frog, a kidney-holed lever cap, and a Hock blade. Well, that’s all fine and good, except that the tote is broken and the lateral adjuster is kind of woogie. It works, but it’s annoying and sometimes makes the hand ache.

So I could have made a new tote (I had previously glued it back together but that didn’t last) and tried to bang out the kinks in the lateral adjuster, but it turns out that I had a Millers Falls #22 (type 2, postwar) right next to it that I had wanted to use at some point. In fact, back when I had my handle-varnishing jamboree about a year ago, the tote and knob from this plane were happy to attend. But mostly, it’s been sitting in pieces at the bottom of the bench, looking kind of stupid.

I pulled it out and spent an hour or so scraping and sanding off the rust, got most of the surfaces clean (primarily by wiping it with camellia oil), oiled the threads, and put everything back together. Then, for the final touch, I stole the Hock blade from my old jointer and put it in. Bingo, a “brand new” jointer:

Nope, no sole-flattening or anything. Mostly, it was all about cleaning out the dead spiders from the inside of the frog and making sure that it works. Really, that’s all I seem to care about in these metal planes now, quite a difference from when I first started out.

Nightstand: Resawing Legs With The Frame Saw

Even though I have not yet completed the cutting list for the nightstand, I do know that I will need four 24″ long legs that are 1.25″ square. I had meant to get the stock milled for this sooner, but it’s been a busy week. I finally completed the flattening of the 7″ wide 8/4 board segment that I plan to use today, and then faced the task of resawing this thing into the piece for the legs and a panel for one of the sides.

It’s been a few months since I last did any resawing, and I wasn’t particularly looking forward to it, given how much work it’s been the last few times. But this time was a little different (otherwise I wouldn’t even be writing about it).

I wanted to try out the techniques shown in a few videos of those magnificent Japanese sawyer’s saws. They use them mostly perpendicular to the grain, letting the huge area of the saw register a very smooth cut through the wood. I can’t do this completely with my frame saw because its blade is not deep enough to register so well, but I could at least try to do it partway.

I started by the diagonal cuts along marked lines that are necessary in order to get a square cut started. Further cutting along each side at a very slight diagonal established a somewhat shallow kerf on side. Then, to connect the two kerfs, I clamped the board upright in my front vise and went at it almost perpendicular to the grain (I’m pushing it here):

As noted before (by several folks), it is really important to tighten up the blade to a very high tension in order to keep the blade from binding up and cutting a curve. From time to time, I would reach the end of the kerfs I’d cut on each side and I’d have to extend them. I think that this actually took more time than doing the bulk of the sawing. In fact, most of this went very quickly because the saw followed the kerfs better than before.

I sawed all the way down to a spot about an inch away from the end, and then wondered if there was any better way to finish off the cut with the vise. I then did a very silly thing: I clamped the board in upside down, with the saw upside down, and pushed the saw up from underneath to finish it off. Don’t do this; it’s ridiculous. Afterwards, I realized that it would have been a lot easier to clamp the board flat to the bench with the uncut end hanging off the end, and just work the saw sideways for that last little bit. There are other setups that I’ve seen that do a better job still, but I don’t have the resources for that yet.

So I was finished with this bit:

Not bad, not perfect, though. There’s one saw mark on the top center-left, but it’s very shallow (one pass of the fore plane will remove that).

I’m starting to figure out that my frame saw is pretty good for boards that aren’t so wide. This was a 7″ wide piece of beech, and that’s probably about the maximum that’s comfortable with this saw. If I ever build another frame saw, it will have the following changes:

  • Longer frame and blade to handle wider boards better.
  • Wider blade for better registration.
  • Much larger teeth.
  • Improved hardware for attaching the blade. I’m not sure how to go about that just yet, but I do think that it ought to be bigger than the stuff I currently use.
  • Yeah, a saw bench would help a lot, too.

That said, what I have is workable for what I do now, and I do have to finish this project in a reasonable amount of time. (I think it’s supposed to be done by the end of August.)

Nightstand: Plan

After a lot of agonizing, it appears that I finally have a plan drawn up for my next project, a nightstand. When researching designs (otherwise known as “typing nightstand into Google Image Search and bracing for the worst”), I found two basic types. The first is a box with an open front. The second is more like a table with a shelf at the bottom. Both have a drawer at the top. After conferring with the “client,” I chose the latter.

Here is the front view. I stole the idea for the arched decoration in the front from Krenov.

The top view cutaway into the shelf follows. On the left of the center line, the stretcher for the area above the drawer is shown. It’s a little bit wider then the one at the bottom of the drawer (shown at right), but there is an extra stretcher front-to-back on the bottom to support the drawer:

The front view cutaway perhaps shows it with a little more clarity. On the left of the center line in the drawing, the front stretchers are cut away, showing the side stretchers and the drawer support.

I could, in theory, integrate the lower drawer supports into the lower side stretchers, but I worry about wood movement between the legs and the front stretcher because a single piece would need to connect to both (I’m not worried about the ones at the top because they will not provide support most of the time.). I’m looking out for wood movement in particular because I’ll be building this out of beech, which is not known as the most stable wood in the world. So I won’t be mortising in the top of this piece, either.

The drawing isn’t quite yet complete. I haven’t added all of the measurements that I need (and hopefully I won’t mess them up this time), and I haven’t broken out the components to come up with a cutting list. I didn’t draw in the drawer. (Do I need to? Maybe.) And perhaps I will come up with a different scheme to support the drawer.

[Update: The mostly-complete plan is now available on the Plans and Guides page.] Err, not at the moment.

One thing is pretty clear: This project looks like the most complicated piece I’ve attempted so far. There are fewer components than the shoe rack, but this is far less repetitive, and they assemble in a much more complex way. However, I have attempted to standardize several of the component thicknesses, which should speed the milling process by minimizing the number of cuts I need to make with the frame saw.

For what it’s worth, a significant part of the agony in coming up with this drawing was trying to find a suitable 3-D modeling system for Linux so that I didn’t have to use Inkscape again. That didn’t work out, so I’ll just stick to what I know for now