My last post covered the weird joint I experimented with in a new project that I’ve been working on, a tool cabinet. During my last few projects, I’ve really gotten a feel for a set of tools that I use on a fairly regular basis but don’t have a real place for. These tools–marking gauges, measuring tools, some smaller planes, and the like–are always sort of hard to find because they’re lying about on a table next to the bench. So they’re hard to find, and they take up a lot of space. My saw till solved these problems for my saws, and my absurd chisel rack solved them for the chisels. I figured that a medium-sized cabinet would do the trick with these tools.
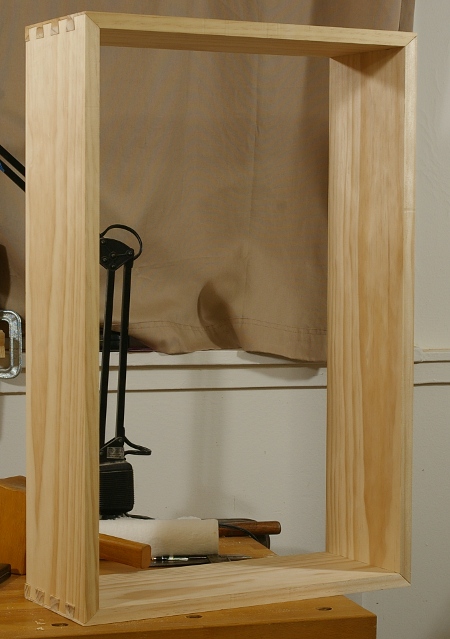
Going at probably the slowest possible pace for a woodworker, I finished the other three crazy joints in the carcase and test-fit the sides:
They basically fit (the lower right corner needs a little more adjustment), so now it’s time to think about what to do with the insides.
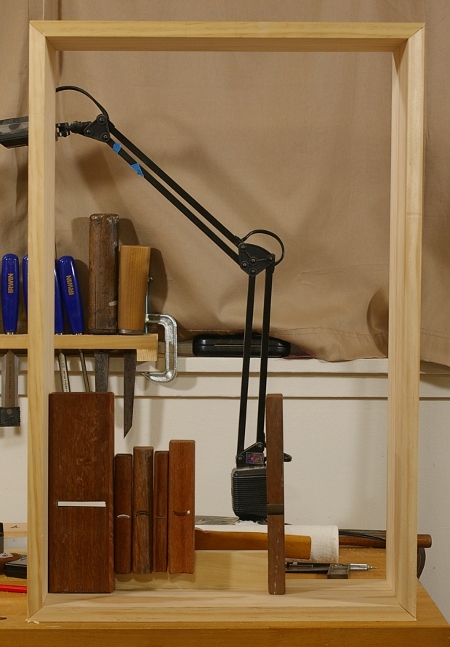
I already had the idea to put my Taiwanese planes inside. I grabbed about 3/4 of them and arranged them like this:
So, in all, they’d take about 1/4 of the space in the rear half of the cabinet. The front half will be sort of empty, because I plan to put on doors that are open most of the time, and these doors will have lighter tools attached (such as marking gauges and squares).
It’s all preliminary, but one idea that I’m going to carry over from my saw till is to have it reconfigurable. In other words, I’ll use screw inserts to hold the tool holders in place, so that if I decide that I don’t like some tools I’ve chosen for the cabinet, I’ll just replace them.
That’s all fine and good, but now I’ve got something else to do before finishing this: I’ve got to pack up the shop, because we’re moving. The next two weeks are going to be hectic. I’ve got more than half of my tools packed already, I believe.
There is, at least, some good news. The new place not only has space for a shop, but I’ll also be able to hang stuff on the walls. So my saw till will have a spot, as well as the chisel rack and this new cabinet (once complete). I’ll also probably be able to hang some eggbeaters and a few other things. Right now, my boring tools are pretty disorganized.
I also might build a new bench. However, that’s looking a little farther into the future.
This weekend, I started work on a new project for the shop that will soon be desperately needed. As with nearly all of my other projects, I drew it up and decided on the joint–dovetails for a carcase frame, of course. I recalled that I’d seen a mitered-shouldered through dovetail joint, did a little bit of reading on it, and decided that it would be a neat one to try.
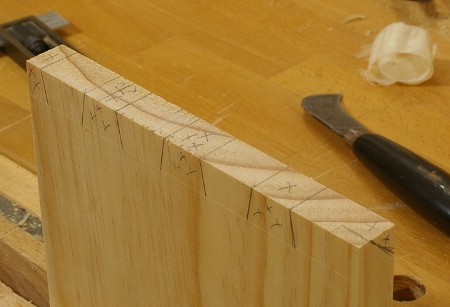
Except that I decided to make it a half-blind version. I clearly did not plan this one out very well, but I was very careful when laying out the tailboard, making sure to put the Xs in the waste parts, and indicating where the shoulder would miter. I thought that this would be a piece of cake, I’d just rough out the miter on both pieces when fitting the pinboard, then fine-tune it later. After all, both miters would be the same angle, right? Right?
What could possibly go wrong?
It should have occurred to me that I’d screwed up somewhere simply based on the fact that as I was sawing down the pinboard the first time, I managed to saw on the wrong side of one of the lines. At the time, I chalked this up to not having taken a break, the anticipation of the big game soon to start, and the fact that a really annoying song was playing on the radio when I made the mistake.
Unfortunately, it was actually fate trying to warn me, and I didn’t listen. Instead, I just sawed off the end of the pinboard, marked it out again, and went upstairs to watch the game.
When I came back the next day, I managed to saw everything correctly, popped out most of the waste, and then, to make sure that the pins and tails fit, sawed off a small amount of the miter on the shoulders.
The tails and pins fit without paring. That was as far as the good times went, though, because that’s when I got out my other T-bevel, set it to 45 degrees, and went to mark out the final miter for the corner.
Something wasn’t right. Why didn’t the miter line up to the corners of the joint? Everything should be the same width and thickness, ri–oh, wait. Duh, on a half-blind dovetail, unless the tailboard is thinner than the pinboard, the joint profile will not be square, and that’s not going to be a 45-degree miter. Furthermore, you can’t cut your miter beyond the half-blind portion if you’ve already done your tailboard, because the tailboard probably doesn’t extend that far.
I don’t know how long I stared at that thing, trying to figure out what to do. I didn’t know if I should try to salvage it, or just hang my head in shame and start anew with something a little more conventional.
Masochist that I am, I chose to try to salvage it because I hadn’t cut beyond the half-blind portion of the shoulder. For another equally long time, I tried to figure out what this was going to look like. I’m not sure I had an idea, but in any case, I started by marking out the miter on the pinboard from the pin base to the half-blind line (or whatever it’s called). Then I measured that angle: 50 degrees. That seemed really fishy to me, but I set my T-bevel to the 40 degrees necessary to complete the full 90 degrees and marked it lightly on the tailboard.
I banged the pieces together a little. Of course, I dented the beautifully-surfaced face that my newly-acquired Taiwanese plane had made because I used a buffer scrap that was too small. At this point, I didn’t care about that anymore, I just wanted those two miter lines to be perpendicular, and to my surprise, they were.
So I pulled the pieces apart and shaved down to the miter lines with my Veritas mini shoulder plane (this worked remarkably well). And then I banged the pieces together to see if they drew tight.
They didn’t, of course. In addition to this unsightly gap, there were also big gaps at the pinboard baseline, and I suspected that they might be related. I put the work down for the night and went off to freak out about something else.
When I dragged myself back the next morning, I tried jamming a piece of paper into the miter gap. It went in only halfway, so I pulled the pieces apart and checked the square of the long edge to the mitered surface. It was slightly out of square–kind of convex on the top. I pared it out (maybe making it a little convex in the process) and tried again.
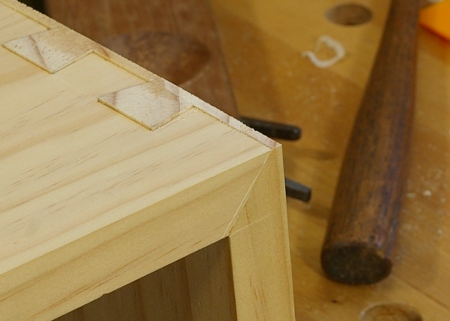
I almost fainted. There’s no way that this should have drawn tight given the number of errors that I made.
The preceding photo was taken after I pared off the excess of the pinboard on the end–I wanted to see what it looked like. I’m afraid to admit this, but I sort of like it. Only I wish I could say that I’d actually planned it that way.
During my last project, I noticed that my carcase saw is not cutting quite as well as it used to, and that it can even occasionally bind in the kerf if I’m not careful. It still works pretty well after about three years since I first shaped and sharpened the teeth, though.
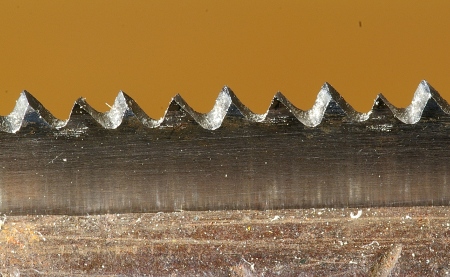
Independently, I decided to finally get a macro lens, and like the nerd that I am, I thought I would point it at the saw teeth to see what they look like (since these are too small for me to really want to strain my eyes on):
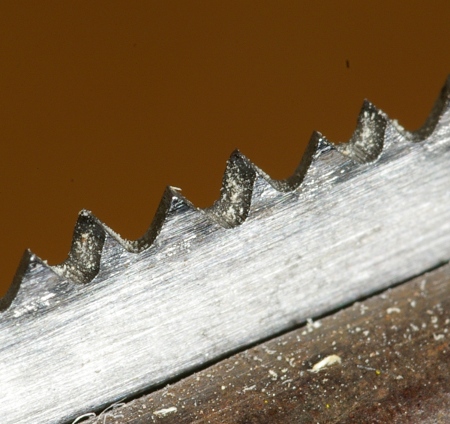
Remember that this is a 14TPI saw, so the area shown here is a little more than a half-inch wide. The image here translates to roughly 8x magnification on a 100dpi display. Here’s a view from an angle:
You can see that a few of the tips have gotten the slightest bit rounded. I will need to resharpen this soon, though I think I’ll take it through the next project first. It will be interesting to see how this looks when I do so, because this was basically only the second crosscut saw I ever sharpened, and I have a much finer file now.
I’m almost tempted to get a new plate and back from Mike Wenzloff, like I did for my recent joinery saw, because it would be heavier and thinner. But I don’t think I want to mess around with making new saws for now. I should at least put together that big backsaw whose parts are currently waiting for me. Oh, did I mention that I fell victim to the miter box syndrome? I’m not sure what to do about that, either.
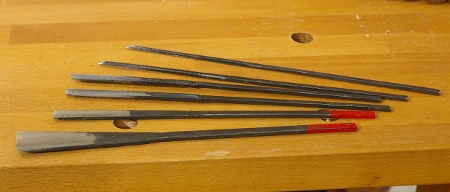
When preparing for this year’s trip to the tool shop, I decided to try to concentrate on purchasing tools that I believe I actually need (imagine that). I had a few ideas already, and I started out with a pile of Taiwanese carving tools–primarily outchannel gouges, but also a V tool and some other stuff:
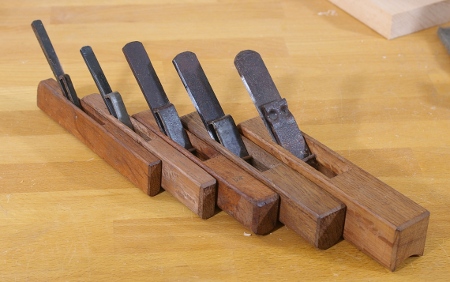
I also got a big pile of hollowing and rounding planes:
Of course, right away, I might be straying from the “buy what you need” mantra, because I’m not sure I really need all of these. However, they’re so much fun and so cheap (less than $10 each) that it’s hard to resist. And as usual, the blades are great: forge-welded cutting steel on softer metal with hollowed faces that take just a minute or two to flatten. I sharpened and tested all of these in almost no time at all.
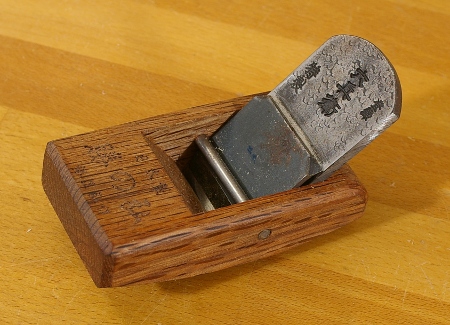
When I saw this compass plane, I realized that I didn’t have one and that this was probably a good time to get one:
This plane exhibits a very common scenario for the better planes sold in Taiwan: a blade made in Japan (supposedly) and a body made in Taiwan. There is also a double-convex version of this plane, as seen a blog that doesn’t seem to exist anymore.
It’s a wicked fun plane to use. I had to try it out; I first gouged out a curve in some wood and then smoothed it out with this thing. It’s really remarkable how easy this goes when everything is tuned correctly. Although this wasn’t the cheapest tool in the shop at about $30, it’s really hard to beat the performance at any price.
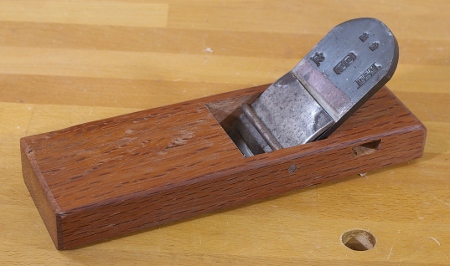
The final tool that I’m going to talk about for this year’s trip is another plane. I got to wondering what a full-sized Taiwanese bench plane would be like. However, as I mentioned before, most bench planes in Taiwan are either wholly from Japan or have a Japanese blade with a Taiwanese body. The shop had one bench plane with all-Taiwanese components, though, and at $35, it was about a third of the price of the hybrids, so I bagged it:
I didn’t have to wait long to use it, either, because while I was still in Taipei, Uncle had a cabinet door that didn’t fit. So I sharpened the blade with the same sandpaper that I used for the chisel on the old cabinet.
It worked fine for this purpose, but it was a job that didn’t need finesse–I wouldn’t have had the time for that, anyway. Not only was the sandpaper (“Matador” brand, 1200 grit) not quite as fine as I had wanted, but the body was new and probably needed some tweaking. I also set the blade for a rather thick shaving.
When I brought it back home, however, I had time to tune the plane. So because it’s somewhat similar to a Japanese bench plane, I dug into Odate’s book and looked at Wilbur Pan’s blog for his experience first, then looked at what I had in front of me.
The first thing I did was to sharpen the blade on my waterstones, and I got a wonderful edge in no time. However, I also noticed something that I still need to think about–this blade was fairly well-cambered, so its initial grinding had it set up as sort of a jack plane.
The type of plane is important because you’re supposed to set up the sole differently depending on its purpose. The rougher the cut, the more you’re supposed to hollow the sole, or so the story goes. However, I don’t need another jack plane, and because the mouth on this one is ultra-tight, I decided that I might want to keep my options open and proceed with caution.
However, something needed to be done to the body because it appeared that the wood had moved slightly since production, causing some of the sole in front of the mouth to protrude a little from the level of the mouth and end. I suspected that I was having trouble with this because my shavings were not of a consistent thickness. I verified this with a straightedge using the method that Odate describes, and quickly marked the high spots. He says to use a scraper plane or something of that nature to take down the high spots (and form a hollow). Wilbur Pan likes to use a card scraper, and I would have done that as well, except that I am silly and haven’t actually gotten around to making one.
I ended up carefully using my Veritas low-angle block plane to knock off the high spots. I didn’t really hollow the sole because I would rather use a scraper for this. But it was enough for a semi-serious test of what the plane can do, and it does make a delightful shaving. A little more work on flattening out the camber on the blade, and this thing could easily be my go-to smoother.
This brings up an important question: What exactly am I doing? After all, I have more bench planes than I can shake a stick at. It seems to be, though, that the more I use wooden planes, the more I like them. It doesn’t seem to matter if they’re western or Asian planes–I simply like the way wooden planes feel, and I’m really starting to appreciate how easy it is to adjust them. Perhaps I will downsize a few of my metal planes sometime.
Someone (who?) once said, “Wood on wood–sure feels good!” There’s a lot of truth to that.
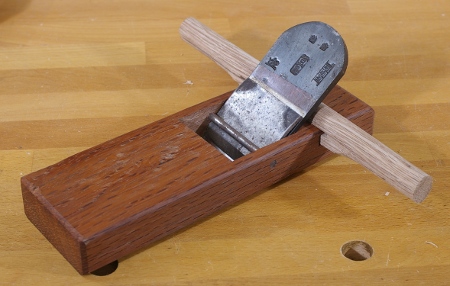
PS: In case you’re wondering what the rectangular hole underneath the blade is, for, the plane comes with a removable handle. When fit, it looks like this:
I believe this is for getting a sturdy grip to pull when using the plane for tougher work, but I’m not too sure. I don’t think it’s the sort of thing you’d use two hands on because it’d be hard to control like that. I likely won’t be using it.
Sometime during the last year, I read about Qilan (Cilan) Mountain in Taiwan and have been wanting to go there ever since. I’d read that there were large, old-growth trees of both Taiwan red cypress (Chamaecyparis formosensis) and Taiwan yellow cypress (C. taiwanensis) there, and had wanted to go there ever since. Somehow word of this got to my mother-in-law, who promptly booked a family trip for us; the family had been there before. The post on Luodong describes what we did on the first day of this trip. Many thanks to her for arranging all of this.
The area is called “Divine Trees.” It’s not wholly virgin old-growth forest; it has been logged, but many trees here were saved. Though it’s not far from Yilan or Luodong (maybe about 25 miles as the crow flies), getting there gives you plenty to think about. You start out in the valley (400m/1312ft). Here is the view from the forest recreation area there, next to the hotel where we stayed:
Then you head up highway 7. If you’re familiar with mountain roads, you probably have an idea of what this is like; if not, refer to C. W. McCall’s lyrics on Black Bear Road–”it looked like a bunch of Zs and Ws all strung together.” Unlike the Black Bear Road, highway 7 is actually paved, and you go up from the valley for about a half-hour or so. Then, around 1000m (3280 feet) or so, you turn off, go through a staffed controlled-access gate, and ride for another half-hour or so on an unpaved road that isn’t really any different in shape than the paved one. If you want to go there, it’s best to go on a tour. For one thing, a guide can tell you a lot about the place, and furthermore, I don’t know if they’ll even let you in without a guide.
During the trip, if you’re not battling motion sickness, you see the forest changing around you. In the valley, the forest is far more of a jungle, with broadleaved trees, fern-like plants, and vines all around (monkeys in the warmer months, too). But as you ascend, you start to see Taiwania (Taiwania cryptomerioides, an important timber species, but not the subject here). If it’s not a clear day, you reach the cloud cover and it becomes foggy. You start to see trees with the scaled foliage sprays that you see in so many genera/species in the Cupressaceae family. It’s a sign that you’re getting closer. Then you see hulks of grey, dead trees towering out of the forest on the mountainside:
At some point, you’re at your destination at around 1550m (5085ft). It’s time to get out and see some real trees. There’s a trail here with two variations; the longer one is about 2km long, with more than 50 trees, the other has a little less than half.
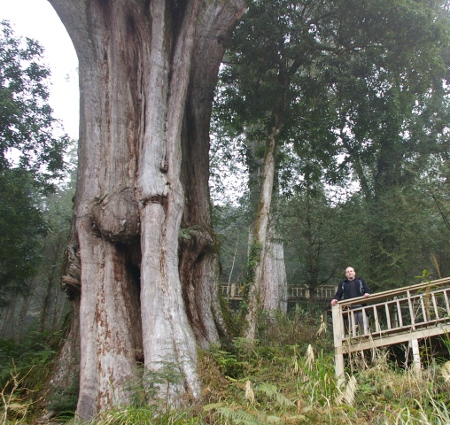
The first trees on the trail are among the largest and oldest in the area. Everything at the beginning of the trail is a red cypress. It’s hard to get an idea for the scale of these trees, especially when you look across to them from higher up on the hill:
A few notes about the Taiwan red cypress are in order:
It’s got a branching form, usually high up on the trunk somewhere. The branch forms seem to vary quite a bit; the example above has the vase-like form that you might see on an elm tree. Others don’t split quite like this.
It grows really slowly. Think “coast redwood or old-growth douglas-fir” really slowly.
In time, its bark and shape do not expel the elements as many other trees do. You can see all sorts of moss and fungus on this one, but did you notice the pepper tree growing high up in the crotch?
After about 500 years, the tree starts to become hollow; bugs eat from the pith out. They don’t eat anything younger than this. I didn’t catch what the relationship was to the sapwood, but in any case, the ideal tree for harvesting is about 500 years old because of this. Anything older was often spared because it was not high-quality wood. There are a few examples of 500-year-old trees in the area, and they definitely have a different look.
But I did mention that these things are big. When we got around to the trunks of the larger trees, you start to understand what the “Giant Cypress” part of Wilbur Pan’s blog name is all about. The preceding photo was a first impression of a particular tree. Then we got around to the other side of it and got a better idea at what was here:
It’s not only big, but it’s quite pretty, too. As with all of the big trees, it has a marker with its name and some information:
Most of the stuff on here should be pretty self-explanatory (DBH being diameter; breast height). It’s a little difficult to compare this to trees such as the giant sequoia and coast redwood, which are a little thicker and a lot taller, but the dimensions do generally match the historical record of a tree that we may be lucky enough to resurrect in time: the American chestnut. Botanically, of course, the chestnut is far different (being a fast-growing angiosperm and all), but now I finally have an idea for what the presence of those things was like.
(All of the large trees have names such as this; Szuma Chien was a famous historical figure in China that lived around the same time this tree sprouted.)
And so on we went through lots of red cypress (some even comical); here’s one that’s “only” about 1000 years old. You can see how its form at this age is far different than the older ones, and in particular, how much larger its crown is:
According to the sign for this tree (No. 31), it is 34 meters tall, 1.5 meters wide, and is named Shin-ma Kuang.
We saw a few other types of trees, but then, somewhere near the end of the walk, we stopped at a big tree and I knew immediately that there was something different here. First, the bark was different; it was shaggy, not unlike a shagbark hickory. It also didn’t hurt that the trunk had a fence around it:
The guide explained that this was a Taiwan yellow cypress (“hinoki”, sometimes classified as the C. obtusa hinoki cypress, but otherwise known as C. taiwanensis). It is principally famous for its aroma, the fact that bugs hate it (unlike the red cypress, they do not hollow with age), and that they have a remarkable resistance to rot. The wood has a tremendous number of uses. It’s also extremely rare because the lumber is so valuable that most of it was logged. There are only five old-growth examples in the entire area! Think of our own C. lawsoniana (Lawson’s cypress, or “Port Orford-cedar”).
And of course, the fence is necessary to keep people from picking at the bark when they learn what this tree is.
Looking up at a yellow cypress, you can see that its form is more excurrent than the red cypress. It’s hard to relate the sort of effect this imparts in words or a photograph.
(If I were into sayin’ profound stuff, I’d say that the tree is saying “The cypress tree on the mountain” to us. But I’m not, so I’ll just say that the tree is telling us that trees don’t talk.)
This tree, named Chu Hsi, is about 900 years old and 1.8m in diameter. I don’t know why I found this one particularly nice-looking, but I did.
Coming up: Back to woodworking and tools! Of course I went shopping for tools when I was in Taiwan.
I learned a lot of stuff when I was in Taiwan during this past trip. For example, there’s a Taiwanese douglas-fir!
It’s supposedly pretty rare. But rather than expand on how much I like douglas-fir, let’s talk about one of the little trips we took.
The Luodong Forestry Culture Garden is a relatively new combination park and museum. Luodong was a busy hub of activity for logging in the early 20th century, and this park represents the elements that comprised the industry.
The log pond, fed by a natural spring, was a storage facility for logs. Today, you can find a kingfisher perched on the driftwood if you look closely:
It is also the location of the terminus of the former narrow-gauge logging railway, including several museum and workshop buildings, six steam locomotives, and rolling stock that were in use on the line.
Such large-scale logging was made possible the by the railway. The Japanese had attained much experience at rail construction by the end of the 19th century. Now in control of Taiwan, they were quite interested in its vast forest resources, and completed the Yilan line (from Taipei) in 1924, though logging operations were well underway before this time. Luodong is where the narrow-gauge line met the Yilan main line, and the park is the site of the station.
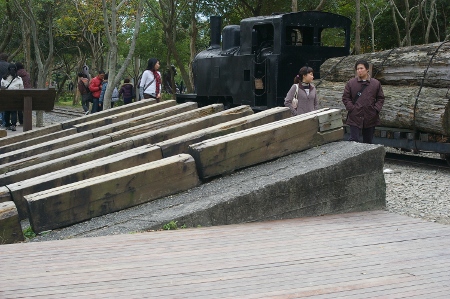
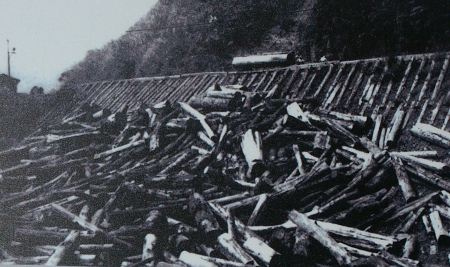
Below, you can see a partial reconstruction of a ramp that was used to roll the logs into the pond:
There’s a photo in one of the buildings that shows a larger-scale ramp. That white speck to the right of the log is a person. These are big logs–we’ll see more of that later.
The forests are located in the mountains, which are quite rugged in Taiwan. One method used to get logs off the hill was the slide (notice the large sculpture in the rear; there are several at the park):
The sled was used for dragging logs across horizontal surfaces where the railway didn’t go:
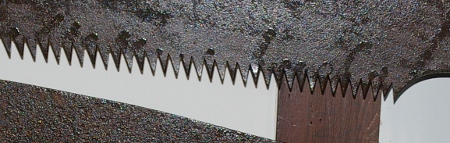
So far, it was an interesting place, all right. But then, in the Forestry Exhibition Hall, we hit galoot pay dirt. It took a lot of self-restraint to refrain from jumping up and down like a kid in a candy shop upon seeing this:
I’d been wanting to see one of those large saws for a long time. It was as large as I expected, but one thing that took me by surprise was just how big the handle was. Compare the handle size with the one below it–this sawyer must have had large hands. Another interesting note is that the larger teeth don’t end in points; they’re flat at the top. I would suppose that this is to provide extra strength.
The labels say 大剖鋸, for big rip saw. Below, there are a few more saws, including some crosscut saws, with the label 五齒孔鋸, meaning five-tooth hole saw. Basically, that means there are five teeth, then a gullet for raking out the sawdust.
Check out the rake angle of second saw! The saw below the large one also featured progressive rake along with the progressive pitch commonly found on a saw of this type. Here’s a close-up–the rake changes from positive to negative.
In this building, there was a timeline of when various operations were done by hand versus machine. Doofus that I am, I didn’t take a photo of it; all I can say is that I was surprised at how long things were done entirely by hand, even ripping logs into boards. It was well, well into the 20th century.
Also included in the display is a handy diagram of how the tools are used. There are no surprises here–the hewing axe (鉞斧) is used for hewing, the crosscut saw is used for crosscutting, and the big rip saw is used for ripping:
Now, you might think that the log above might be a little large for that fellow to handle. That is, until you get to the “mountain life building” and you see a photo of this veritable he-man getting to work:
Notice how he has a second, smaller saw at his side. I’d guess that he started the cut with this thing. What’s particularly fascinating about the way these guys worked and their saws is that they could do it as a single-man operation–no pit saw needed, no pit needed! It’s remarkable how the saw did not need to be wider than the log. I’m going to speculate that they’d saw from one side, then the other, then back, all the way down the log.
There is “DIY” building in the park where they apparently let people mess around with wood and tools, but it was closed when we went there. Too bad.
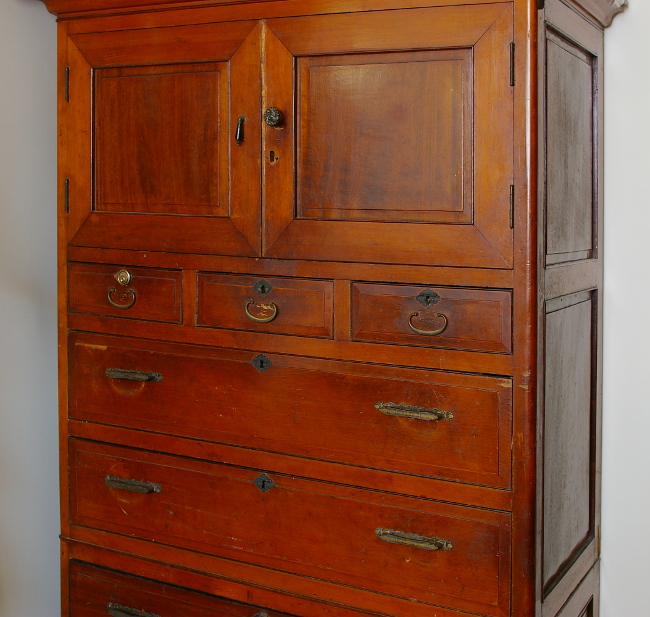
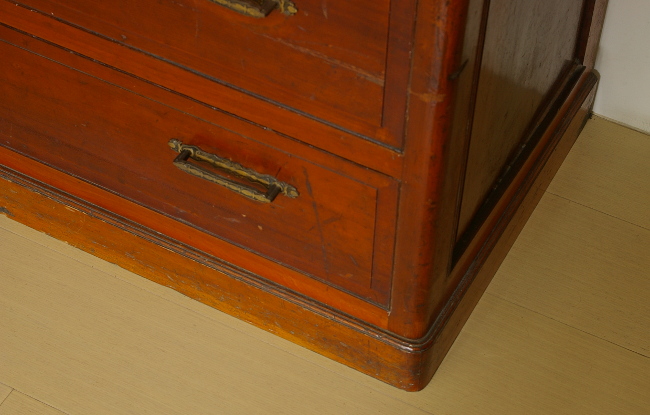
On last year’s trip to Taiwan, I encountered a cabinet at the in-laws’ place that I found interesting. This year, I got to take a closer look and some photos.
It’s probably about 90 years old. My grandmother-in-law says that her husband bought it before they were married, and he bought it from a Japanese friend or vendor (at this time, Taiwan was a territory of Japan).
It was likely not the most expensive cabinet that you could buy at the time, but its construction clearly indicates that it was a good quality item and that it was primarily (if not completely) made by hand–I don’t see any machining marks on it, and at this time, machine tools were not in common use in the area.
The design is pleasant and streamlined. It consists of two pieces–the upper part shown in the preceding image, and a base with two more drawers on the bottom. The base has a kickboard that matches the overall design, and is well-moulded:
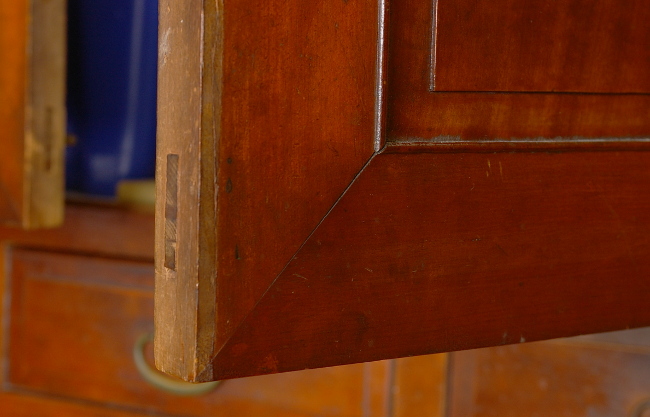
Last year, what I noticed first about this piece was that the doors had the mitered-face mortise-and-tenon joint that I wrote about (and made) last year:
The tenon (like most of the ones I’ve seen here) is a through tenon. It’s very common in furniture here, and I now know the Chinese name for it–but I’ll save that for later.
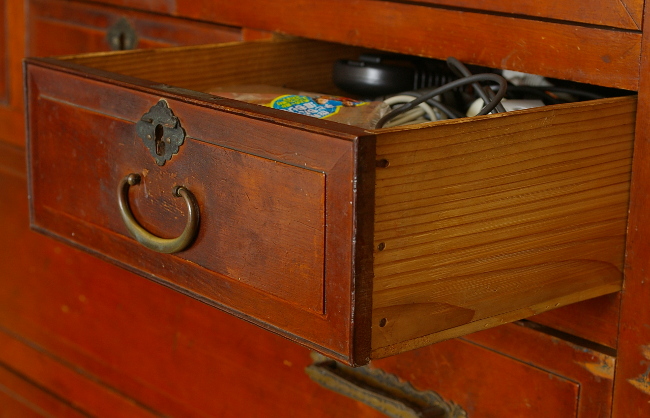
The drawer construction would bring mixed reactions to some western joinery enthusiasts–the sides are tacked in. Though our first reaction might be to poo-poo this, remember first, that dovetails are not common in eastern furniture, and second, that this thing is 90 years old, and these drawers are still very solid. The humidity differences it has had to endure have been quite extreme–from very humid and sticky summers to a life in an air-conditioned environment.
It’s all solid wood construction. The face is a good-quality light-colored hardwood that’s been lacquered, the rim around the face is an expensive dark wood (don’t know what, but it has large pores). The rest is a quick-growing softwood of some sort.
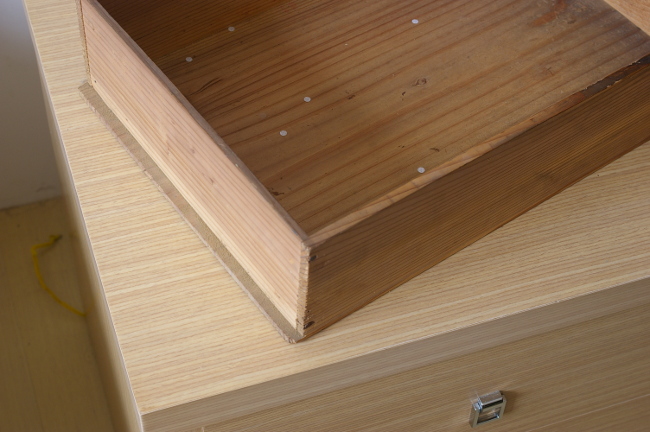
The rest of the drawer is also quite solid, in spite of violating “rules” of drawer construction (tacked together from the bottom, bottom panel grain runs along the front-to-back axis rather than side-to-side):
Notice the “rear deck” on the back. It’s not of a consistent width. It serves as a drawer stop–I am speculating that the builder intentionally let this protrude and then simply trimmed the end to get the drawer to stop flush with the front of the cabinet.
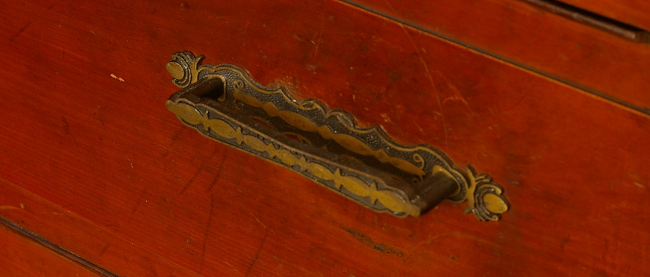
Here’s the hardware on the lower drawers. I don’t know if this is the original, but it’s kind of cute:
[Edit: It’s not original; in the picture at the top, you can see where the original hoop handles were. Thanks to Daniel for putting a finger on this.]
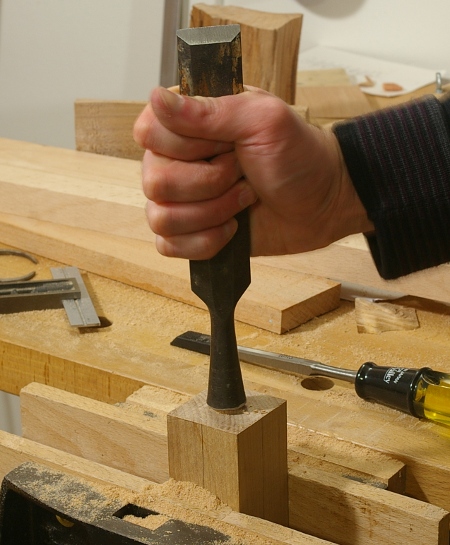
Now, with all of this said, there’s a further story with this cabinet. Over the years, the wood has moved in such a way that made the drawers very difficult to close. It was even said that they might have to get rid of it because it was so difficult to use. So I said, hey, this is the best piece of furniture in this house, and I could get the thing in good shape.
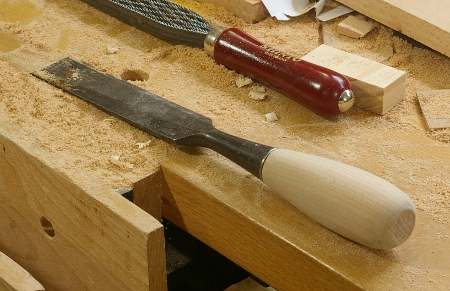
I didn’t have any appropriate tools (even after a ritual tool-shopping trip that I’ll talk about later), or any I could borrow, so of course, I decided to go buy something. I went down to the tool shop in search of a chisel and some sandpaper to sharpen it.
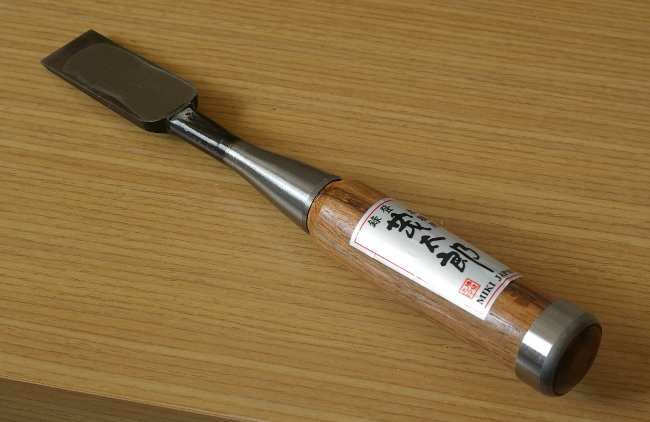
The sandpaper was easy enough. But I wanted a Taiwanese-made chisel, and got one. However, it looks like this:
Yeah, it says “Miki Japan” on it, with a name. This is one thing that sometimes drives me up the wall with Taiwanese manufacturers. An example of this is that you’ll often see labels like “Boozoletti Italy” in stores on clothing that’s made in Taiwan, on really decently-made stuff. (Yeah, you can get not-so-well-made stuff too, but that’s another story.) It’s almost a very strange parody of the knockoff concept. Some companies have wised up and created their own unique identities, but that’s another story, too.
In this case, the chisel is made of the laminated (laid) steel that you’d expect from something like this, and it takes and holds an excellent edge. The grinding was excellent–it took only a few minutes to flatten and polish the face. Perhaps it doesn’t hold an edge as well as the famous Japanese chisels (not sure about how to test that), but it’s as good as any mass-produced western manufacturer of the past such as Union or Pexto.
And it cost a grand total of about $7.50. Best of all, it got the old cabinet in great shape in very short order.
I got a request a few months ago from my sister-in-law to investigate how one would go about making wooden purse handles, because she’s been in the habit of making purses lately. We talked about a few ideas–some involved bending, some involved joints, and some were not so strong. I was particularly concerned about strength of cross-grain when cut thin, because we all know how well that often turns out for plane totes. And I said that I would get around to making some at some point.
It was one of those projects in the back of my mind, where was I trying to figure out a way to do it where the end result might not totally suck. And so there I was one day, watching some Harry Potter movie on TV, when I thought I saw a glimpse of a purse with wooden handles being used as a prop. Pause and rewind with the DVR confirmed it.
So I came up with a drawing that seemed to minimize the danger of cross-grain stress and milled some wood. The wood might be walnut. I’m not really sure. Maybe I should break out the loupe some day:
I cut out part of the drawing to use as a template (I just traced it onto the wood):
Notice the segmented slot in the drawing–I’ll get to explaining this later.
I cut out the rough template with a coping saw (one side at a time, not gang-cut), then taped the two sides together and clamped it into the vise:
Then I shaped them with my ever-trusty Shinto saw rasp and Gramercy sawmaker’s rasp:
I don’t know why this is so, but the more I shape handles, the more I like it. In this case the edge profile of the two handles when put together is similar to one edge of a saw handle.
With each side shaped, I put in the slots for hanging the textile part of the purse (the part that I will not make):
You can see here that the slot is segmented. That’s to keep whatever is wrapped around it from bunching up on one end when the handle is tilted (this is a problem on one prototype that I saw).
Cutting these slots was difficult. I don’t have a 1/8″ mortise chisel, so I had to pare out the slots. If I ever have to do something like this again, I’ll get a mortise chisel and be done with this task in ten minutes instead of the who-knows-how-long this took me.
Next up was to cut recesses for clearance of the textile parts on the inside. This design feature is so that the handles can close flush to each other. This was easy once I got the hang of it. It was the standard procedure of using a chisel to waste out most of it and a mini routing plane to clean the floor of the recesses. I got the plane in a trade a while back (thanks, Darren!):
Then I smoothed everything out and put on the first thin coat of varnish:
They need a few more coats, then they should look quite nice. I have only about a week to complete that task, so I only have time for that much, anyway.
Perhaps one day, I’ll have a photo of the complete project.
I’d like to say that I’ve been off designing a new project for the last three weeks, that I’ve made a new workbench, or that I’ve been moving, or something like that.
But no, I’ve been making a new mortise gauge, and yes, it took me nearly three weeks (mainly because I haven’t spent much actual time in the shop due to an acute case of laziness). This is based on the marking gauge I made a while back, but I wanted to solve some of the deficiencies of that one.
I should also mention that the whole reason I wanted a new mortise gauge was to correct an irritating problem in the two-armed Asian-style gauge that I have now: there’s only one thumbscrew to secure the whole thing, and the two arms are separated by a little metal plate. When you’re trying to adjust one arm, the plate moves, moving the other arm slightly. It takes a lot of dorking around (at least for me) to get both adjusted to the correct length. So I resolved that I would fix that by making a two-armed version with two independent thumbscrews.
I started by making the stock out of some of that pacific madrone that I’ve got hanging around, using the same technique as in that earlier post. This is the view after I’d cut the mortises, drilled the small guide holes, and shaped the top:
When I set about making the arms (out of beech, for whatever reason), I fine-tuned them to fit the mortises tightly using the old “plane clamped upside down in the vise” trick that was featured on what I think was a fairly recent episode of St. Roy’s show:
Just watch that you don’t plane your fingers! When the arms were fit, I had this:
Then it was time to put in the screw inserts for the thumbscrew securing mechanism. Sometimes this can be a real pain, and it was a really big pain this time. I started by enlarging the guide holes with a #5 auger bit:
The problem was, however, that a #5 bit was too small for an insert (seen behind the vise above), and a #6 was too large. Furthermore, the screw inserts were brass, which means that they are very easy to mangle. I used a round file to enlarge the holes slighty, then gently drove in the inserts with a bolt. (Prayer may also have been involved; I do not remember.)
With that part done, I made the holes for the blades, the wedges to secure the blades, and finally, the blades themselves (out of spring steel again). Remembering my goof from the previous marking gauge, I put the wedges on the outsides of the blades this time. The wedges were also fine-tuned using the clamped-plane method described above.
Then I made the “saddle pieces” that I described in the marking gauge post. This time, I bought a thinner strip of brass so it was easier to hammer to shape. Then, to design around the problem of the saddle getting in the way, I marked where the blades hit the saddle:
Then I sawed and filed out a notch in each saddle so that the blades could be brought flush to the stock:
At that point, there was nothing left to do but trim the thumbscrews and wedges down to size, and call it done:
Initial tests seem to indicate that it works.
[Edit: If you’re thinking about making a marking gauge, see this post for an important tweak that helps resolve a certain annoyance in this style of marking gauge. This one doesn’t have that issue, but bigger ones tend to.] I’ll restore this link some day, maybe
Everyone seems to make a handle for a handle-less socket chisel that somehow escaped the wrath of mushrooming by way of hammer. In my case, I had a 1.25″ Stanley 720 sitting around asking for some attention. I thought, hey, well, if I ever have a chance to sit down with a lathe, maybe I’ll make one.
Then Bagathon rolled around, and I asked Tom Conroy about what’s involved in making one, because he actually turns stuff and always has good advice. He said that a lathe is not really necessary, and the socket fit itself always needs a bit of tweaking, so I might just try to make one without turning.
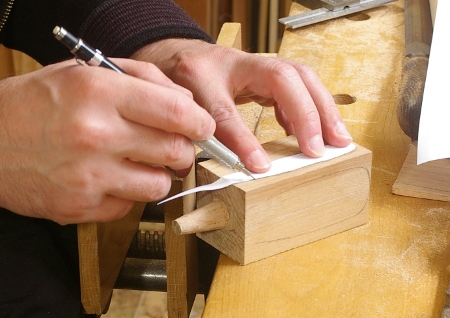
So I decided that is what I would do, and I finally got around to it. I dug out the handy block of yellow birch that I used for my pigsticker handle, cut off a piece, marked lines through the center of each face, and then cut what sort of looks like a square tenon for the cone where the socket fits:
After tracing the approximate angle line onto each face here, I used my saw rasp to take it down to a cone. This sounds trickier than it is; all you do is work the corners first so that you have an octagonal shape, then refine it until you have a cone.
Then to fine-tune the chisel’s fit, I put the chisel on top of the cone and twisted a little:
The grime inside the socket left marks on the high spots that I could then pare off:
After a few iterations, the chisel fit, and it was off to shaping. I didn’t know what pattern to use, but I like the general contour of those yellow-handled Lee Valley chisels, so I traced that to a piece of paper, then traced that pattern onto each face:
Next time, before doing anything, I’ll mill the block down to its final extent so that I don’t have to remove as much. Because the block was much wider than the ultimate handle width, I had to saw two parallel faces off and re-mark the pattern.
But even with this, the shaping went relatively quickly, first getting down to a squarish profile:
Then doing the octagon thing again to get to a refined curve, and finally some files and sandpaper to get it smooth, I had something that looked like a handle. Here’s the more-or-less end result before finishing:
It’s not perfectly round, but it’s fairly close. I’m not sure I want perfectly round. The next handle I make will probably have a sort of oval profile.
Tom was right. This wasn’t hard at all, and it didn’t take much time, either. The only thing that was a little bit of a pain was holding the handle in place when it began to take final shape. I had to improvise some jaws to fit in the vise for that.