Okay, so it turns out that clearing 105-year-old grease from a hand drill’s gears is a moderately ugly job.
Who knew?

Okay, so it turns out that clearing 105-year-old grease from a hand drill’s gears is a moderately ugly job.
Who knew?
Last week, I finally finished off that Jackson backsaw that I’d been working on since before the dawn of history. Here’s what it looks like when all was said and done:

Skipping back a few entries, this is what it looked like before I did any work:

As you may recall from the last episode, I messed up badly and had to reshape the teeth before I got to the final stage of pointing (sharpening/filing the fleam). But finally I got to print out my tricky-dicky PostScript fleam guide and use it properly. Here’s how it looks in use:

All you do is align the file over each line and take a few strokes. This picture was shot after the first half of the teeth were done, so you can see how every other tooth is a little shorter. It evened out very nicely, just as it was supposed to, and when viewed end-on, the “valley” that you’re supposed to see between a crosscut saw’s teeth was there. Fantastic.
The tip of this saw isn’t in good shape. There’s a kink in it, and the teeth are especially uneven there. Because it’s only about an inch and a half of steel, I’m considering taking the moderately drastic measure of hacking off the tip. I likely already would have, except that I don’t have a machinist’s vise yet.
I didn’t do anything to the handle of this saw, either. Unfortunately, it’s shot; it’s soft almost all the way through, making it hard for the sawnuts to get a grip. The sawnuts are also in bad shape. So I just put it back together so that it wouldn’t be too loose. There’s no point in fussing with it any more; if I want to improve the handle, I’ll need to make a new one. (This is not a bad idea, because I like the shape of the handle and have this fantasy of eventually making my own saws.)
Well, so much for the saw’s looks. A more important question is, “How does it cut?” I’m happy to report that it’s great. Due to its somewhat aggressive rake angle and the relatively low number of teeth per inch, there is moderate tearout, but it saws quickly and with very little effort.
For some reason, I don’t particularly expect to use this saw much. It should be fine for cutting smaller boards down to size in a miter box, and for cutting down the shoulders of tenons, but it’s too small for large boards, and because it’s a crosscut saw, it’s useless for sawing down the cheeks or anything else that’s a rip operation. That’s fine, though. My next two saw projects really ought to be full rip and crosscut handsaws.
I’m a little relieved that my two candidates for those two saws are in much, much better shape than this thing when it started out…
I got all “high-tech” on the problem of pointing the teeth in my Jackson backsaw, thinking that I could maybe do something a little differently because I know the PostScript programming language. So I wrote a program to image a fleam angle guide, and spent last night getting my infuriating printer to work.
I couldn’t resist the urge to tweak the program a little while I was at work, so I was really excited to come home, print out the guide and try it out.
Unfortunately, I was in full bonehead mode. I put the guide on backwards and promptly screwed up the shape of my teeth. So I had to reshape and reset the teeth. Not that this was a bad thing; the teeth near the front of the saw were a little messed up. However, the file I was using is now history; I’ll need to get another one or two tomorrow.
I’d mentioned earlier that setting the sawteeth was a royal pain in the ass. Perhaps this was a “happy accident” today, because setting the teeth went a lot faster today due to this setup:

The first thing that helped here is that I printed out my pointing guide with a fleam angle of zero degrees and taped it to the saw, effectively making it a setting guide. This helped out a lot. No more squinting, trying to figure out if I was on the right tooth; just point at the next line, squeeze, and move on.
The other thing (and this is a big duh for me) is that I put the damn thing in the saw vise this time. Why I didn’t earlier is beyond me.
I just set the teeth of the Jackson backsaw. What a major pain in the tuchus. I hope it gets less of a pain with practice!
I knew that I would need to shape the teeth of some of my saws sooner or later in order to sharpen them properly. I decided to start with the Jackson backsaw that I’d de-rusted earlier, again figuring that I’d only be out $1.99 if I messed it up.
The teeth were at 11 points per inch, but very badly shaped in some parts, especially the tip. So I started with jointing. I don’t have a saw jointer, but you can just use a mill file without a handle. Maybe I ought to buy or make a jointer, though; it’s hard to get a good grip.
I decided to set the rake angle at around 20 degrees, a moderately aggressive cut for a crosscut saw. To make a rake guide, I cut out a chunk of yellow-poplar and drilled a hole in the side (as recommended by most saw-sharpening guides).
It turned out surprisingly well, especially considering that this was my first attempt. The teeth are reasonably uniform, and it certainly looks much better than it used to. It seems that it is important to take only a few strokes at a time with the file, going over the teeth several times until they start to look alike. However, due to the poor initial shape, I did remove a significant amount of steel to get to this stage.
Next up for this saw is setting and creating the fleam angle. Hopefully, I’ll have gotten the handle in decent shape at that point, so I can test it out right away.
I’ve been working on my saws. My first victim was that rusty old Jackson backsaw from the last journal entry. I followed this dude’s instructions and ended up with a significantly derusted version:

It was fairly pitted, but I intentionally started on a saw that wasn’t in such hot shape. I applied a lot of wax, so it should saw very cleanly once I bang out the kink at the end and get the teeth in decent shape.
Having this as encouragement, I decided to attack the “Warranted Superior” saw that had been sitting around for a while with the handle off. I got that saw very soon after moving to San Francisco for $2 from a couple of old ladies who were selling stuff out of their garage on weekends. The blade of that guy was in really nice shape, with very little rust, so I didn’t expect the derusting to take very long.
However, after scraping a bunch of rust off with the razor blade, I came across the etching. I thought I was on crack or something when I first read it, so I used a little bit of care to raise it to be able to see it for real:

This saw is a Winchester #16. Or is that a #46? Huh? Apparently, these are somewhat collectible; they were not made for long (according to this, in any case). Who really made this saw? Beats me. We know that Stanley and Sargent made the Winchester planes.
Now I don’t know what to do. Should I sell it? The blade is in stellar shape, but the handle isn’t so hot; the top horn is a little broken, and the finish was crap. I’ll probably just continue on with the restoration, dunno. The teeth are rip profile, but it’s been improperly sharpened with crosscut fleam.
I realize that I have not been posting all of my goodies lately. This isn’t because I haven’t gotten any new tools lately, it’s that I’ve gotten too many and it would be hard to keep up. But I will make an attempt to post one every now and then.
Probably the most significant thing I got lately was this saw vise:
This might sound like the lamest tool in the world to post about, but only for someone who doesn’t have a saw vise. It is shown here holding my run-down old Jackson backsaw, which won’t be run-down for long, now that I have a saw vise. It weighs 12 pounds, god only knows who made it and when, and it cost me a whopping $10 on ebay. Thank goodness it doesn’t seem to have a manufacturer’s mark; otherwise, some lamebrain would have probably tried to get all collector on it (I had already bid on a few Disstons but they quickly got out of hand).
It’s really hard to use mere words to describe how useful something like this is. No, really. Before, I was wondering how difficult sharpening saws was going to be. Now, I don’t, because this thing really holds those bad boys in tightly. It couldn’t have come at a better time, because a few working saws are the next order of business for me. I bought a few files today in anticipation.
And it actually clamps to the bottom of my WorkMate. Though I’m not sure this is a great feature.
So the big news first–I’ve finally made some serious headway in planing. Basically, I got another plane in working order, did some fine-tuning, honed my blades to death, and here we are with a full-length shaving:

It’s hard to describe how much of an improvement this is over my previous attempts. I was getting a few good shavings before, but here, every last shaving was awesome. The surface is like people say; it’s smooth and shines (and this with a silly workmate!). I’d been dreaming of being able to do this for many years.
Here are the two planes I used:
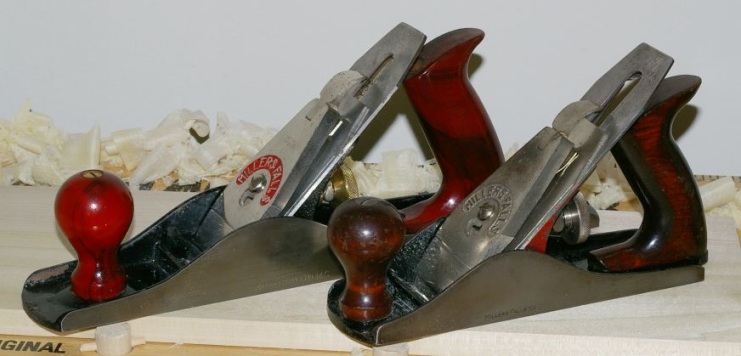
The smoothing plane is the same one from before, but I’ve been working on it. I flattened the lip of the chipbreaker, and flatted the frog base and mating surfaces with my diamond stone. I cleaned out the mouth a little.
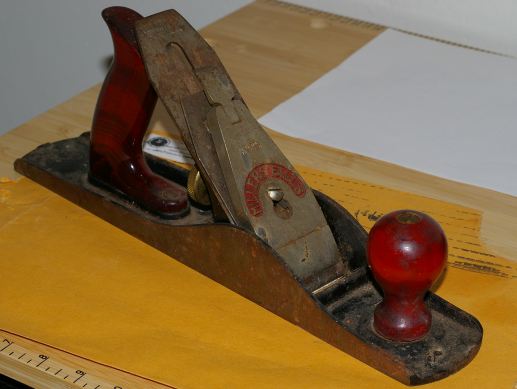
Now, the jack plane is the Millers Falls #14C that I was talking about before as my next restoration project. I said that this was a pretty plane. Here’s what it looked like when I got it:
And the after (wow):
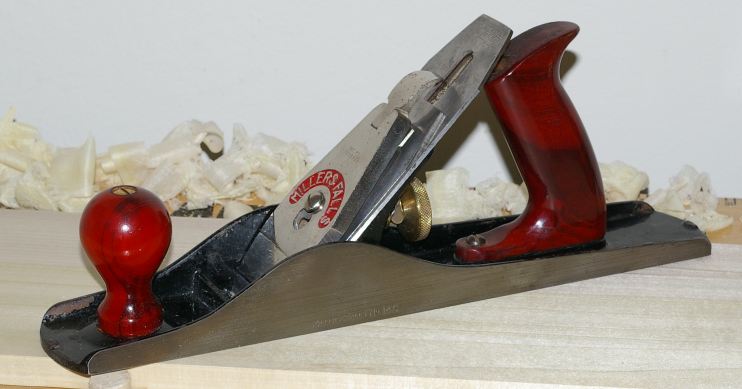
This plane is a type 4, made between 1955 and 1966. Some say that this was the pinnacle of the Millers Falls bench planes. There are superficial differences. The adjuster nut is solid brass and the wood in the tote and knob are superior, but there is one major difference between this and my other older Millers Falls planes that can affect function–the iron is much thicker, about as thick as a Hock iron. It has “solid tool steel” stamped on the top, which concerned me at first, because I thought it might not be of the usual good stuff, but it takes and holds an edge very well.
Millers Falls #14C: I took the blade up to Tahoe last weekend and flattened the back. I also shaped the bevel; it’s ready for true honing now. This week, I worked on cleaning it up. It had more rust than the other stuff I’ve worked on, but it wasn’t too bad. All of the parts are clean now except for the nuts that hold on the tote and knob. The only other thing that needs to be done is lapping the sole.
[See the edits in this post about my current thoughts on lapping.]
I have also flattened the frog bases of this and my #9. I don’t know if this is going to reduce chatter or not, but it was very easy to do with my diamond stone, so I figured it wouldn’t hurt.
Stanley #6: blade flattened, bevel shaped (what a pain). Probably will be done about the same time as the MF #14C, maybe tomorrow.
I made some improvised bench dogs for my silly bench by drilling holes through 3/4″ dowels, then pounding thin dowels through those holes. I used my old Jackson crosscut backsaw to cut the big dowels. It’s as dull as a hoe, has terribly-formed teeth, is kinda rusty, has a loose handle, and still cuts better than any other saw I’ve ever used. I really need to schedule rehab of that thing.
So dubido asked for a plane lineup. Here are all of my current bench planes (meaning that this excludes block planes, spokeshaves, and other weird stuff):
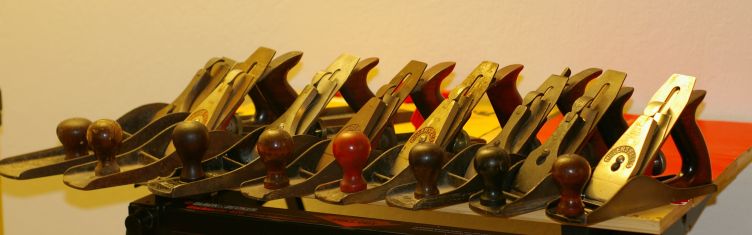
From left to right, they are:
