Unknown's avatar

About Brian Ward

I have no idea what I'm doing.

Shoe Rack: Shelf components and side glue-up

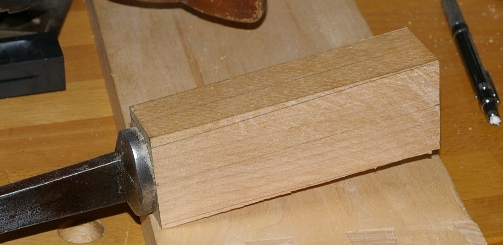
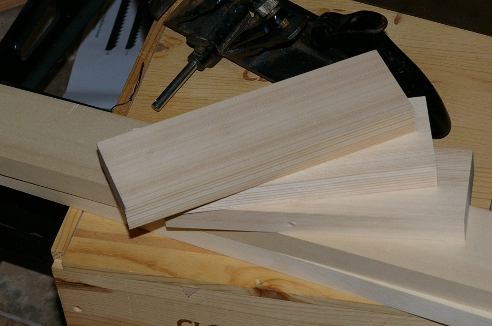
Although I didn’t have much time to work this weekend, I did make a little progress on the shoe rack. The shelves are coming along; in the following image, the mortises for the small stretchers are all complete, as are half of the tenons. The other half of the tenons are marked out and ready for the saw.

There are 18 of these small stretchers, which means 36 more mortise-and-tenon joints, but they go pretty quickly at this size (about 1/2″ square face size for the tenons).

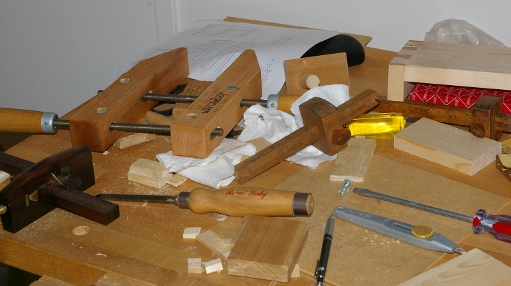
I also picked up some liquid hide glue and glued up one of the side frames:

The Workmate doesn’t seem too bad for this operation. With some fooling around with the bench’s panels, I was able to clamp it between the jaws. Using the liquid hide glue (Titebond in this case) was about as easy as you’d expect–squeeze it out, spread it on the joint, and clamp. This is good, because without a heat lamp or something, I don’t think I’d be able to use hot hide glue in the shop because it’s just too cool down there to have any sort of reasonable open time for glue-up operations that involve more than a handful of joints.

There isn’t much left to do on this project. I need to cut the rest of those small joints (24 left), glue everything up, and then apply some sort of finish.

Henry’s Stool

Several months ago, I made a visit to my aunt, who has some old family furniture. Among them was this stool that I remember from my grandmother’s place:

It was made by my great-great grandfather, Henry Snyder, for my grandmother when she was young, so this would have been in the early-to-mid 1920s. The wood looks to be some sort of softwood, likely one of the pines.

The stool’s joinery is very simple; three nails on each side of the front stretchers, plus nails from the top down. On woods that move a lot, this would have caused checks due to the large variance of humidity in the Baltimore area, but this stuff seems to be pretty stable, and the pieces are quite small. I like the design’s lines and simplicity.

Henry Snyder was a carpenter who built his own house in addition to this stool.

Shoe rack: Side frame

At this point, most of the significant work on the shoe rack’s joints are done. the side frames are complete, with both consisting of six mortise and tenon joints like this:

In addition to this, there are three shelf frames that are on their way to completion. They’ll take just a little more time to complete, but all of the boards have been cut and now it’s just a matter of making 36 more joints. This sounds worse than it actually is, because the mortises and tenons on the remaining joints are quite small.

I have made a few decisions on this project. The first is that I’ll use some sort of bottled hide glue for the joints to see how it works. The second is that this will be a knockdown project and I will use some fastening hardware to attach the sides to the shelves. These decisions reflect a desire to experiment a little more, while at the same time saving some time, because this thing really needs to get done so that I can move on the the next project.

I also figure that since this is not meant to be the finest piece of furniture in the land, it doesn’t matter too much if some flaws show up a couple of years down the road. This became even more so when, a few weeks ago, I saw a design I liked a lot better than my current one.

A Tale of Two Saws

Or, rather, two descriptions. I finally finished the pile o’ handles I was working on, and two of the saws on which they belong are complete:

The one in the back is a 28″ Disston No. 7. When I got it, it was filed at 4.5TPI crosscut. However, this pitch (and the saw’s handle) is far more suited for ripping, so during sharpening, I converted it to a rip saw. For the first time when simply modifying teeth on an old saw, I needed to add some set–there was practically none. Although the surface looks a little funky (strange corrosion patterns), it’s actually pretty smooth, and it tears through wood like a bat out of hell. I have wanted this saw to be complete for a long time. I’ll be using it a lot.

The other saw is a “Warranted Superior” backsaw from the 50s or so. There’s nothing remarkable about it. It’s not mine (it belongs to someone in the family), but I’ve had it for a while because it was in bad need of a rehab. The teeth had been nearly worn off in places. Nasty. So, after refinishing the handle and redoing the teeth, it cuts about as well as you’d hope it to. Interestingly, it’s been a while since I did crosscut filing; most of my latest projects have revolved around different varieties of rip saws.

Unfortunately, this thing was on my project list for a couple of years. Now I can finally send it back to its owner.

Mortise chisel: Part 2

I marked out the angles on the mortise chisel by “feel,” just by sort of looking at all of the pictures I’ve seen and guessing. With two sides cut away, it looked like this:

I cut out these sections with my larger rip saw. It would have taken forever with anything else. Then I used a block plane to smooth around the oval. I nicked the blade of the plane against the chisel bolster doing that. Boo. Grinding that stuff out is always such a pain.

Following the plane, I used a spokeshave to further smooth the oval shape, then, finally, progressive grits of sandpaper on a block to do the final smoothing. This sequence was quick.

A couple of oil/varnish blend applications later, along with the requisite sharpening, it was ready to use. Here it is with its first test mortise-and-tenon joint (upper left, not that stuff to the right):

It’s a lot of fun to use. Best of all, it’s fast.

Mortise chisel handle: Part 1

I’ve been jonesing for a “real” mortise chisel for a long time now. My obstacle, however, has been the irrational cheapskate inside of me. There’s been a lot written about the English “pigsticker” style of mortise chisel lately, and I’ve been trolling ebay for a cheap one or one without a handle. I finally got my hands on a handle-free sample a couple of weeks ago.

Made by W. Butcher, it has a strange width–something like 9/32″. This is close enough to 1/4″, I guess. Its cutting edge is laminated to a softer metal for the rest of the blade.

Unfortunately, it was dubbed at the tip when I got it, and it was a lot of work to flatten the back (I took the dubbing problem from both ends; shortened it slightly and flattened the rest off). You would think something that small would be easier to flatten, but the steel is really quite hard. I used Norton 3X sandpaper on a granite surface plate, grits 80 on up.

After doing this task, I set out to make a new handle per Derek Cohen’s instructions. Putting in the hole for the tang was a real pain in the ass:

The wood is yellow birch. We’ll see if it holds up. Next step is to shape it, then finish sharpening the blade.

Shoe rack: Side frame pieces

I’m in the process of making a shoe rack. It will basically be two side frames with three shelves, all done with mortise-and-tenon joints. I have most of the wood dimensioned, and have the boards for one of the sides cut to length now:

There are going to be quite a lot of mortise-and-tenon joints in this project. I’ve been practicing, and am getting much better. The fun part is that I’m no longer using the “drill and chop out” method of making the mortise. Now that I have no more downstairs neighbors, I’ve just been chopping the whole thing out with a chisel. It’s noisy and destructive and a lot faster than fooling around with the drills.

This wood is some rather cheap mystery softwood. These boards have a lot of knots in them; in fact, they’re downright tragic if you look at them whole. However, if you buy 10- and 12-inch widths, you get a lot of sections that have clear wood, and you can get cuts that are quartersawn in this way. This is a pretty common trick with softwoods.

The growth rings are very closely packed in some of these boards, but it’s still a rather soft wood, somewhere around the toughness of yellow-poplar (tuliptree). It’s always kind of tricky to make joints in wood like this, but I must admit that there’s a bit of a charge when you succeed.

Various handles and knobs

I’m in the process of varnishing four saw handles, a plane tote, and a plane knob. Here are half of the pieces.

As usual, I’m not being terribly speedy here. It’s been seven months since I started working on that tenon saw handle in the center. Things happen but I like to think that sooner or later, I get back to this stuff. (Especially since I’ve had the saw blade sharpened almost since I started on the handle and it’s otherwise ready to go.)

The larger hand saw handle in the rear is for a Disston D-8 that will become one of my new rip saws, somewhere at around 7TPI. This will be in addition to a No. 7 (I think) that’s going to be a larger 4.5TPI rip saw. The handle for that one is also in this batch, thankfully. Both of these handles were glopped over with some awful green paint that I needed to strip before the refinishing process started. What is it with the green paint?

The initial finish on these two handles was a mix of “colonial maple” stain, some satin polyurethane, and tung oil, for an oil/varnish blend (this makes the rays in the beech look nice). After a few coats of that, I’m now putting on satin polyurethane. I like the way that a top coat of polyurethane feels on the other handles I’ve done (as opposed to alkyd varnish and oil/varnish blends), and it seems to hold up better. It takes a little more effort to get polyurethane to look decent, but it’s not that bad.

I think I need one or two more coats on the handles.

The knob is from a Millers Falls #22 jointer plane that’s been waiting for restoration. I did not use the oil/varnish blend on this (or its accompanying tote), because the ray structure in this tropical wood did not seem worth bringing out. I may be done with the plane parts; I’ll evaluate that later.

Shooting board

I made a shooting board a couple of weeks ago. As with the bench hook, I don’t know why I did not do this earlier.

As it turns out, there’s a repeating pattern of things I don’t know here. I have no idea why I dovetailed the lip onto the front. I did this on the bench hook, too. It didn’t take long and it wasn’t hard, but why? I also don’t know why I decided to do two little pieces for the front lip instead of one big piece.

The Veritas low-angle block plane works fine for shooting stuff of this width. You could use a low-angle jack plane for this, too. But I now see why people like their miter planes. I don’t really see myself spending so much cash on one of those for this purpose, though.

I need to make a rack for my chisels and small saws. The bench is a mess.

Bench in new shop

Here’s a shot of the rebuilt bench in the new shop. I suppose it doesn’t look much different than the old bench, since most of the changes are on the side (big lower side stretchers and 2x thickness on the legs).

Yes, those are shavings on the top. I managed to do a tiny bit of wood prep on that piece of spruce or fir or whatever on the left (it’s mystery cheap softwood from Lowe’s, surprisingly not too bad).

Also, there’s a new bench hook over there on the right that I made a little while back before moving. Yay for bench hooks!