
While waiting for the glue to dry on my botched-mortise fixes, I broke the edges on the leg frame with sandpaper. I did this moderately, not taking off too much, but more than just a light touch.
Then I chamfered the edges of the top. The more I use the chamfer attachment to my Veritas low-angle block plane, the more I like it. It’s not the easiest thing in the world to control at first, but by taking light strokes (and starting at 1/4 to the end of the cut and working your way back as you would a moulding plane), it does a nice job. Not to mention that it has an adjustable mouth.
With no excuses left, I had to face the dreaded glue-up task. This part is always a little intimidating to me because you actually have to make sure that you get it done reasonably fast, and I normally like to work slowly. In addition, I’m even more clamp-challenged than most woodworkers.
One thing in particular that worried me was that my joints were very tight; it was difficult to insert and remove the parts without any glue. So how hard would it be to jam these things in?
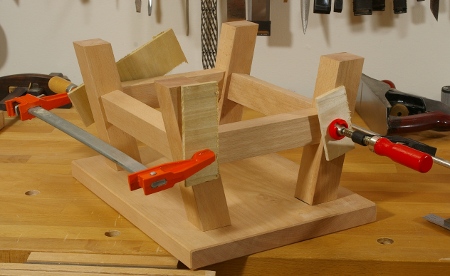
So, from the preceding photo, you can not only see that I managed to get the joints together, but I needed only two clamps! The frame pieces went together like butter; it seems that the hide glue acted as a little bit of lubricant instead of being an impediment. The only time I really had to use some force was driving one of the legs all the way into the top. I called upon my mallet to do that.
I’m not even sure that these two clamps were necessary. The joints were really holding together tightly, perhaps because of the overall structure.
Will I dare try stepping on this thing tomorrow?
