Triumph of the Planes

So the big news first–I’ve finally made some serious headway in planing. Basically, I got another plane in working order, did some fine-tuning, honed my blades to death, and here we are with a full-length shaving:

It’s hard to describe how much of an improvement this is over my previous attempts. I was getting a few good shavings before, but here, every last shaving was awesome. The surface is like people say; it’s smooth and shines (and this with a silly workmate!). I’d been dreaming of being able to do this for many years.

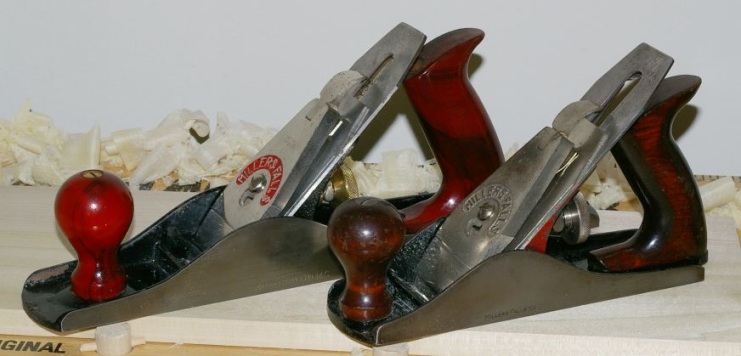
Here are the two planes I used:

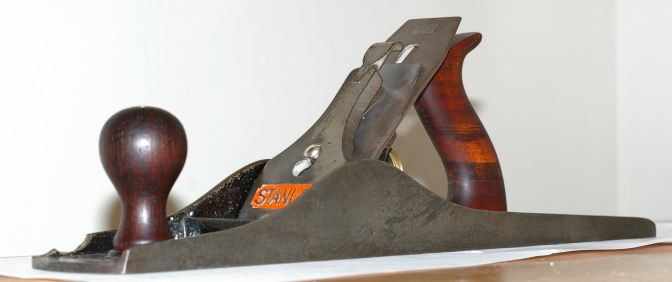
The smoothing plane is the same one from before, but I’ve been working on it. I flattened the lip of the chipbreaker, and flatted the frog base and mating surfaces with my diamond stone. I cleaned out the mouth a little.

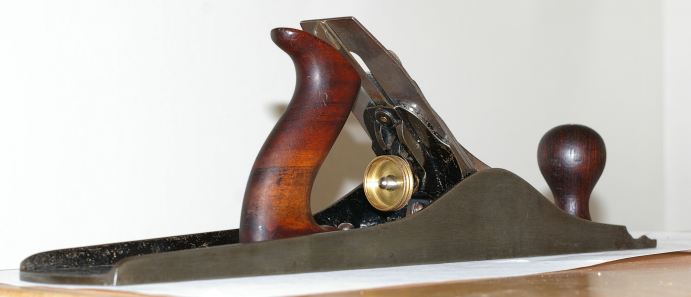
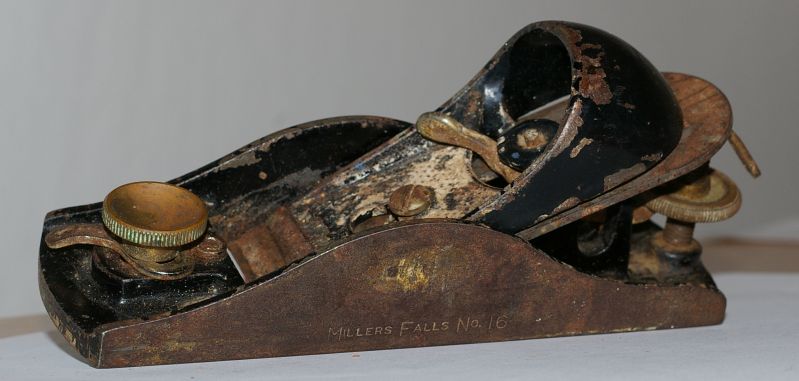
Now, the jack plane is the Millers Falls #14C that I was talking about before as my next restoration project. I said that this was a pretty plane. Here’s what it looked like when I got it:

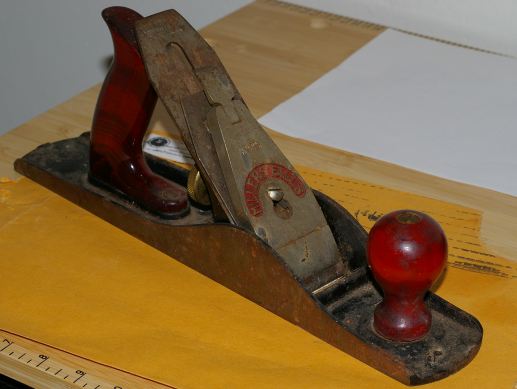
And the after (wow):

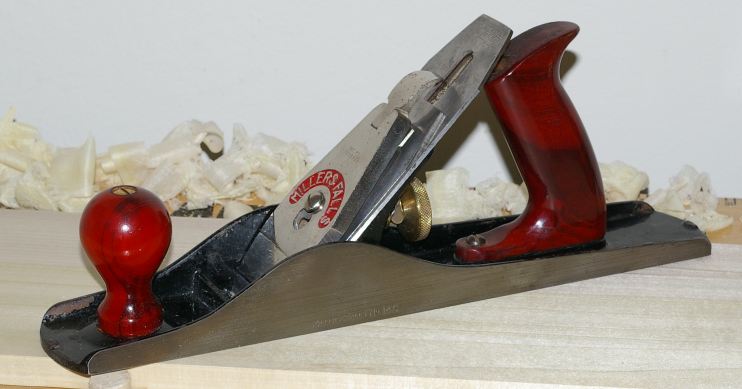
This plane is a type 4, made between 1955 and 1966. Some say that this was the pinnacle of the Millers Falls bench planes. There are superficial differences. The adjuster nut is solid brass and the wood in the tote and knob are superior, but there is one major difference between this and my other older Millers Falls planes that can affect function–the iron is much thicker, about as thick as a Hock iron. It has “solid tool steel” stamped on the top, which concerned me at first, because I thought it might not be of the usual good stuff, but it takes and holds an edge very well.

Gradual Progress

Millers Falls #14C: I took the blade up to Tahoe last weekend and flattened the back. I also shaped the bevel; it’s ready for true honing now. This week, I worked on cleaning it up. It had more rust than the other stuff I’ve worked on, but it wasn’t too bad. All of the parts are clean now except for the nuts that hold on the tote and knob. The only other thing that needs to be done is lapping the sole.

[See the edits in this post about my current thoughts on lapping.]

I have also flattened the frog bases of this and my #9. I don’t know if this is going to reduce chatter or not, but it was very easy to do with my diamond stone, so I figured it wouldn’t hurt.

Stanley #6: blade flattened, bevel shaped (what a pain). Probably will be done about the same time as the MF #14C, maybe tomorrow.

I made some improvised bench dogs for my silly bench by drilling holes through 3/4″ dowels, then pounding thin dowels through those holes. I used my old Jackson crosscut backsaw to cut the big dowels. It’s as dull as a hoe, has terribly-formed teeth, is kinda rusty, has a loose handle, and still cuts better than any other saw I’ve ever used. I really need to schedule rehab of that thing.

The Usual Suspects

So dubido asked for a plane lineup. Here are all of my current bench planes (meaning that this excludes block planes, spokeshaves, and other weird stuff):

From left to right, they are:

  • Stanley #8 jointer (24″), type 5 (1885-1888). This is in the worst condition of all of my planes, and is also my most expensive (hey, let’s see you try to be a cheapskate and get a jointer). It will clean up and work, especially now that I have a frog that’s less broken than the original.
  • Millers Falls #18 fore (18″), type 2 (probably 1936-1941). Some serious rust on the sole of this guy, otherwise should be easy to clean.
  • Stanley #6 fore (18″), type 16-ish (1933-1941). My first bench plane purchase. Almost ready to use.
  • Millers Falls #14 jack (14″), type 3 (1941-1949). Rust-o-rama, almost certainly needs electrolysis.
  • Millers Falls #14C jack (14″), type 4 (1955-1966). My next restoration project. A very pretty plane, as you will see in weeks to come.
  • Stanley #5C jack (14″), type 11 (1910-1918). Kinda beat up, with a cracked tote and stuff, but should eventually work fine.
  • Millers Falls #900 smoother (9″) sometime after 1949. An “economy” version of the #9, this does not have the frog depth adjustment screw, the three-point lever cap, or the spiffy handles, but probably will work just as well when tuned, since it’s otherwise almost identical to the #9.
  • Millers Falls #9 smoother (9″), type 3 (1941-1949). My first completed, tuned, and used plane; see previous posts. A nice user, that’s for sure.

More plane practice

I got out the gear from last week to try to improve my planing and sharpening skills. We definitely have progress here.

It turned out that I messed up the primary bevel last week; I had it somewhere near 25 degrees, but it should be much higher. So earlier this week, I took out the honing guide and diamond stone and (groan) reworked the bevel. This made a big difference; sharpening also went much faster this time. And I have yet fewer arm hairs.

What took a long time was the sole preparation. I was wondering about the “friction” people talk about on plane soles, so I tried a test run on my MF #9 with the iron retracted on a board. Well, I’ll be–“friction” is real. Man, that thing was hard to drag around. So I decided to see if I could get the bottom a little smoother. I probably should not have done that, it was likely a waste of time and it took forever to get all the crud off the bottom and out of the plane. But I couldn’t help myself, and I polished up the sides to a semi-shine while I was at it. Oooh, purty.

After this, I waxed the sole. Now that really did the trick. Wow. I will not skip this step again. It amounts to Friction-B-Gone, and now I’m wondering if hot waxing (as you would do on a snowboard or skis) would be even better. The nice thing about hot wax is that there aren’t any awful chemicals in the wax paste that have to evaporate before you smooth it.

I’m experiencing all of the usual problems you get when you’re still learning how to use a plane and those that you experience in a plane that needs some fine-tuning. My biggest problem is getting the shavings not to jam. The solution I finally ended up at was just to open the throat a little wider. Of course, this was after who-knows-how-long, and the iron was dull at that point, but that’s not a big deal. I’m at least getting good chipbreaking action. My practice board is much smoother this week than it was last week, but I can probably improve on this still by getting better shaving control. I was getting a bunch of single-fiber shavings today. That was neat.

Before cleaning up, I sharpened another chisel, my 1/2″ one, including lapping the back. This was much faster now, not only because I’m getting better at it, but also the lapping took virtually no time on the diamond stone. Then I tried it out on some wood, and that was really cool. I love how a sharp tool gives a glass-smooth finish. Endgrain? No problem.

One thing that’s becoming painfully obvious (and I knew this was going to be an issue) is that the ‘ol workmate just isn’t cutting it when I use a plane, and I need to solve this problem. I need to hold it down with one foot to keep it from tipping up because I’m putting too much force on it. It would work in a somewhat adequate manner if I could find some way to bolster it against a wall. But what I’ll probably need to do is make some cheap ‘n dirty workbench that’s a little more stable (and one that I can do an end vise number on). This would be more useful anyway, because I eventually want to be able to use the workmate for sawing.

Well, there’s that problem, and also that my apartment isn’t a good workshop. But there are solutions.

In the near future, I need to get one of my jack planes working, as well as a few saws. I had the opportunity to use my 99-cent Jackson backsaw today. Even in the wretched shape that it’s in, it cut surprisingly quickly.

It’d also be nice to get one of the fore planes up and running, even though I’m not sure what I’d use it for. I’m so close on my Stanley #6 that I might just try to get it finished before a jack (which is going to require rust removal, some serious grind-o-rama, and who knows what else).

First Usable Plane!

So this weekend turned out to be a big one for me, as I finished off my Millers Falls #9 and tried it out on wood for the first time. I’d been coming up on this for a while now, since there were very few tools that I haven’t messed with so far. The only other new thing (offhand) that I could have done was get a saw into working shape.

There were three things remaining on the plane before this weekend: the sole needed lapping, the iron needed honing, and the screw for the tote needed some sort of washer. This latter one was easy, I just bought a little o-ring and threw it in there.

[edit: I don’t lap my plane soles anymore, unless something’s seriously messed up, and usually, nothing is. This lapping stuff seems like it’s blown out of proportion, and sometimes, doing it can make your plane sole worse. That said, I’ll often quickly rub a plane’s sole on a piece of Norton 3X sandpaper on the surface plate, but this is usually more to remove rust than to “make it flat”.]

Lapping the sole was something I’d never done before, but had heard tons about. My method was to spray-glue some acetate drafting film to my glass plate, add oil and silicon carbide grit, and start rubbing. The acetate turned out to be a great idea, because the grit quickly became embedded. The only thing that might have been better could have been Mylar drafting film, which is more durable, but costs about six times as much. I used sunflower oil because it’s fairly light and isn’t smelly and toxic.

I had a little help in lapping. My friend JJ decided that she wanted to come over, and I warned her that I’d put her to work. It didn’t take as long as the horror stories I’ve heard from this before, though, so I was happy. I’m not sure about my friend though; something tells me that she may have not had a day of plane rehab in mind.

What did take forever, though, was lapping the back of the iron. I’d been dreading this ever since I did the chisel, because it took forever on that. I decided it was time to pull out the wallet to try to buy off some time here. In other words, I bought a coarse diamond stone. It still took forever, especially because there was one corner that was the tiniest bit convex. Argh.

And of course, wouldn’t you know that there were a bunch of pits on the bevel, too. Now here was where I was really happy that I got the diamond stone, because I don’t have a grinder. I just locked the sucker in the honing guide, plopped it on the diamond stone, and rolled like mad, and finally ground past the pits and the other really nice deficiencies.

After the requisite arm-hair shavings, it was time to try it out on some poplar:

Of course, you never get it right the first time. I’d never used anything like this before, so naturally it took a lot of gouging and fiddling to finally arrive at something passable.

This is going to take some practice to get to where I need to be, but you gotta love it when your floor looks like this:

Thank goodness for vacuum cleaners…

#6 Reassembled

After looking at a pile of parts for about a month, I realized that now that I’d cleaned the frog and screws, there was no reason not to reassemble the #6 plane (other than losing a few of those parts, that is). Here’s the result:

It sure isn’t gonna win any beauty contests with that big ol’ chip missing off the front left side. More important is that all of the moving parts actually move smoothly and easily now. It’s amazing how well this stuff works when you get rid of all of the rust and apply a tiny amount of oil.

Of course, it’s not done yet. Two big things remain; first, I have to lap the sole and clean the sides. Second, the iron needs honing. Actually, it needs more than that; it needs grinding first, because the edge lists to one side. That’s sort of a big job for someone who’s never done it before, but it’s not impossible.

[edit: see the edits in this post for my current thoughts on lapping.]

Here’s the rear:

With this one in decent shape, I can move to another plane. I’ll probably do the Millers Falls #9 now. As you may recall, I already started on the lever cap from that. I’ve also cleaned the iron and chipbreaker, so given that the wood doesn’t need any special work, it won’t be long until that one is looking good, too.

At least I hope it doesn’t take too long. Other than these two planes, somehow five others have popped up that also need, uh… work.

First Marking Gauges, More Plane Work

These two marking gauges arrived last week:

One of these is a Stanley #61. Who knows what the other one is, a Stanley #62? The #61 is from the Sweetheart era, so that makes it between 70 and 85 years old. The other one is older, with a patent date of 1873. It’d be real handy if they actually told us the actual patent number, but that would have just been too easy.

The #61 is in really good shape, perfectly usable and ready to go. The other one’s marking scribe is in a strange state. It’s probably salvageable, but I don’t want to munge it too much on a tool that is this old (even if it isn’t in the greatest shape).

These are neat tools; check out the all-wooden screws.

Today’s tool work centered on that Stanley #6. I decided that it was time to attack the schmutz on the bed and frog. I was getting a little tired of wiping crud off, thinking, “OK, now I’m at the end of it,” only to discover more and more of it. So I sat back and thought, okay, well, water isn’t gonna hurt the japanning, and if I dry it fast enough, it won’t rust…

So I took it to the sink, whipped out the Palmolive, and gave ‘er a big scrubbing. That actually did the trick, finally. I had a hair dryer ready, so that’s one clean bed now. The frog is mostly clean now, too, but I did not do as much to it because it’s a more complex part and it may not need any more.

The final cleaning frenzy came this evening, when I scrubbed and polished the various screws and hardware. Although they look very nice now, I have to admit that there is a point, when you’re meticulously scrubbing a frog-securing washer with an off-center hole, that you ask yourself just what in the hell you’re doing…

First Block Plane

I wasn’t really looking to get a block plane right off the bat. First, for whatever reason, the good ones always seem to end up costing near $35-$40 when they’re in decent shape. Second, it wasn’t a pressing need; they are good at trimming end grain, and that’s not something I wanted to fool around with just yet.

As has happened with my other planes, a somewhat questionable example showed up for a reasonable sum (that is, like $5), and thus, I am now the owner of this little Millers Falls #16:

At first glance, this thing looks positively awful. God only knows what inhabited this plane before it was shipped to me. That pin holding in the iron’s cam locking lever doesn’t exactly look like the original part. The chrome on various parts looks like it’s flaked off. And there’s not a lot of japanning left.

However, the rust is really only a little surface rust, the brass knob and depth adjuster are intact, and most importantly, the mouth adjuster is intact. The adjustable mouth feature is really what separates the men from the boys in the block plane business, and this, being a knockoff of the Stanley 9 1/2, has that feature. Don’t ask me why they made so many stupid block planes without it, or why these manufacturers (Stanley in particular) decided to make so many stupid block planes in the first place, or why a low-angle block plane costs so goddamn much these days. I do not know the answers to these questions.

What I do know is that this plane is going to need a little work to clean up, and that it’s not among my priorities right now, especially because I have amassed way too many planes since I started on this little mission of mine. Seriously. When the dust clears from this initial spending spree, I’ll have two smoothing planes, three jack planes, a fore plane, and a block plane. It has also dawned on me that I’m probably gonna need to start to learn a few simple things about metalworking at some point. In particular, a lot of this stuff seems to have riveted parts. I don’t know much about that.

Stanley #6 Tote and Knob

I’ve been working on the knob and tote of the Stanley #6 for quite a while now. Here’s how they looked when I got the plane:

The original finish was pretty much shot; chipped off in many places, cracked all over, and generally lousy. I guess that’s not too bad for 70 years of wear, but it wasn’t going to be very comfortable for a tool that I actually wanted to use.

Being very conservative about this, I first tried rubbing only some mineral spirits around the wood to see if the finish would crack and fall off easily, as it’s purported to sometimes do. Unfortunately, that didn’t work. The weak parts of the finish fell right off, sure, but a little less than half was really stuck on there. Here’s how it looked after the mineral spirits:

I don’t know if this was better or worse than before. However, even though I relish driving around in a beat-up-looking car, I do not want the same to be true of my bench planes.

So I waited for an appropriate time and place to get out the ol’ paint stripper. That stuff always gives me the heebie-jeebies, because it usually melts your gloves to a point where you generally throw them out after a strippin’ session. Scary or no, it is effective, as this photo shows:

I should make one note about paint stripper–make sure that you clean and rub the wood over with mineral spirits when you’re finishing up. Don’t use water. You see, wood expands and contracts based on its water content, and you risk cracks, raised grain, and all sorts of awful stuff. Wood won’t readily absorb mineral spirits like that. It will evaporate slowly over time and leave the wood in a fairly even, dry state.

So, with the paint finally off, I had a decision to make: what to use for a new finish? Traditionally, varnish or lacquer is used for this stuff, but I’m not much of a fan there. I’ve always really liked the oil finishes, but I wasn’t too sure about this because it is rosewood, after all, and it’s a pretty dark wood already. Not to mention that the tool collectors would scream bloody murder.

Eh, screw those guys. The wood was nicked up anyway, and I really like the way that oil finishes feel in the hand:

This is after two treatments; one more tomorrow and it’s ready to go. It’s hard to tell much because of the glare from the flash, but this is really looking good. The knob is darker than the tote (you can tell this pretty clearly from the stripped photo above), and is now a very rich hue, with the growth rings adding a subtle accent. This should hold up fairly well. I guess if I’m unhappy about it later, I could always draw the oil out with the yummy paint stripper and go at it again with something else. But it’s unlikely that I’ll do anything else except maybe replenish with a different oil.

Rusty Tool #1 and Other Junk

This Millers Falls #14 jack plane arrived on Saturday:

The jack plane is one of the more useful sizes; Stanley’s #5 was the archetype mass-produced until the cows came home. My new plane, like the MF #9 shown a few days ago, is another of the type 3 wartime production series.

It’s also kinda rusty. Even though all of the parts still move and all, it’s pretty clear that this plane needs a lot of work (this is what $5.99 gets you). Because my Stanley #6 is starting to shape up, it’s likely that I won’t bother starting on this iron oxide dump for another month (more on why later).

I have a few more things on the way from eBay. There’s a couple of marking gauges, a Millers Falls #2 hand drill, a backsaw that may be in questionable shape (99 cents cannot be expected to buy much, but I figured it was worth it if just for the handle and sawnuts), and a rusty block plane (yay).

I’m very close to having all of the tools on my initial list. In fact, seems like I really only have the saw set and the chisels left, assuming that I can get the backsaw in some sort of decent shape.

The chisels worry me. The other stuff on my list consists of no-brainers to get “vintage,” but the chisels seem like kind of an iffier thing to get used, the sort of thing you want to look for in person. Because it’s always a questionable proposition to look for anything remotely old around here, I’m just thinking that it might be worth the extra $10-$30 to get a couple of new chisels, provided that they are well-made. There’s a place down in San Carlos that supposedly has them, so I might look at them tomorrow after I pick up my car from the shop.

I also paid a visit to an automotive paint store two blocks from work today to check out their sandpaper supply. They had up to 2500 grit paper, so I bought a bunch in anticipation of Scary Sharp[tm]. Just need to get some plate glass (or something), and I’ll be ready for my first shot at honing.