So, in the little free time that I seem to have these days, I’ve been building the obligatory dining room table. It’s to be in solid red oak, a no-leaf design, and fairly large: about 7′ long. (That’s roughly 2100mm for those who measure in sensible.)
Lengths that long make things unfortunate. I’m not using really thick stock, so there will be battens and such underneath to keep things straight, but just finding clear boards that aren’t excessively bowed has been a problem. In any case, I’m getting somewhere:
Now, the length introduces another problem, that when edge-joining, you’re going to have a really hard time getting everything to line up. Even if you were somehow to find perfectly straight boards, they start flexing around a bit at that length, so managing it is annoying.
There are several ways around this, such as creating index battens to clamp to the faces while gluing up, but in the end, I’ve decided just to index with inserts. In this case, sort of small loose tenon things, and matching mortises for them to fit in.
Even though I recently bought a mortiser (blasphemy, I know), this stuff is so hard to manage that I decided that it would just be easier to do it by hand. And since I wasn’t really in the mood to whack it out with my normal mortise chisels, I went for the old “clamp a guide to the face” method:
Essentially, mark the edge away from the face with a marking gauge, clamp on the guide/jig/whatever, drill out most of the waste (a brad-point bit is helpful in this small size), and excavate with the chisel up against the guide. It’s surprisingly quick.
When finished, a board looks like this:
I don’t bother to put much (if any) glue to affix the loose tenons during glue-up because it’s a hectic time, and the edge-glue joint all around is much stronger anyway. But it really does help tremendously to keep everything behaved while getting the work in the clamps without worrying about if things are flopping around or sliding into the wrong place. Sometimes I’ll also put small F-clamps over the very ends to bring those into alignment, if necessary.
This is one of those times when you are tempted to buy a biscuit joiner or something like that because it might save a little bit of time (or at least seem easier), but I really don’t want to buy another tool. (I guess I have a doweling jig for some reason, but dowels make me go meh.) And really, preparing the faces and edges has been the most time-consuming thing in this project anyway. So far.
But I do wish it were as easy as the smaller table tops that you can just slap together all in one shot.
It’s now been a year since we moved to New Jersey. In my last update, I said that there would be a lot of work needed to get up and working again, and that’s no lie. It’s taken a year, but my new shop is almost operational:
This is more or less the backside view of my post a year ago. I can do hand work reasonably now, or at least, I can when I move the detritus off a benchtop. I had an unpleasant surprise when I found that the soles of several of my planes had developed some rust spots, but I eliminated those and they’re back in action. I don’t have a good sharpening station yet. Several boxes haven’t been unpacked, but they seem to get unpacked as I need things inside.
The item that took the longest amount of time to sort out was the floor, and there, I spent several months trying to figure out what I wanted to do, and who was to do it (sigh). In the end, I tore the carpet out and put the new one in myself with some help from my niece. This is LVP (“luxury vinyl plank”). I don’t know how it’ll work out in the long run, but so far, it seems fine. It’s got a little bit of “give” and won’t shatter cast iron if you drop it, and the color reflects light so that I should be able to see fairly well.
I can’t use the machines yet because of the usual nightmare of dust collection. That, however, is (probably) almost done.
This would all go a lot faster if I didn’t have, like, a day job, and other annoying stuff like that.
And now for something completely different…
One thing that keeps me out of the shop for a month out of most years is the annual trip to Asia. Understand that any sort of woodwoorking-related thing that happens during this trip tends to occur as a “drive-by”–that is, some sort of incidental opportunity along the way (I don’t tend to ask to visit anything in particular for fear of boring the rest of the family to tears).
In any case, we usually visit Japan, and this time, we were able to take a short trip to Niigata (Prefecture). I’ve always wanted to go there, and wouldn’t you know, we took the Shinkansen to Tsumbame-Sanjo. This is a major center for toolmaking and other metalworking, and in the station itself, there is a store showcasing the stuff that they make there. It’s everything from hand tools to sickles to pots and pans to tableware. This was almost perfect, because my family could drool over the cookware while I drooled over the tools.
Then, the staff there mentioned, “Hey, there’s a bigger store just down the street like this if you like this stuff.” That would be the “Regional Industries Promotion Center”, and of course we walked down there.
Here’s some of the stuff that I looked at:
The obligatory planes. These are, of course, the “mass-produced” variety, but they’re still all very nice. Somehow, I avoided buying a rabbet plane (my fetish, or something) but I don’t know how.
Obligatory chisels, similar to the planes. Still didn’t see the one specialty thing that I’ve been looking for.
Some of the nicest pliers you’ll ever see. I picked up a pair of needle-nose pliers. Seriously, I’ve long said that Japan makes some of the best of these sorts of “mundane” tools, like pliers, clamps, and screwdrivers. Tsubame-Sanjo is usually the source. And here’s the thing–it’s really not that expensive. Sure, more than what you’d pay for the run-of-the-mill junk that you see in home centers here, but nothing you’d need a second mortgage for.
Shears and nippers for sewing. I bought some shears. They feel perfect in the hand, cut as well as you’d expect.
We got a whole bunch of other stuff that I don’t need to show, like new tableware (some of the nicest I’ve seen, on par with the Berndorf stuff I got from Austria years ago), ice cream shovels/spoons, and so on. It’s true that you can get most of this stuff via mail-order (though it can be difficult from outside of Japan), but there, you can see a huge variety in person and get it tax-free as a foreign tourist.
In addition, here’s some drive-by woodworking content:
This shoji at the Northern Culture Museum (essentially, a rich farmer’s estate), never mind the crazy-nice garden view from here.
This timberwork–I believe it was in the granary, but don’t quote me on that.
Some shoji or other at the hotel we stayed one night. I don’t know why I singled out this one in particular, I guess liked the use of empty spaces and small wood panels or something.
We found a new house a more quickly than I thought we would. And it’s in… New Jersey. Central Jersey, in particular, if you believe that such a place actually exists. (There’s apparently some sort of debate about this?) In any case, it’s an odd feeling; I’d never thought about the possibility of moving here until very recently. So far, I kinda like it, though I can’t exactly describe why at the moment.
So we’re officially moved in. The move happened during a raging snowstorm, because of course it did. That’s just the way things have been going lately. But the movers didn’t have any difficulty, nothing got too banged up, and I no longer have to spend every weekend looking at houses.
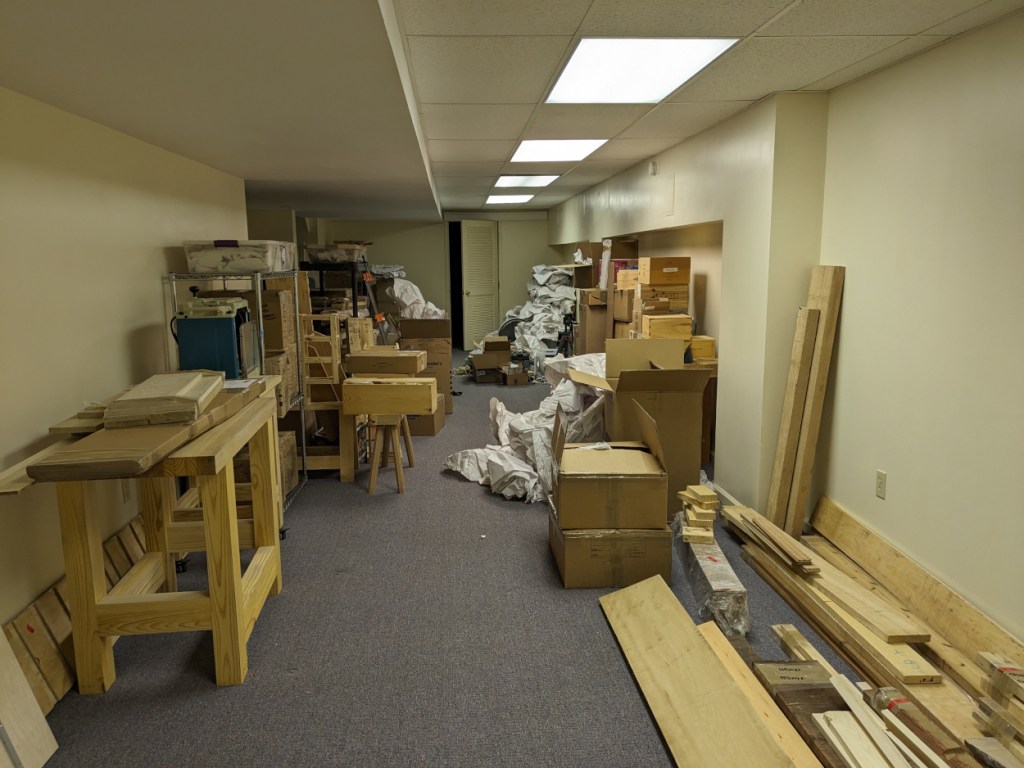
The shop will be in the basement, and although all of the tools and benches are down there, nothing is set up. As you can tell from this photo, there is some work to do:
And by “some work,” I mean a lot of work. Other than obvious things such as de-existing that carpet, there’s electrical, lighting, paint, and so on. I’m aiming for getting this done over the next couple of months, but we’ll see. There’s plenty of other stuff that I need to do in this house, too.
In theory, I could do some limited things with hand tools, but I’m kind of determined to set up things better than my last shop, so I think my efforts should be concentrated on that. I’ll try to detail that as much as I can as I do the work. I need to get a little more organized at the moment as well. I also would have liked a little more time to prepare the shop space before moving, but that just wasn’t an option.
Strangely, I might be able to make a new video or two mildly soon. That is, if I can dig out my lights…
I’d mentioned a year ago that I would be moving at some point. Well, that’s finally happened–partially. What that means is that I’ve moved out of my old house and into a rental. Because the housing market is best described as “Dumpster fire” right now, finding a new house has been challenging, to say the least. There’s virtually nothing on the market, it’s all exceptionally overpriced, and we’re picky. We’ve been looking all year, and this is probably still going to take some time.
I didn’t trust the movers to pack up my hand tools, so I did that ahead of time. Here’s a shot of nearly everything in boxes:
Some would say that this is way too much. But I also have some friends who say that this is way too little. My personal view is that I’d probably prefer to have a little less, but the main issue is (and always has been) organization. If my fantasy of building a dutch tool chest had come true by now, a lot of this would have fit in there, as well as the base that was to go with it.
In any case, after the movers came, pretty much nothing but tumbleweeds remained.
I even removed the lights after this. The sharpening station will stay; I’ll build another when the time comes.
I don’t know if I’ll get much woodworking done before we find a new house. There might be a little opportunity here and there, but it’s unlikely, especially because I stupidly did not take my mini-workbench with me to the rental.
I’ll miss the place that we lived in. A quick walk before the move yielded the opportunity to see some good fall colors by one of the neighborhood lakes:
But it’s not like we’re leaving the spirit behind. Here’s the D&R, which will be close to wherever we move (this is from last year, but probably looks a lot like this right now):
I posted a new video of the hand-tool work done while making a replacement stair nose for my porch. It features probably way too many tools for its sub-4-minute length.
This project and video, like most things lately, is on the short side and was done as time permitted. There just hasn’t been room for longer projects lately.
It seems that I’ll be moving again. Perhaps “liminal” is not the best term here because I seem to move on a fairly regular basis, but I want to use that word and there’s nothing you can do about it. Then again, this time will be different, so it might be warranted. Instead of needing to get everything packed and moved in one shot, I have the luxury of being able to hold on the current place while in the process of finding and preparing a new one. So, whereas I was without a shop for more than a year when we moved from California, I will (probably) have my shop available here until I have another space available.
Everything about this is vague at the moment. What I do know is that SWMBO will probably need to be somewhere near Princeton, NJ for at least half of the time. (That is, unless we decide that a different location is better. I said that it was vague, right?)
I’ve moved my woodworking shop three times already (four, if you count moving from the apartment where I started), so in theory, I’ve learned something about the process by now. I’m not so sure about that, but I will try to make notes here (and perhaps make a video or two) as I’m going about things.
The general mood and pre-loathing
I have mixed feelings about the prospect of moving again. On one hand, we really like our house in Maryland and also like where we live. We’ve gotten used to it. On the the other hand, there are a lot of pluses to the area where we may end up. The proximity to Philadelphia means a lot to me in particular. So even though there might be a natural tendency to be somewhat overwhelmed and depressed about having to do this (as I am wont to do), I should instead look ahead to the “new adventures” that await.
This is not to say that there hasn’t been loathing. For a while now, I’ve suspected that this might be coming. The unspoken prospect of another move has played an important role in how I have organized my work patterns and developed my shop during the time I’ve been here.
Learning from not upgrading the shop
When I first moved down into the current shop, I had grand plans. I had mostly bare walls and a framed-out partition that I used to form my main working area. My biggest desire was to frame out the rest of the walls and remove part of the partition. Being in a windowless basement, I wanted to put in some false windows to mimic north-facing windows. I wanted to put in a bunch of shelves to provide some long-desired storage. And I was contemplating running some 220V circuits for my bandsaw and dust collector.
So inviting.
None of that happened, and it’s probably worthwhile going through a few details on each bit:
The framing: I never found myself with the energy to push through on this. I knew that I’d probably want someone to help me with this, and then stuff happened. A certain global pandemic did not help: It drove up the prices of framing lumber and ensured that no one would be able to help. If I had a lot of experience in framing walls, I could have probably done this very quickly after moving into the shop, but that was not the case.
Removing part of the partition: This had to go along with the framing, as the partition would have otherwise blocked one of the walls.
The faux-windows: Aside from also going along with the framing, I had a crisis of terrible lighting early on in the shop and had to come up with a fix quickly.
The shelves: Also depended on the framing, but I actually did manage to get two shelves up on one wall.
220V circuits: I found that I didn’t need them. My bandsaw can run on 110V or 220V, and is rated for about the reasonable maximum current draw on a 110V 20A circuit. It’s never struggled with anything I’ve ever asked it to do. The dust collector (on a separate circuit) popped its breaker once and I’m not sure why, but it also doesn’t seem to have trouble. I don’t have a table saw or any of those other big power-hungry machines, and it’s unlikely that I’ll get any.
Actual upgrades
The first things I did after moving into the shop were to put up a couple of shelves up high on a wall that was actually framed up and hang some french cleats on the partition framing so that I could hang my tool cabinet, saw till, and a few other doo-dads up on there. I also cobbled together a place for my chisel rack (even though I dislike it). Then I did just a couple of things later on that I would call significant:
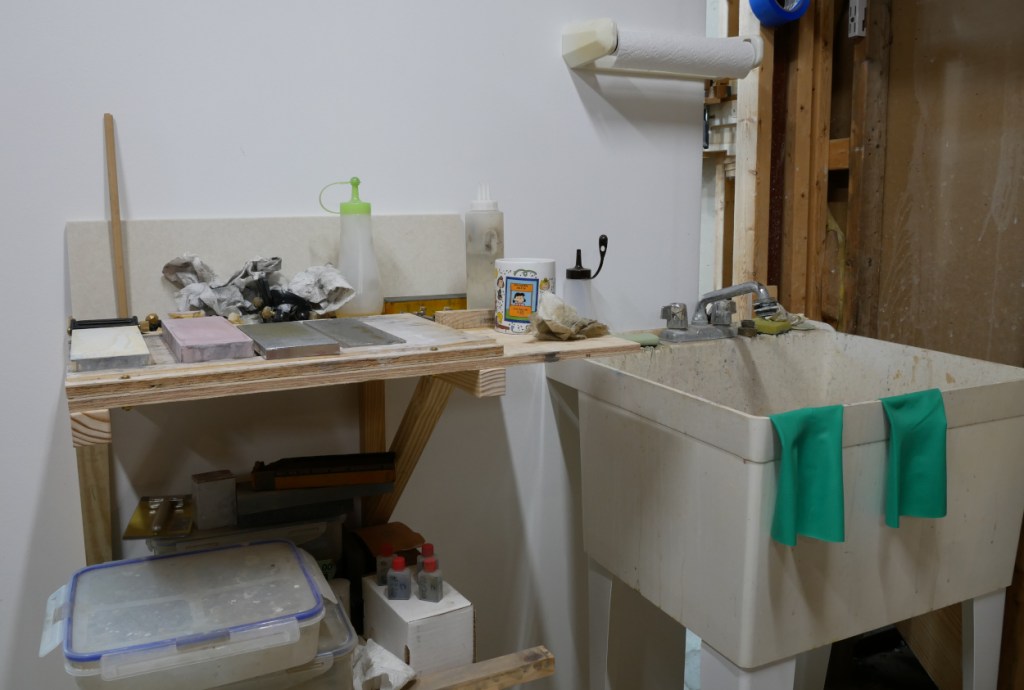
Lighting: I was dealing with bare bulbs in utility fixtures when I first started. It was awful. I went through three iterations of LED fixtures, from “I need something, fast,” to “let’s see how these fill in some of the shadows,” to finally researching some decent high-CRI fixtures to get everything covered. I was lucky because nothing of what I bought was wasted. I relocated the first set of lights to areas where I needed their flexibility and portability, and permanently installed the second set in dark places where they were sorely needed, such as above the slop sink and in the garage. I can also take the final set of lights with me if I like.
One piece of drywall: I put one piece of drywall on the framed-up partition behind the slop sink. It took me a while to realize that I wanted to do this. It was remarkable what a difference it made. In particular, due to the…
Sharpening station. The drywall allowed me to build some semi-permanent brackets for a sharpening station next to the slop sink. This low-rent project from some spare southern yellow pine and plywood cutoffs made life much easier. It is close to my work area, my stones are right there, ready to go, and it’s clear of any other junk. Just go over, sharpen a tool, and get back to work.
Lessons and aspirations
With this still said, what do I hope to accomplish for a new shop and what have I learned that will help me in that direction?
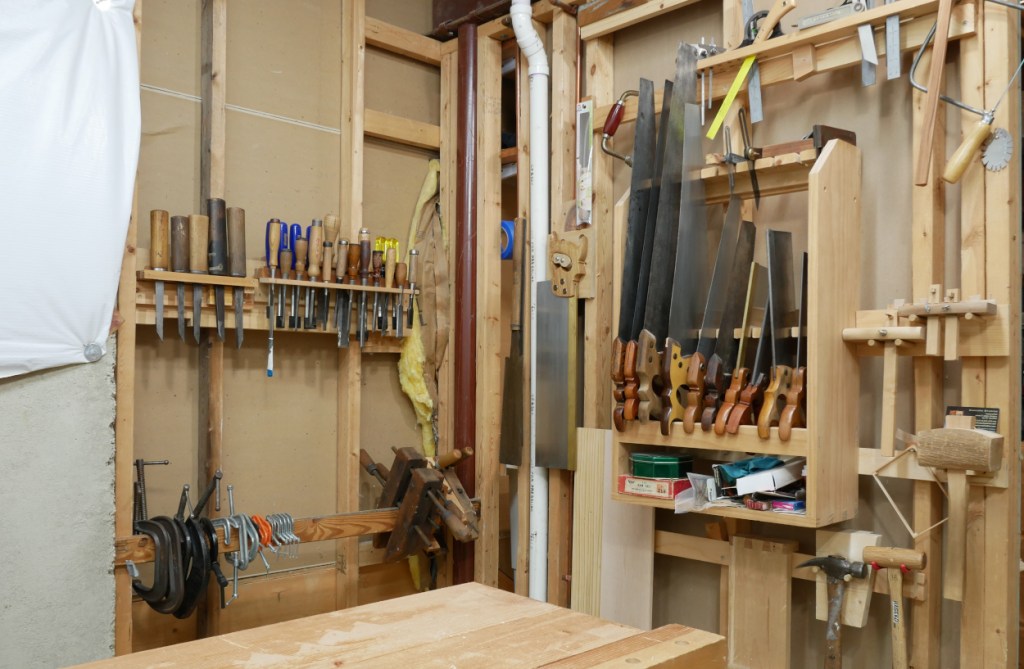
First, I believe that I’ll be trying to work on the idea of compact, flexible tool storage. After thinking about Team Tools-On-The-Wall vs. Team Work-Out-Of-A-Chest for many years, I’m guessing that I’m mostly in the latter camp. A lot of that sentiment might be from a desire to achieve “negative reinforcement.” For example, I’ve never been happy with my chisel storage solution. It’s just a rack on a wall, but it’s always felt inconvenient and never sat quite right in my mind.
In general, I just don’t like very much about this. The saw till is OK for the big saws. The marking gauge stuff is also OK, but only because they’re easy to get to. And the only tools that I find really comfortable here are the striking tools–the mallets and hammers. It is not a coincidence that they are the easiest to reach.
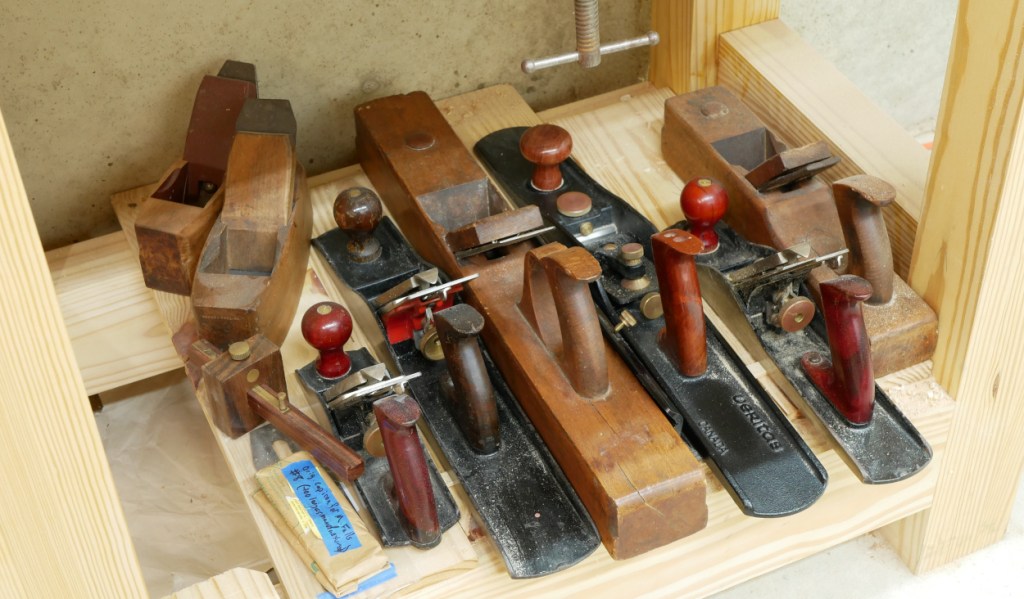
And then there’s this disaster:
Stating that my plane storage (“stick ’em on a shelf below the bench”) has been a sore point is an understatement. Dust is always falling down there so I have to clean them off constantly. This is sort of a convenient spot, but seriously, how often do I use half of these? In particular, I use only one of the smoothing planes more or less once per project. This needs to change.
Pivoting, for better or worse
I find myself in a position where I want to change up a bunch of things about the way I store tools and organize the shop, but also facing the prospect of moving the shop as well. Perhaps there is an opportunity here to do a few things at once.
I’ve now got some experience with a small version of a traditional tool chest (even though I don’t use it for tools). I’ve been impressed with it, and I believe that I can proceed as follows:
Continue to work on the current furniture project.
Build the “dutch tool chest” (DTC) to address the chisel/miscellaneous tool problem.
Build a base for the DTC to store bench planes and perhaps some other stuff.
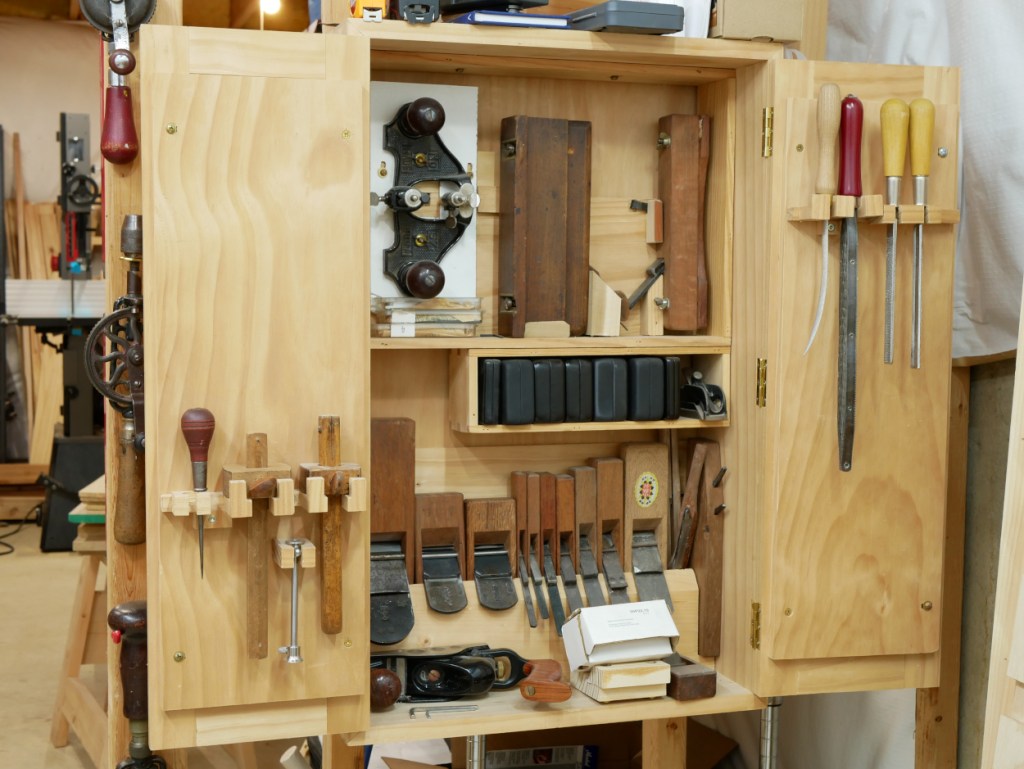
Rework the space in this thing:
This cabinet, which holds some really frequently-used tools, is currently awkward to close, and so I leave it open most of the time. But a DTC could better house a lot of the blockers (such as the block plane), making this something that could live up to its potential as a dust-blocker.
Will it work?
All of this sounds like it might be clever, right down to the part where I mention that I have the wood that I need for the DTC base and probably have what I need for the DTC. But I don’t know if this whole scheme will be a success. It comes down to time and motivation.
Squaring up small workpieces has been a pain for me as long as I can remember. It’s not unique to me; several old publications also mention the problem as well as making a longer shooting board for just this thing.
So I made a prototype. It got the job done, but it wasn’t easy to set up, and I had trouble keeping the longer pieces held in place with one hand as I was planing with the other.
It seemed to me like there were things that they don’t tell you, and perhaps not coincidentally, there is an article in The Woodworker (C.H. Years) Volume II (pp. 497-498) titled “Things They Don’t Tell You: Shooting Board Technique.” Does it address the above question? Well, no, but that’s not to say that it’s useless; I’ll get back to that in bit.
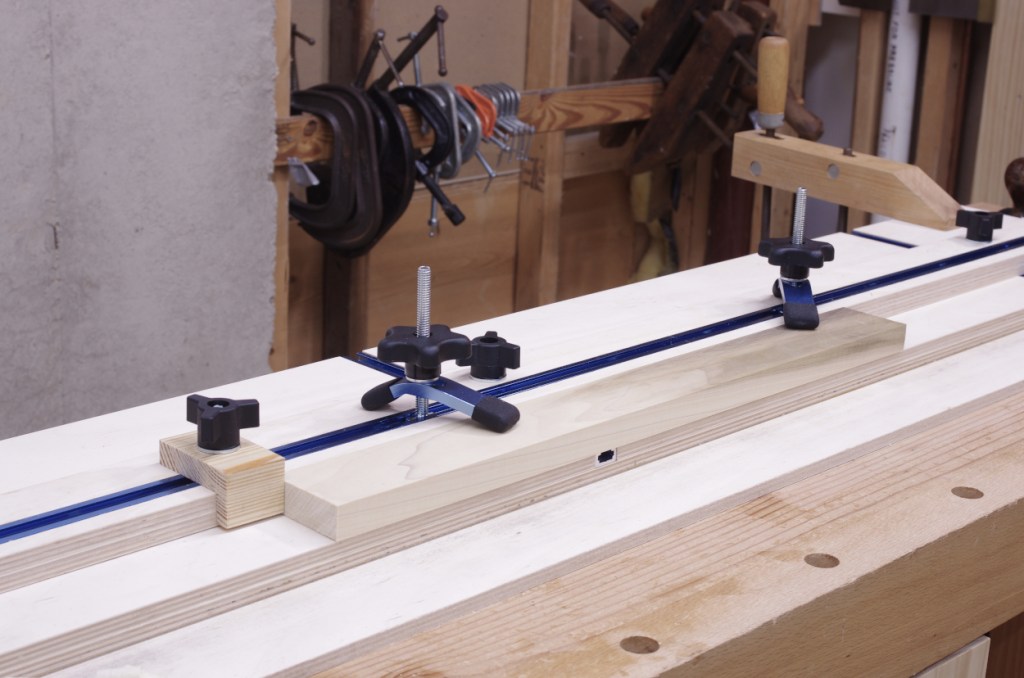
After several months of consideration, I made a new long shooting board that is a bit less traditional than my usual fare:
That’s right: Plywood, T-tracks, jig hardware. Knobs and screws and stuff. You know, standard fare in the realm of power-tool fanatics. But other than my bandsaw and drill press for a few odd jobs, I used hand tools to make it.
I made a video as I was building, also explaining where I got some of the ideas, and how it works in practice, so if that sounds like something you want to know, here you go:
Essentially, I got the idea of a modified tapering jig in my head, and it wasn’t going to leave until I built something.
There are a couple of tidbits that I didn’t put into the video because they were not terribly captivating (or, at least, I am not yet talented enough to make them appear so), but if you’re interested and literate, here we go:
The Fence Angle
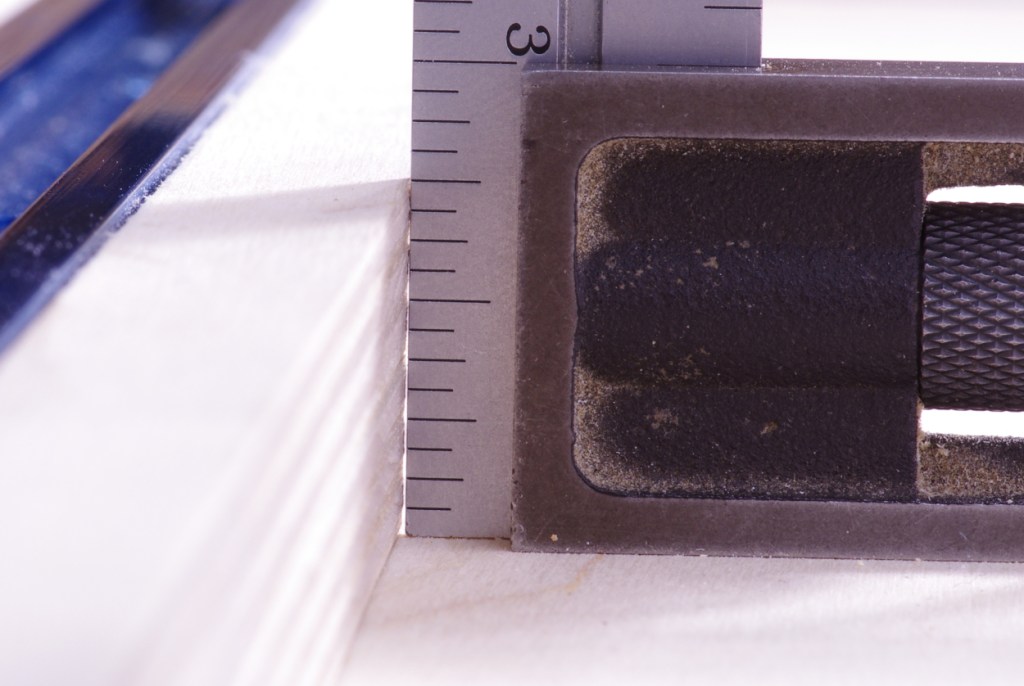
I gave the fence a very slight overhang. When I say “very slight,” I mean it:
This is to discourage stuff from slipping and riding up the fence. There isn’t anything special about the angle, I just didn’t want it to be tilted in the other direction. There are probably other options, such as lining that edge with sandpaper.
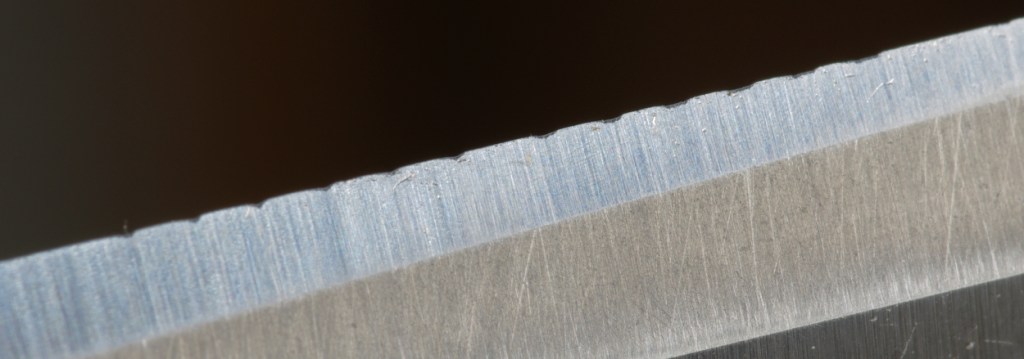
You might be wondering why the fence edge seems to undulate a little. This is because the glue in plywood can be murder on edge tools:
I mention this in the video; obviously, you don’t want to make a regular habit of subjecting your blades to this kind of abuse. Really, if you have to use plywood all the time, just get a track saw or something. But for a one-off like this, you can just go back to your coarse stone, raise your burr, hone, and get on with your life (possibly with a little bit of cringing in the interim).
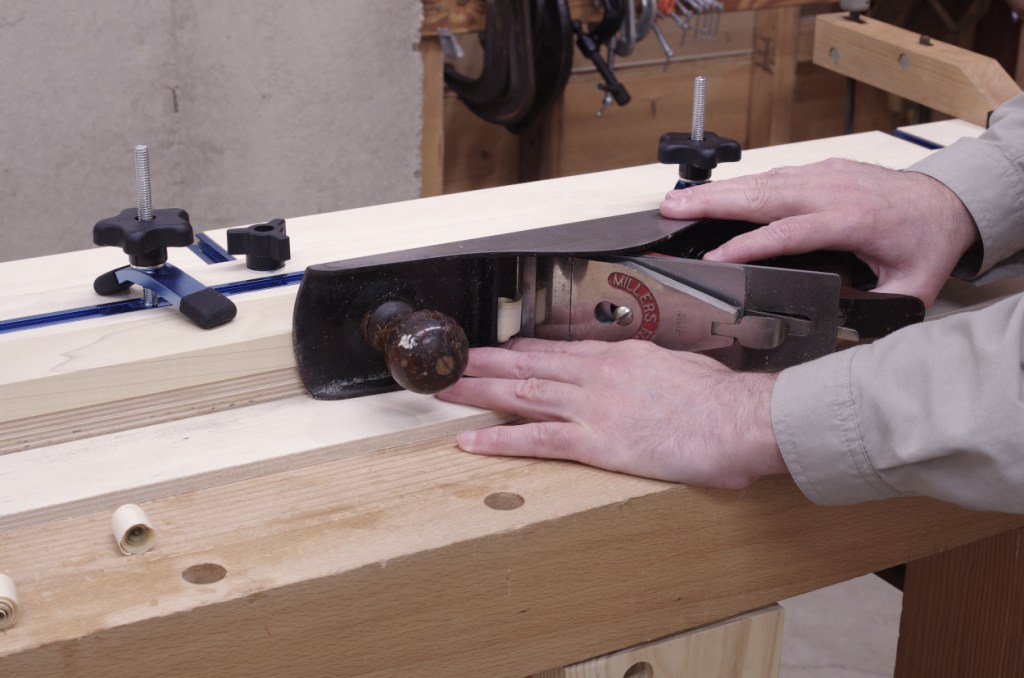
The Plane
I’m using a Millers Falls No. 18, a Stanley #6-equivalent that I wrote about a while back. Another possibility would have been a #5-size jack plane.
However, this brings us back to the Things They Don’t Tell You article (let’s call this TTDTY:SBT). It states that plane soles are usually not square to their sides. This would have applied to almost any kind of Bailey-style plane of times past, and mine is no exception. So you can’t just set the plane for an even cut and expect it to cut square in a shooting board. The article doesn’t give any rectifying advice than the usual blurb of “oh, if you’re edge-jointing, just flip the other board for the supplementary angle effect” (and hope the grain runs in the correct direction, which is a TTDTY).
There’s a simple solution for most metal planes: The lateral adjust lever. Put the plane on its side, put a square next to it, and adjust until square.
But what if I were really obsessed about the square sides thing?
Other Planes
So let’s say that I had all of the money in the world and could get another plane for this shooting board. What would I get?
You might think that I’d go for one of the contemporary versions of the Stanley #51, like the Lie-Nielsen No. 51 or the Veritas Shooting Plane. But I’m not so sure. For one, they are made in left-and right-handed versions. You need the left-handed version to go from right to left, which is what I found felt the most natural with the long board (as a right-hander). A normal bench plane like mine can just be flipped on either side to go in either direction.
The other thing about those planes is that they are really meant for shooting end grain; their blades have very low angles achieved by skewing the blade. If you happen to hit an unlucky grain direction, crazy stuff could happen.
Incidentally, TTDTY:SBT says that a low-angle block plane works well for end grain, with photos illustrating bench planes for edges.
I think that just the usual #5 or #6 bench planes from Lie-Nielsen or Veritas would be just fine for an extravagance. Perhaps the best plane would be some sort of crazy 16″ mitre plane, which doesn’t really exist.
Another idea is that if a normal bench plane could be conveniently attached to a wooden base with a couple of nice ergonomic handles, it would slide really nicely and feel a little less weird. But this is not enough of a problem for me to matter.
Straight, Flat Cuts
TTDTY:SBT describes differences between shooting an edge with the grain versus endgrain. It asserts that when shooting with the grain, you want the workpiece to overhang a bit, and let the plane’s sole do the work of getting the edge straight. You are not expected to run the cut until the plane stops (presumably because the guiding edge of the shooting board is not expected to be straight).
However, with the plywood, I was able to get the guiding edge reasonably straight, and I demonstrate that in the video. As long as it stays that way, I don’t see any reason why I can’t use that for most purposes.
But for edge jointing, I likely will not do it this way. In the video, I also go through the process of planing down to a line. For edge joints, I’ll want something more along the lines of so-called sprung joints, and that’s easy enough on the shooting board.
Other Fence Ideas
I had originally played with the idea of trying to lock down a thin, wide panel by putting it on top of the fence. That didn’t work; the plywood fence was too flexible.
But I don’t want to give up on this idea. I think that perhaps I can just make a simple half-length fence out of a piece of bowed solid wood, and it might be able to lock down a panel (or a piece of veneer, or whatever) with relative ease. Maybe I could put a piece of sandpaper on the underside, too.
Plywood.
Having used plywood to make a few shop appliances in the past year, you might wonder if I’ve gone plywood-gaga. I hope not. I was even thinking about making this out of quartersawn southern yellow pine, but I didn’t have enough of that on hand. Eventually, practicality won out: I made the shooting board (plus a tapering jig and a drill press table) out of a single 5×5′ piece of 3/8″ baltic birch plywood.
With this project, I think I’m done with plywood for a while.
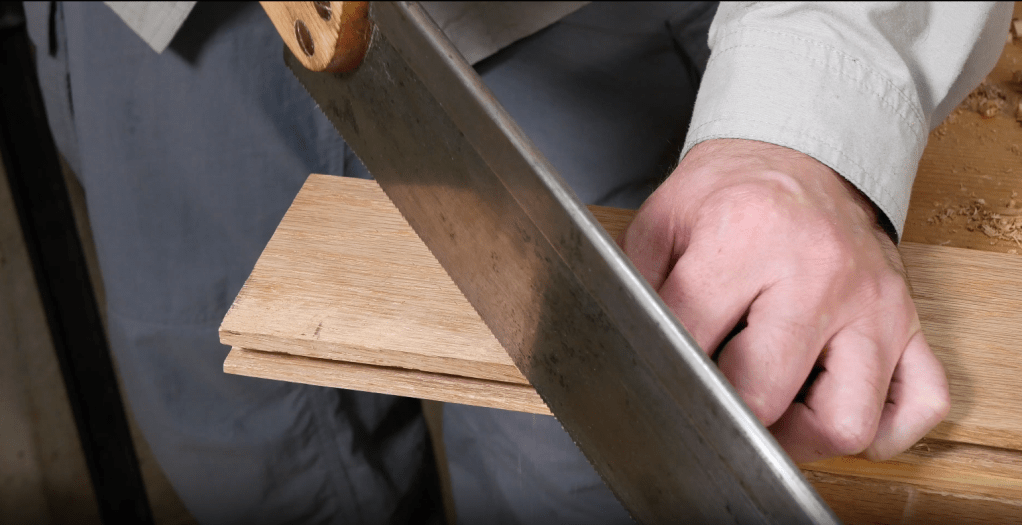
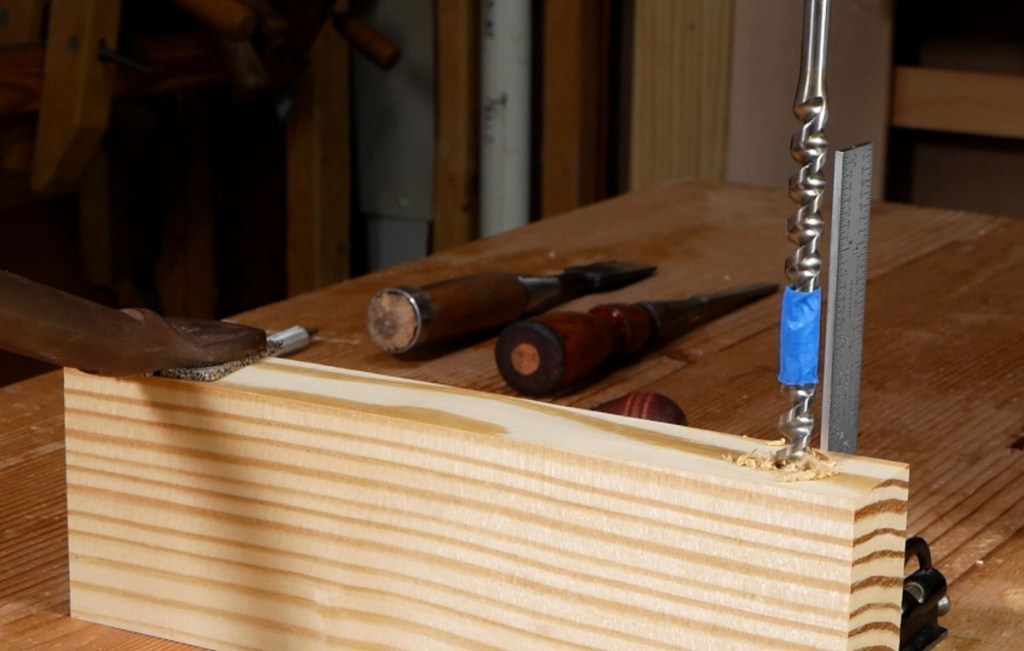
I made a little video with some mortising notes, including the grain-direction tidbit that I posted about a while back. Aside from some sweet mortising action, it features an impersonation of a riveting figure who rives.
It features some boring action, which I don’t think I’ve done in a video before:
That chunk of southern yellow pine has really hardened up. I forget how old it is. It’s approaching ossifrage status.
For the first little bit of this year, I’ve got a small goal of organizing and cleaning up. The biggest problem I have right now is wood storage. The first thing I did to address that might seem a little counter-intuitive: I built a project, the “Kitchissippi” chair that Lee Valley sells the plans for:
(I haven’t rounded over the edges or painted the thing yet, but that can wait for somewhat warmer weather anyway.) So the shop was a bit of a mess while I was working on it, but the goal was to use up a stack of cedar that had laying around. This worked; it turns out that having less wood in storage makes it easier to organize. And because it was built to a plan and I didn’t have to think about much other than where I’d be making the cuts from, it didn’t take the usual 27 years that it normally takes me to complete something.
Then, over the last week, I’ve been making some sort of effort to clean up the place for Chinese New Year (新年快樂, y’all). Maybe it sounds like a good idea at the time, I dunno. I cleared shelves, reorganized lots of stuff, and streamlined my scrap/offcut piles. There will be no cleaning tomorrow.
Above all, I’ve been making plans. I’m not done with this cleanup task. For the next stage, I’ll be making a few more projects. Some are for the shop, including one to finally end my planes-under-the-bench problem. Others are for the house, where (I think) I have the wood necessary to make a project or two.
With its ability to flatten wide stock quickly and effortlessly, one of the things that my planer sled design has enabled is a little more flexibility and ease when I need to glue up something wide. Ironically (or perhaps not so much), the jack plane often comes into play here. A quick treatment with everyone’s favorite “rough ‘n ready” sometimes saves even more time.
By way of example, I’m working with a bunch of suboptimal cedar at the moment. I need 10-inch (~255mm) stock, and I don’t have any. So I glued up sections of three (crummy) 4-inch stock, first roughing out the stock on the bandsaw, then planing slightly “sprung” edges using a jointer plane. I didn’t make the edges perfectly square to the sides because the sides were rough and uneven from the bandsaw (and the thicknessses varied anyway)–all I cared about was getting edges that would join together.
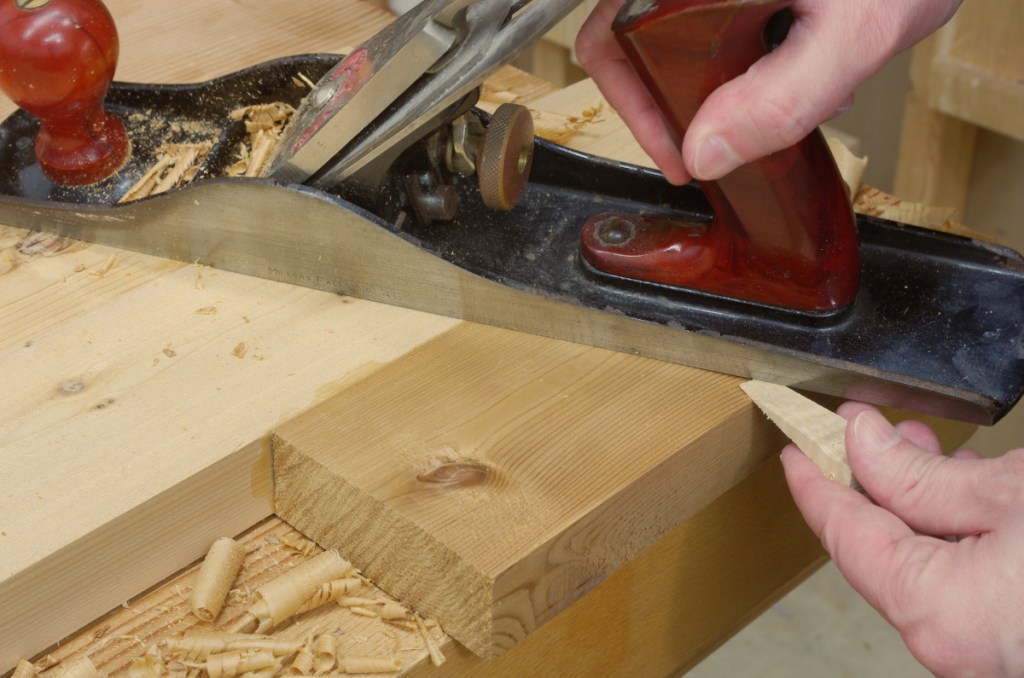
When doing something like that, you end up with a glued-up board resembling something from the Cubist style, for which the conformist cries out to flatten. And we oblige. For the planer sled to work correctly, you want the face you put on the bottom to be “roughly” convex, but there’s no particularly exacting standard. So you can grab a jack plane to (effortlessly) knock off a bit from the sides near the edges:
Wedge shows the part that I planed off.
Now, you can flip it over, pull out the planer sled, and fix the whole mess in place:
Yes, this is a strangely-shaped piece.
And just like that, you’re ready to feed the whole mess into the thickness planer and flatten it in one shot. The process of knocking off the edges, fixing in the planer sled, and flattening with the thickness planer only takes a few minutes (I spent a lot more time taking the photos and writing up this post).
Perhaps there’s a need for a “moral of the story” trope-ish thing in here, so here you go: The jack plane is invaluable. Even though I don’t need to use it nearly as much as I did in my prep-stock-by-hand days, I’d still be lost without it.