Various handles and knobs

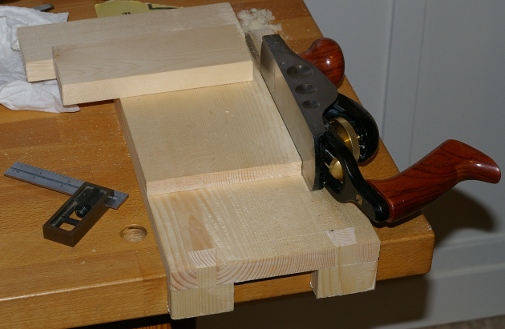
I’m in the process of varnishing four saw handles, a plane tote, and a plane knob. Here are half of the pieces.

As usual, I’m not being terribly speedy here. It’s been seven months since I started working on that tenon saw handle in the center. Things happen but I like to think that sooner or later, I get back to this stuff. (Especially since I’ve had the saw blade sharpened almost since I started on the handle and it’s otherwise ready to go.)

The larger hand saw handle in the rear is for a Disston D-8 that will become one of my new rip saws, somewhere at around 7TPI. This will be in addition to a No. 7 (I think) that’s going to be a larger 4.5TPI rip saw. The handle for that one is also in this batch, thankfully. Both of these handles were glopped over with some awful green paint that I needed to strip before the refinishing process started. What is it with the green paint?

The initial finish on these two handles was a mix of “colonial maple” stain, some satin polyurethane, and tung oil, for an oil/varnish blend (this makes the rays in the beech look nice). After a few coats of that, I’m now putting on satin polyurethane. I like the way that a top coat of polyurethane feels on the other handles I’ve done (as opposed to alkyd varnish and oil/varnish blends), and it seems to hold up better. It takes a little more effort to get polyurethane to look decent, but it’s not that bad.

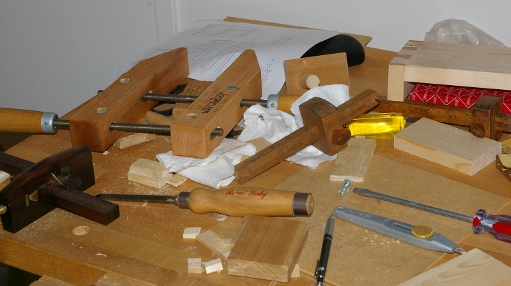
I think I need one or two more coats on the handles.

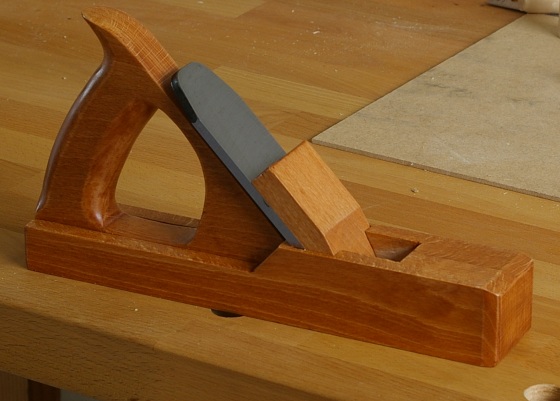
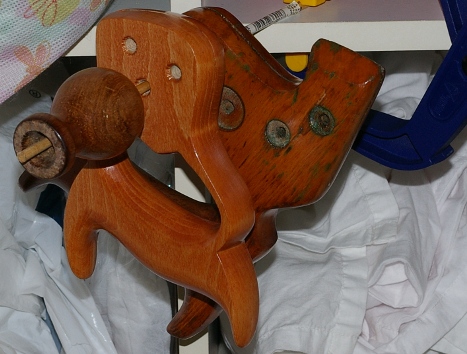
The knob is from a Millers Falls #22 jointer plane that’s been waiting for restoration. I did not use the oil/varnish blend on this (or its accompanying tote), because the ray structure in this tropical wood did not seem worth bringing out. I may be done with the plane parts; I’ll evaluate that later.

Shooting board

I made a shooting board a couple of weeks ago. As with the bench hook, I don’t know why I did not do this earlier.

As it turns out, there’s a repeating pattern of things I don’t know here. I have no idea why I dovetailed the lip onto the front. I did this on the bench hook, too. It didn’t take long and it wasn’t hard, but why? I also don’t know why I decided to do two little pieces for the front lip instead of one big piece.

The Veritas low-angle block plane works fine for shooting stuff of this width. You could use a low-angle jack plane for this, too. But I now see why people like their miter planes. I don’t really see myself spending so much cash on one of those for this purpose, though.

I need to make a rack for my chisels and small saws. The bench is a mess.

Scrub plane: finished

I decided to rub out the finish on the scrub plane last night, and call it “finished” for now.

I had remarked to my friend how much rubbing out a finish changes it. In this case, there are a lot of minor finishing screw-ups that somehow got less bogus in the process.

Looks aren’t everything, though, and in this tool’s case, maybe it isn’t even ugly enough for its intended task of hogging off wood. In any case, I have a new toy, and I want to try it out tonight.

Scrub plane: Starting the finish

I did the final shaping and glue-up of the scrub plane’s tote a while back. That, along with the edge chamfering, left me with this:

I tested it, and found it much to my liking.

Because the tote will likely see heavy use, I decided to varnish it, and before doing that, I decided to stain it. I had a can of “golden pecan” (a pigment stain) in the cabinet, so I tried it out on a test piece of beech. It didn’t seem horrible, so here is the plane after two coats (with sanding between):

There is a little blotching. I believe that I should have probably done a washcoat. It seemed to have avoided a lot of problems on that old saw handle.

Though passable now, I feel that I should sand and do another coat of stain. The second coat evened things out a lot, so a third should do it most of the rest of the way?

After that step, I would like to even it out with clear varnish. Satin polyurethane again? It’s worked well for me so far.

Scrub plane: Fitting the tote

I decided to attack the long, wide groove to fit the tote today. I wasn’t too sure how to approach this, so I decided to see if a router plane would do what I needed it to. Having never used this tool (a Millers Falls #67 with a Lee Valley blade), I sharpened the blade and tested it on a piece of Douglas fir that usually sees test victim service. It seemed to work, so I set out clamping the plane body to the bench, marked the sides, and sawed down as much as I could:

Then I attacked it with the router plane until I got to the bottom. I had to remove the last part by chisel. (Next time, I will try to design the tote so that I can do the whole thing with the router plane. This was a severe pain in the butt.)

Finally, I shaved the edges of the groove so that the tote would fit snugly:

This could have turned out a little better, I guess. I was a little paranoid about trusting my lines when I sawed down, and it turns out that I shouldn’t have–they were dead on. In the end, there’s sort of a small gap on one side of the groove between the tote and the body. All in all, though, this went a lot better than the complete disaster that I expected…

Scrub plane: Tote and body back

Faced with a dearth of time to work, I’ve been flailing around at shaping the tote/handle for the past several days. I’ll get home, take a few whacks at it with the rasp, file a little down, and so on.

Today, I decided to cut the “razee” part of the body. Seems to have gone okay. Here’s the body, along with the current tote:

The tote isn’t exactly the prettiest thing in the world right now, but it is at least comfortable. I haven’t gone far beyond this level of finish because I haven’t decided which tools to use now (can’t use the rasp any longer because the finish is too rough). Files? Sandpaper wrapped around a dowel? A scratch stock? Anything I can find?

Scrub plane handle, Part 1

I think I used too much glue when laminating the plane body, creating a slightly larger gap than I was expecting, but that’s life. It does seem solid, and that’s the important part.

Yesterday, I cut a triangle out of a board for the handle, and today, I traced out the rest of the handle from the printed drawing. Then I knocked out the inside and back with a coping saw. Coping saws are a pain, but a having a solid workbench is a godsend, and nowhere was this more evident when I roughed out the outline with a rasp. I’ve never had much success at using a rasp before, and I realize now that it was due to having a bench shake all over the place.

That’s a somewhat-maligned cabinet rasp there. It seemed to work fine, and it also didn’t cost me anything (woot). Of course, the real test will come when I use it to shape the oval profile of the grip, but it doesn’t seem like it will be a problem.

Truth be told, cutting out the handle was a lot more fun than I expected. If the rest of the shaping goes even half as well as this, I’ll really have no excuse for not getting to work on those saw handles.

Scrub plane body

I had time to work on the scrub plane today. I already had two milled pieces of wood ready to go, and the drawing was done. So I set out on the somewhat complicated task of cutting the various tapered slots. I made the wedge first. Then I marked out the blade’s bed (at 45 degrees), traced the wedge shape onto both body pieces, and cut out the housing for the blade and wedge:

That’s all fine and good, but you sort of need a path for the shavings to come out. This is the tricky part. You have to maintain a significant portion of the wedge/blade housing, but still open up the area in front of the blade. In addition, you have to open this area to the full width at the mouth. Here’s what I’m working with now:

The area for the shavings is a bit narrow, and the tapered path for the shavings is a rather high angle, but this is probably okay, because the shavings on a scrub plane are not really supposed to be as wide as the mouth anyway.

When assembled, the body is supposed to look like this:

With the blade and wedge inserted, it looks like this:

From below, we have this:

Fine. So I was happy with all of that and decided that it was time to glue up the sides. It was not terribly easy, and looked kind of ridiculous when clamped up:

At least I got it aligned. I’m starting to think that it might have been easier if I had glued it up first, then cut out the various parts. Then again, I wouldn’t have been able to use my saws. Oh well, the price you pay when you don’t have any thick pieces of wood lying around.

Then I sharpened the blade. First time sharpening a cambered blade. Hmm. Well, it could have been worse, I guess.

Surface plate and Stanley 75

Yesterday I went down the peninsula to visit some friends. They’d been asking me for help on a smoothing plane for a while. Specifically, the blade needed sharpening, so I packed up the sandpaper, waterstones, honing guide, and drove down.

Before starting anything, we went to the Woodcraft store. I had been thinking about getting a granite surface plate for a long time. Since I was eager to try out anything that would lessen the pain of flattening the face of a chisel or plane blade, especially the one that was about to be flattened, I bought one. It was at least cheaper than a Hock plane blade.

Well, I’d been hearing stories about people and their surface plates. How they wanted to get married to their surface plates, they loved them so much. How they might have children–you know, that sort of thing. And now I know why. For some reason, it’s a lot easier to flatten stuff on the plate than on glass or diamond stones or whatever. Perhaps it’s because it’s heavier, or maybe there’s more friction? I don’t know for sure, but it works. Using a little water to hold Norton 3x 220-grit paper in place, it took almost no time to get the face of the 2″ blade flat. The blade’s milling helped a lot, too.

I still had the surface plate buzz lingering today, so I decided to see how quickly it would do the job on this little Stanley #75 bullnose rabbet plane:

Very quick, as it turns out. That silly little plane works surprisingly well, too. It’s kind of a pain to adjust at first, but once you get the hang of it, it’s not bad.

Scrub plane design

It’s taken forever, but I finally got around to drawing the scrub plane, or at least the side view.

I’m still a little unsure of these dimensions. Most wooden scrub planes have the blade set a little further back. But since I want a tote on this thing, I had to shift a few things around. The basic tote shape comes from the small Lee Valley tote that I got for my low-angle block plane. It’s likely that even if it works out for me, it will not be comfortable for those with larger hands. In any case, the tote is not meant to be grabbed with four fingers; the index finger should go along the side.

I’m not sure what to do about the front. I suppose that it’s possible to put a knob or something on there, but I’m not going to bother with it until I try it out.