Scrub plane: Fitting the tote

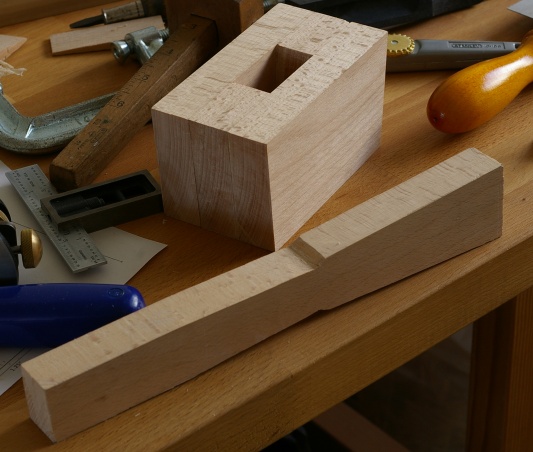
I decided to attack the long, wide groove to fit the tote today. I wasn’t too sure how to approach this, so I decided to see if a router plane would do what I needed it to. Having never used this tool (a Millers Falls #67 with a Lee Valley blade), I sharpened the blade and tested it on a piece of Douglas fir that usually sees test victim service. It seemed to work, so I set out clamping the plane body to the bench, marked the sides, and sawed down as much as I could:

Then I attacked it with the router plane until I got to the bottom. I had to remove the last part by chisel. (Next time, I will try to design the tote so that I can do the whole thing with the router plane. This was a severe pain in the butt.)

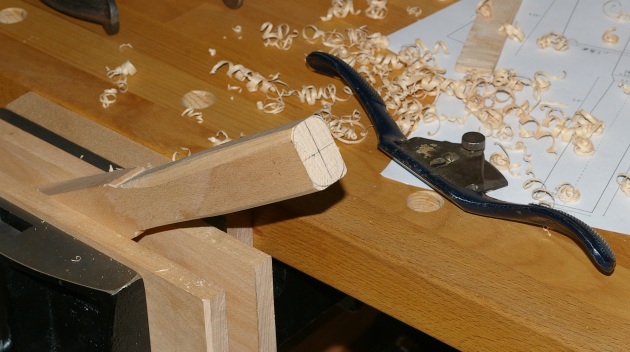
Finally, I shaved the edges of the groove so that the tote would fit snugly:

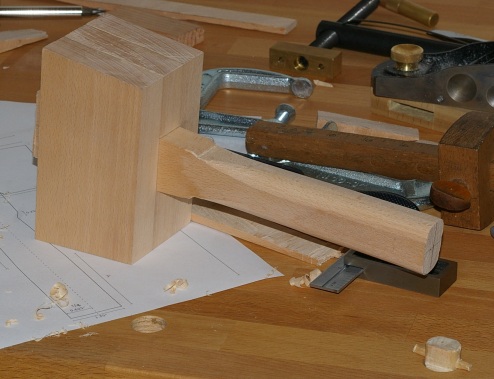
This could have turned out a little better, I guess. I was a little paranoid about trusting my lines when I sawed down, and it turns out that I shouldn’t have–they were dead on. In the end, there’s sort of a small gap on one side of the groove between the tote and the body. All in all, though, this went a lot better than the complete disaster that I expected…

Scrub plane: Tote and body back

Faced with a dearth of time to work, I’ve been flailing around at shaping the tote/handle for the past several days. I’ll get home, take a few whacks at it with the rasp, file a little down, and so on.

Today, I decided to cut the “razee” part of the body. Seems to have gone okay. Here’s the body, along with the current tote:

The tote isn’t exactly the prettiest thing in the world right now, but it is at least comfortable. I haven’t gone far beyond this level of finish because I haven’t decided which tools to use now (can’t use the rasp any longer because the finish is too rough). Files? Sandpaper wrapped around a dowel? A scratch stock? Anything I can find?

Scrub plane handle, Part 1

I think I used too much glue when laminating the plane body, creating a slightly larger gap than I was expecting, but that’s life. It does seem solid, and that’s the important part.

Yesterday, I cut a triangle out of a board for the handle, and today, I traced out the rest of the handle from the printed drawing. Then I knocked out the inside and back with a coping saw. Coping saws are a pain, but a having a solid workbench is a godsend, and nowhere was this more evident when I roughed out the outline with a rasp. I’ve never had much success at using a rasp before, and I realize now that it was due to having a bench shake all over the place.

That’s a somewhat-maligned cabinet rasp there. It seemed to work fine, and it also didn’t cost me anything (woot). Of course, the real test will come when I use it to shape the oval profile of the grip, but it doesn’t seem like it will be a problem.

Truth be told, cutting out the handle was a lot more fun than I expected. If the rest of the shaping goes even half as well as this, I’ll really have no excuse for not getting to work on those saw handles.

Scrub plane body

I had time to work on the scrub plane today. I already had two milled pieces of wood ready to go, and the drawing was done. So I set out on the somewhat complicated task of cutting the various tapered slots. I made the wedge first. Then I marked out the blade’s bed (at 45 degrees), traced the wedge shape onto both body pieces, and cut out the housing for the blade and wedge:

That’s all fine and good, but you sort of need a path for the shavings to come out. This is the tricky part. You have to maintain a significant portion of the wedge/blade housing, but still open up the area in front of the blade. In addition, you have to open this area to the full width at the mouth. Here’s what I’m working with now:

The area for the shavings is a bit narrow, and the tapered path for the shavings is a rather high angle, but this is probably okay, because the shavings on a scrub plane are not really supposed to be as wide as the mouth anyway.

When assembled, the body is supposed to look like this:

With the blade and wedge inserted, it looks like this:

From below, we have this:

Fine. So I was happy with all of that and decided that it was time to glue up the sides. It was not terribly easy, and looked kind of ridiculous when clamped up:

At least I got it aligned. I’m starting to think that it might have been easier if I had glued it up first, then cut out the various parts. Then again, I wouldn’t have been able to use my saws. Oh well, the price you pay when you don’t have any thick pieces of wood lying around.

Then I sharpened the blade. First time sharpening a cambered blade. Hmm. Well, it could have been worse, I guess.

Scrub plane design

It’s taken forever, but I finally got around to drawing the scrub plane, or at least the side view.

I’m still a little unsure of these dimensions. Most wooden scrub planes have the blade set a little further back. But since I want a tote on this thing, I had to shift a few things around. The basic tote shape comes from the small Lee Valley tote that I got for my low-angle block plane. It’s likely that even if it works out for me, it will not be comfortable for those with larger hands. In any case, the tote is not meant to be grabbed with four fingers; the index finger should go along the side.

I’m not sure what to do about the front. I suppose that it’s possible to put a knob or something on there, but I’m not going to bother with it until I try it out.

Scrub Plane Preparation

It’s been a busy few weeks with practically no time for woodwork. However, there has been a little progress. Today, I finally got around to milling the two faces of the board that will eventually become the scrub plane. As with the mallet, the plane will be made of European beech. What a pain–gave myself a blister doing it, too. The only thing left to do on the board is hit it with a smoothing plane, but that’s easy.

I still need to draw the thing. I think I’m going to go with at least a 10-inch length so that I have enough room for a tote in the back, but I don’t know how tall it should be, nor do I know how far forward the blade will be, and I don’t even know what design I’ll use for the handle.

Other minor activity is that I’ve finally gotten around to finishing the Winchester saw handle that’s been sitting around for at least a half a year. There are lots of nicks in the handle. I used a smoothing plane to knock out the most superficial of those. A washcoat and a coat of stain (a pigment-colored varnish) is now on. I’ll do another coat of that tomorrow, and probably follow up with a some polyurethane. One of these days, someone tell me why it’s so impossible to pour anything out of a paint can. There has got to be a better way.

Another fix for the junkie arrived from Lee Valley today. This shipment included the high carbon blade for the scrub plane. I don’t know why the HCS blade costs $18 and the A2 blade $38. It’s surprisingly heavy.

Also in the package were a small tote and front knob add-on for my low-angle block plane (a sort of silly extragavance, but that plane is really nifty), and two 4″ 2x slim taper handsaw files.

My waterstones had started to dish a little, so I flattened them with my diamond stone. That was delightfully easy.

Mallet: finished

In a previous episode, I had just given the mallet an oil/varnish blend finish to give it its color. Then I left for two weeks of vacation, and a week ago, I came back, ready to hit it with some polyurethane.

I wanted to use polyurethane for two reasons: first, I’d never really done much with varnish before, and I thought it was about time to start. Second, it’s good stuff against dirt and sweat, and it’s tough. So off I went and thinned it way too much, so it took a week to get all of the coats on.

I used a “satin sheen” on it, because I’m not big on shiny stuff. Today, I was able to finally hit it with some rottenstone and get the final result:

It’s sitting on top of a piece of the same roughsawn european beech board that it was made from. I guess that’s progress.

Here’s a shot of the top. I managed to get the ray fleck there, so I left it as-is. I’m fairly pleased at the way the end grain turned out.

There are a few flaws. But this is, after all, a striking tool, and I don’t know how pretty it’s gonna look after a period of using it as intended. Incidentally, I am pleased at how it has performed in a few tests so far. The real test comes when I try to make a mortise and tenon (or pretty much anything) again, and I reach for this thing.

Vacation stuff

I’m back from two weeks of being in PA. For some strange reason, I paid a lot more attention to the trees this time. Gee, I wonder why. Penn State’s campus has some great native trees.

I fooled around with polyurethane on the mallet today. No pictures yet, but they wouldn’t be earthshattering, especially since it isn’t a gloss version. I used way too much thinner, so I’m not getting a very thick film on there. On the upside, I’m not getting any bubbles or brushstrokes or anything.

Something is happening, at least. I’ll probably need at least four coats with this thickness. That’s okay, I’m not in a hurry.

Mallet, touch-up

This morning, I took out the chamfering attachment to my low-angle block plane and set to work on the head. This was relatively easy work, and soon I had moved to the handle. I tried to work out some funny stuff that was going on in the handle, but wasn’t altogether successful. This is okay, because this (and one flaw on the head) does not affect the operational aspects of the tool.

When it was all said and done, I had this:

Groovy. I tested its grip and balance a little. It’s mostly to my liking; when I make the next one, I may put a thicker handle on it.

That left the finish. I went to the local hardware store and found nothing that I could stand. So I decided to use the same oil/varnish blend (“danish oil”) that I put on the workbench. This means that the mallet will show camouflage with the bench (because it’s made of the same wood), but this is okay.

I was a little disappointed at having to use the same finish as earlier because I really want to get started with varnishes. What I will probably do, however, is apply clear non-gloss polyurethane on top once the oil/varnish cures. This should provide a lot more protection against sweat and grime.

Mallet handle

I cut out the handle with a combination of a dovetail saw, a coping saw, a chisel, and a low-angle block plane. I would do a few things differently when marking next time, but it’s not like it’s a big deal.

The mallet components now looked like this:

Not bad. The handle fits the head, and it definitely feels like something you can whack stuff with. Except for those nasty sharp edges. I marked out the cross-section on the end of the handle and set about it with a spokeshave:

This was the first time I used a spokeshave! That was fun. Though I might want to try getting my Stanley #151 in working shape. It’s not easy to adjust the depth on the #51 I was using, but then again, it wasn’t that bad.

There was the very edge of a knot on one side of the handle, so that made it difficult to avoid tearout. So I used a little sandpaper to even out that part, and now we’re getting somewhere:

Still left to do is chamfer some edges, even up the head faces, and apply a finish. I have decided against an additional bevel on the top of the head, partly because I like the ray-fleck pattern, and partly because I feel lazy.