Mortise chisel: Part 2

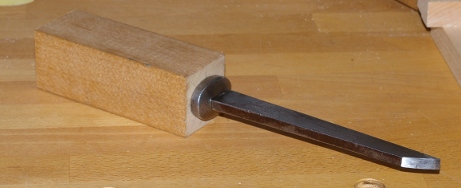
I marked out the angles on the mortise chisel by “feel,” just by sort of looking at all of the pictures I’ve seen and guessing. With two sides cut away, it looked like this:

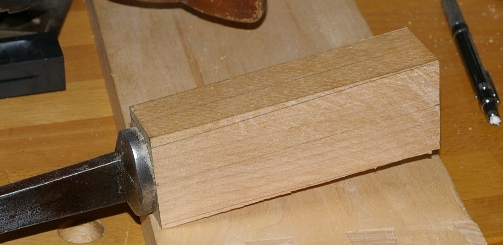
I cut out these sections with my larger rip saw. It would have taken forever with anything else. Then I used a block plane to smooth around the oval. I nicked the blade of the plane against the chisel bolster doing that. Boo. Grinding that stuff out is always such a pain.

Following the plane, I used a spokeshave to further smooth the oval shape, then, finally, progressive grits of sandpaper on a block to do the final smoothing. This sequence was quick.

A couple of oil/varnish blend applications later, along with the requisite sharpening, it was ready to use. Here it is with its first test mortise-and-tenon joint (upper left, not that stuff to the right):

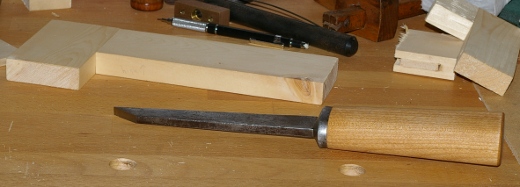
It’s a lot of fun to use. Best of all, it’s fast.

Mortise chisel handle: Part 1

I’ve been jonesing for a “real” mortise chisel for a long time now. My obstacle, however, has been the irrational cheapskate inside of me. There’s been a lot written about the English “pigsticker” style of mortise chisel lately, and I’ve been trolling ebay for a cheap one or one without a handle. I finally got my hands on a handle-free sample a couple of weeks ago.

Made by W. Butcher, it has a strange width–something like 9/32″. This is close enough to 1/4″, I guess. Its cutting edge is laminated to a softer metal for the rest of the blade.

Unfortunately, it was dubbed at the tip when I got it, and it was a lot of work to flatten the back (I took the dubbing problem from both ends; shortened it slightly and flattened the rest off). You would think something that small would be easier to flatten, but the steel is really quite hard. I used Norton 3X sandpaper on a granite surface plate, grits 80 on up.

After doing this task, I set out to make a new handle per Derek Cohen’s instructions. Putting in the hole for the tang was a real pain in the ass:

The wood is yellow birch. We’ll see if it holds up. Next step is to shape it, then finish sharpening the blade.

First Waterstones

My waterstones arrived today. They are 800x and 4000x.

Of course, I was very eager to try them out. Goodness, what a difference. I flattened a plane blade back, and that took a little bit of time, but once flat on the 800x, the 4000x did its job with amazing speed.

Then I honed the bevel–in just a few minutes. But the real surprise came when I did the final hone with the green compound on wood. I knew that the edge was pretty sharp, but it didn’t look too shiny. Well, the green compound made the blade shine like nothing I’ve ever done before.

Well, that’s all fine and good. And I did shave off the requisite arm hair. But I really wanted to see how the blade worked, so I put that bad boy back into its type 4 Millers Falls smoothing plane, clamped in a yellow-poplar board, and set the blade for a very fine cut.

Holy crap. Now, granted, I’d been fiddling around with this plane recently, but I did not expect so see shavings so consistent and thin. The blade zipped through like it was almost nothing and left my best surface yet. Even on the part of the board where the grain reversed direction!

I guess it’s so long for Scary Sharp for me–it was a nice cheap way to get started, but even though waterstones are slightly messy, the speed, ease, and consistency of results are really hard to deny.

[edit: I still use sandpaper (Norton 3X, then grit progressions) on a surface plate to initially flatten faces of tools. It’s faster and less error-prone because you don’t have to worry about keeping a stone flat. But I always turn to my waterstones for final sharpening, and I generally don’t use the sandpaper after the initial flattening.]

First honing

So I had my first attempt at honing today. My 3/4″ chisel was my first victim of the Scary Sharp system. I was a bit nervous about it because, well, this was it, you know… the last thing that I needed to do in order to have a usable tool. That, and I’d been reading about how to sharpen stuff for a long time.

It actually worked. I used a variety of sandpaper grits with repositionable spray adhesive on glass. I learned the following:

  • Don’t use too much adhesive. Just a little bit makes the sandpaper stick and keeps it from sliding around. Too much makes it goopy and slippery. Repositionable is great because you can clean it with citrus cleaner.
  • Lapping the back of a blade is the hardest part and takes a long time. Thank goodness you really only have to do this once. I need some more sandpaper grits to do this more quickly; it took me a long time to work out the original milling marks and skip between the various grits.
  • Corollary: It’s gonna take forever to lap the soles of my planes.
  • Honing the bevel is pretty fast and easy, especially when you have a honing guide.
  • A mirror finish on a blade makes things really, really interesting.
  • It’s pretty easy to tell if you’ve done it right. You really can shave your arm hair, and a sharp blade cuts across endgrain with the greatest of ease.
  • I need a real strop.

I still need more practice. But the today’s results are much better than I expected.

Chisels: Check.

The chisel problem had been weighing hard and fast on my mind, and today I did something about it. After picking my car up from its regular service, I remembered that there was one of those Woodcraft stores in San Carlos, which is relatively close to the mechanic. Having that convenient mode of transport ready, I went there to see if they had any new chisels that were okay and didn’t cost like a million dollars. Also, I’d never been to one of those stores before, and I was kind of curious to see stuff like the Lie-Nielsen planes.

So I asked the guy there about the chisels. He was really helpful. He understood exactly what I was trying to do, and basically said, “Yeah, we have a lot of really spendy chisels, but these plastic-handled Irwin/Marples ones that are much cheaper and available in this handy four-pack will be great for what you’re trying to do. You just gotta put the time and effort into honing and learning how to use them. Then, when you are good at that, and properly addicted, come on back, purchase the really expensive stuff, and take lots of classes ‘cuz you’ll like that.”

I paraphrase, of course, but I have to admit that it was rather refreshing that the guy wasn’t trying to sell me the most expensive thing in the store. This might be partly because there is no shortage of Yuppie Bastard (and his silly German car) in the bay area, and therefore, no shortage of chumps throwing money around like candy at a parade. He asked me if there was anything else I needed, and I told him that maybe my small try square might not be very useful, but he said, “Nah, it may be a little small, but for now, it’ll be fine; sometime later you might need something bigger.” Odd, all of this, but it definitely means that I’ll probably go back there on similar occasions.

Anyway, the store definitely has some drool appeal. Those Lie-Nielsen planes sure do look nice, but, uh…