I haven’t made much in the past few months because I moved. That’s always a pain. However, I now have a shop. This seems like it will be a pretty big improvement.
In preparation for the move, I rebuilt the base of my workbench. I replaced the legs with 4x4s, widened the depth of the side stretchers, and replaced the lower side stretchers with much larger timber.
No pictures at the moment, though. I’m still getting things organized. There’s a lot to do here.
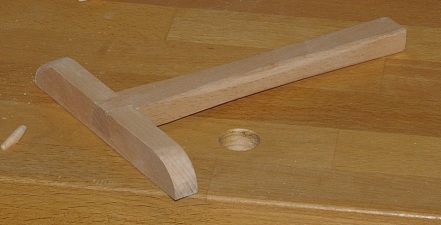
Here’s a quickie project for a co-worker, a crepe spreader. It’s 5×7 inches.
It uses a sliding dovetail joint to connect the two parts. The joint came out better than I expected but I don’t think I will use it for any future crepe spreaders. A wedged through mortise and tenon seems like it would work better.
It’s pictured without a finish. I’m going to give it a very light once-over with some sort of oil (probably olive oil) just to make the surface a little easier to clean after use. Otherwise, it’s not worth really giving it any sort of extravagant finish because it will see a fair amount of wear anyway.
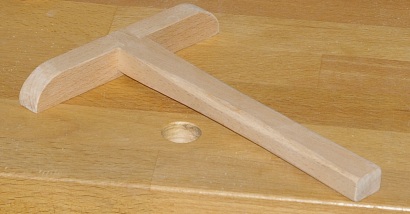
Well, this is more or less done. I haven’t decided if I should apply varnish over the oil/varnish blend that I put on it, but it looks decent enough right now.
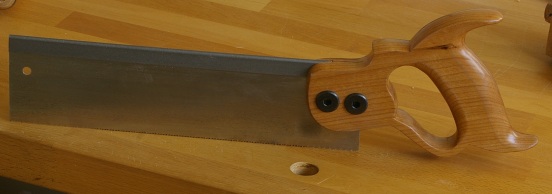
Well, it was a long time coming, but I finally finished this saw.
It has 13 teeth per inch, filed rip at a 0 degree rake angle. It cuts smoothly, but not super-quickly, as one would expect for a saw of this size and pitch. The finish on the handle turned out pretty well. I guess it had better, after, what was it, 10 coats of varnish?
And even though this one is done, there’s another one for a 16″ tenon saw in the works.
Those tools to the left are the Shinto saw rasp and the Gramercy sawmaker’s rasp.
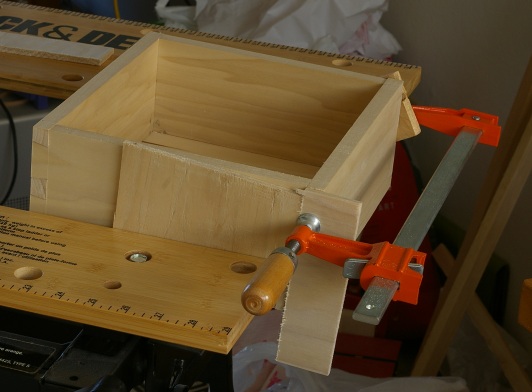
I’ve been messing around with hide glue in preparation for assembling the dovetailed box I’ve been working on for centuries now. That stuff may be smelly, but it does seem to work quite well if you have the patience.
For whatever reason, I messed up one of the corners and managed to make the joint out of line. The joint fits fine, though. I must have slipped when marking out the tails from the pins on that one joint I did in reverse. Oh well.
I got two of the joints together (badly), and then realized that the panel should have probably gone in after one joint, because the frontally-exposed grooves were stopped. I worked around it by bending the sides enough to slip the panel in:
At this stage, I realized that I am clamp-challenged or just silly, because I wasn’t able to jam the tails in far enough to get rid of some very small gaps on that side, even though I knew it was possible to do that. When I glued the front on, I used my Workmate and the one bar clamp I have to get rid of that problem on the other side, at least for the most part:
It’s pretty obvious, though, that I’m going to have to provide some clamps and cauls for this kind of thing.
I somehow forgot exactly how I did the holes in my last saw handles, and I just had to do it again, so I’ll enumerate the steps so that I don’t have to remember the next time. Basically, you need to bore holes in the handle, with one side of the handle having larger holes than the other, because one side needs to house the saw nut, which is wider than the screw on the other side.
So here’s how (it assumes that you’ve already cut the sawblade kerf):
Secure the handle with a sacrificial board underneath.
Mark the holes on the screw side with an awl, using a template (or by hand).
Drill all the way through with a brace and bit sized for the screw.
Clean out the holes and sawblade kerf, flip over the handle, and resecure.
Place a piece of paper in the sawblade kerf.
Using a twist bit sized to the saw nut in the brace, enlarge the holes on the other side. Slowly ease your way in to prevent tearout and keep the hole centered.
Stop when you hit the paper. After enlarging all of the holes, pull out the paper and clean out the sawblade kerf again.
If necessary (this depends on your hardware), carefully use a countersink to countersink the holes on either side.
I suppose that it isn’t strictly necessary to have different-sized holes with the hardware that I’m using, but you definitely need to do it with older-style saw screws and nuts.
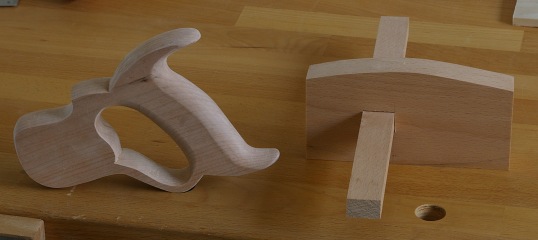
I haven’t been working on anything major lately, but two little projects that I haven’t mentioned before are coming close to completion:
On the left, a handle made out of cherry. The template is identical to my apple handle, and the saw will be identical as well, except that it is filed rip instead of crosscut, so I will be using it for tenons and perhaps larger dovetails.
On the right, a cutting gauge made from scraps of beech. When complete, it will have a captive wedge to hold the arm tight, and some sort of wedged blade that I haven’t figured out yet. I’ll probably give it the same finish as my mallet.
The next task for the box was to cut the grooves where the panel will slide in. The only somewhat appropriate tool I had for this task was my Millers Falls #67 router plane. This is more or less a copy of the Stanley router plane, but without the fence. Unfortunately, the fence is what I really needed. So I decided to make one. The first attempt was just a piece of wood attached to the bottom through the hole in the plane sole. That didn’t work very well.
I decided to get a little more serious about this, and made a combination shoe/fence out of masonite and a strip of yellow-poplar.
This was a nice excuse to use my overly expensive countersink to keep the brass screw heads below the various mating surfaces.
It’s still not the easiest tool in the world to use; to cut a groove, you must move the adjusting nut down between passes while keeping the blade in the same lateral position. You can accomplish this by doing the adjustment while keeping the blade inside the groove you’re in the process of cutting.
There’s just one bit that you can’t get with the shoe/fence attached, and that’s the very end of the stopped groove on the pinboards where you start the cut. There’s a “swimming pool-like” recess there that you need to cut deeper (see the first photo above at the bottom right). To get to that, just remove the shoe/fence and cut in the opposite direction. You don’t need the fence for this because the shallow groove that you already cut guides your blade.
So now I have the four sides and we’re nearly ready for assembly. It’s probably time to complete that bottom panel.
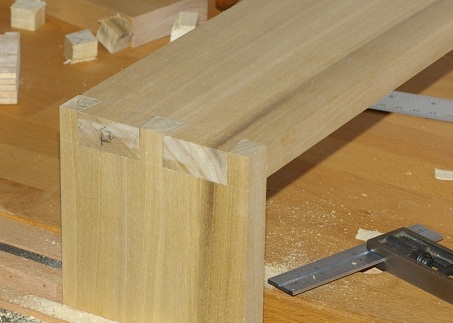
Unsure of what I was going to do next, and with little time to do it, I sat around doing very little for a while. Somewhere along the line, I got the idea that making a dovetailed box will help me improve my technique. So at the most glacial pace imaginable, I milled a board, cut it to width, then cut out four pieces for the box sides.
Then this weekend, I made the joints. I was really slow at first, but gradually gained a little confidence.
That turned into “too much confidence,” because I sawed the wrong thing when making the tails of the very last joint, which screwed up a lot of things. After looking really stupid for a little while, I decided to salvage it by shortening the tailboards. However, if I simply made a new joint on the opposing tailboard, I would have had to shorten the pinboards too.
So I decided to just try re-making one set of tails by marking them out from its pinboard. It was a little unnerving, since I’d never done it that way before, but it seemed to work out okay. I’m slowly getting used to sawing straight with that little dovetail saw, though I have to admit that it’s a lot easier and natural-feeling with the saw I made a handle for.
The box was originally supposed to be 10 inches on each side; now it’s gonna be 9.5″x10″.
Next step is to make the grooves for the panel (which I’ve already milled but have not assembled).
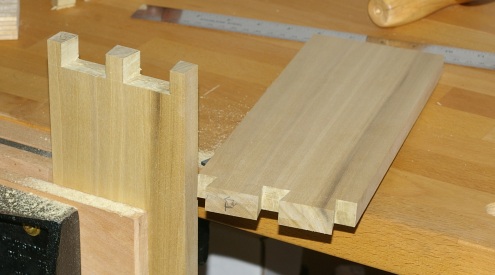
Last week I did some milling in preparation for a dovetail attempt. Having fooled around with various things for a few days, I decided to finally give it a shot today. I followed the instructions in Korn’s book pretty much to the letter, and wouldn’t you know, I ended up with two pieces that looked like a tailboard and pinboard.
The most interesting part is that the pieces fit on the first shot. I sawed and trimmed the pinboard just up to the lines, and after the cleanup:
I decided that I wanted to glue and clamp it up, so let’s see how it looks once I plane off the ends (maybe tomorrow).