Scrub Plane Preparation

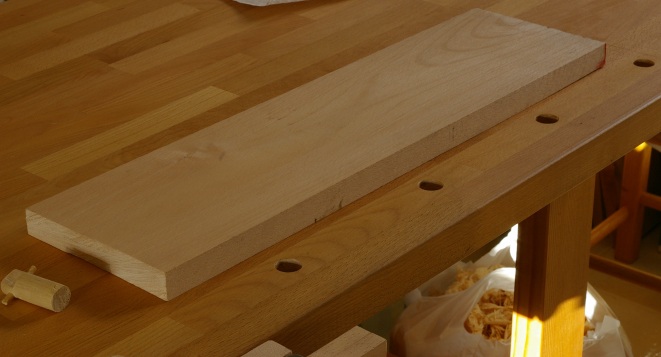
It’s been a busy few weeks with practically no time for woodwork. However, there has been a little progress. Today, I finally got around to milling the two faces of the board that will eventually become the scrub plane. As with the mallet, the plane will be made of European beech. What a pain–gave myself a blister doing it, too. The only thing left to do on the board is hit it with a smoothing plane, but that’s easy.

I still need to draw the thing. I think I’m going to go with at least a 10-inch length so that I have enough room for a tote in the back, but I don’t know how tall it should be, nor do I know how far forward the blade will be, and I don’t even know what design I’ll use for the handle.

Other minor activity is that I’ve finally gotten around to finishing the Winchester saw handle that’s been sitting around for at least a half a year. There are lots of nicks in the handle. I used a smoothing plane to knock out the most superficial of those. A washcoat and a coat of stain (a pigment-colored varnish) is now on. I’ll do another coat of that tomorrow, and probably follow up with a some polyurethane. One of these days, someone tell me why it’s so impossible to pour anything out of a paint can. There has got to be a better way.

Another fix for the junkie arrived from Lee Valley today. This shipment included the high carbon blade for the scrub plane. I don’t know why the HCS blade costs $18 and the A2 blade $38. It’s surprisingly heavy.

Also in the package were a small tote and front knob add-on for my low-angle block plane (a sort of silly extragavance, but that plane is really nifty), and two 4″ 2x slim taper handsaw files.

My waterstones had started to dish a little, so I flattened them with my diamond stone. That was delightfully easy.

Milling musing

I still don’t have a scrub plane, so milling this piece of european beech for my future mallet was as time-consuming as you’d expect:

To minimize the pain, I just flattened one side and then scribed the other side for about the maximum thickness so that I wouldn’t have to take off too much stock. I don’t even know how thick it is, just that it’s pretty much uniform. We’ll see why this doesn’t matter in later stages.

I used the jack plane quite a lot more for this one. Working straight across the board and in diagonals took out the cup fairly quickly. The fore plane rounded out the first face, and this side turned out very, very flat.

There was more work to do on the other side because there was still a significant amount of stock to remove, so naturally, it took a long time. In addition, I decided to goof around with one of my smoothing planes again, trying again to improve its tuning. This went fairly well. I managed to tighten the throat a bit and straighten out the frog.

Moreover, I figured out a trick on how to straighten the frog: if the sides are square, you can use a double square. Put the stock on the frog bed (where it meets the blade), and extend the rule out over the side. If the frog is square, the rule can sit flush with the side of the plane, because those two surfaces are, in theory, supposed to be orthogonal. I suppose that a photo would be handy here, but I’m too lazy right now to show it.

The downside of all of this messing around with the smoothing plane is that in my excitement, I took off a little extra from one of the edges, making the second side “not quite flat.” In the grand scheme of this project, it does not matter. In fact, it might be a good thing.

The only thing that does matter is that the next thing I mill down had better be for the body of a scrub plane.

Milling, Part 5

At this point, I’d milled my board to width and depth; the only thing remaining was cutting it to length. My goal was two one-foot (roughly) lengths.

This meant using a crosscut saw, preferably a backsaw, which meant that the task fell to the old Jackson saw I’d been playing with. I wasn’t terribly happy with the initial sharpening job I did on it. The saw kept wandering around in the cut. so yesterday, I decided to try again. I jointed, shaped, and set the teeth, then went about to pointing the teeth.

I screwed up, and the teeth ended up looking ridiculous. The saw didn’t exactly cut so well, either. So I jointed, shaped, and set again, and then I screwed up the pointing again. So I jointed, shaped a little, then went to bed.

Not to be deterred, I woke up this morning (“full” of energy), and decided to try a few different things. First, I used less set on the teeth. Then I set about pointing with a lower fleam angle (something like 10-15 degrees). Finally, I decided to ignore the rake angle guide when pointing, rather relying more on sight and feel.

The saw certainly looked a lot better when I finished. And it cut better–it did not wander around now. So I was ready to put it to use. Here’s the end product after shooting the end grain with my low-angle block plane:

Yay. I’m done with milling. Plus, I got to put the Veritas plane to a torture test of sorts.

I’m still not thrilled with the backsaw. It cuts smoothly and relatively quickly now, and it doesn’t wander, but I can’t help but thinking that it could produce a finer cut. The question, though, is if I’m barking up the wrong tree here. That saw has just 10 teeth per inch, which is fairly coarse for a crosscut saw anyway. This thing may be better off as a ripsaw for tenon cheeks and stuff like that. I don’t think I want to retooth it, because that will wear down even more of the saw, and there isn’t much blade left to begin with.

Whatever. I’m ready to try making a mortise-and-tenon joint now.

Milling, Part 4

In the last milling episode, my board was now flat on three sides. I needed to rip it to its final width of 2.5 inches. First, I scribed a line around the cut with my marking gauge, then pulled out my now-functional ripsaw. I took the cut a little slowly, not really knowing what to expect. The saw did its job perfectly, guiding itself with the kerf and never wandering:

To get the final surface on the edge, I had two choices with my jointer plane: use a shooting board or try it freehand. Since I don’t have a shooting board, and I didn’t want to cobble together some lame setup again, I opted for the freehand method. It was a lot easier than I thought it would be.

That little Lee Valley double square is really handy for checking the edge.

There’s just one thing left to do: saw the end square to final length and plane it smooth. But for the rest of today, I’m going to clean and wax a few tools that seriously need it (like that jointer plane, ugh).

Milling, Part 3

At this beginning stage, I do not have much material (MDF, ply, etc) for making jigs and fixtures such as shooting boards. But I decided that I want to use a shooting board-like thing for squaring up one of the edges, so I improvised something out of a bunch of pieces of hardboard on my bench:

At the near end that you can’t see, my Veritas® “Wonder Dog®” is holding the edge in place. It worked fine, though I can see where a hold-down or holdfast would be better. I am not interested in forking over the cash for one of those right now.

Though I seriously need to get the rust off that #7 jointer frankenplane, it did the job fine. My square says that it’s a square edge. Oh, goodie gumdrops.

Next, I need to rip the board to width, and that means that I need to get one of my saws into ripsaw shape. Tomorrow, perhaps.

Anyone notice that Lee Valley recently announced their new Veritas plow plane? Only costs about a million dollars, as you probably guessed, but it does look kind of slick.

Milling, Part 2

Against my better judgement, I decided to mill the second face tonight. First, I used a marking gauge to scribe the target thickness into the edge of the board, then threw it rough-side-up on the bench:

Yeah. That’s about a quarter-inch that I had to knock off the board. That should sound like a pain. And it was. Sort of. It took a long time because I used only the #6, but I finally arrived at the goal:

This face turned out to be a little bit flatter than the first one. Practice, I guess. Or desperation. Whatever. It’s not as “smooth” as the first face, but that’s only because I decided that I didn’t want to get really anal with this, especially considering that a smoothing plane is going to hit it at some point.

If I have to do much more of this, I am seriously going to look into getting a scrub plane. The sheer number of shavings that I ended up with was ridiculous.

Next up, I’ll need to shoot one edge flat and square, rip to width, and plane the other edge. I probably need to improvise a shooting board for this.

Milling, Part 1

My goal for yesterday was to set up my sawhorses and saw off a piece of poplar for milling four-square. I was going to do the sawing outside, because it’s kind of messy. But by the time I got my act together, it was getting late, so I just did it in the kitchen.

At first, I tried using one my larger untuned handsaws, figuring that it “seemed sharp enough” for such an unimportant job. Ho, ho, wrong idea. After having it bind a few times and not really cut much, I decided to go back to my Jackson backsaw–not the ideal tool for the task, and not even ideally sharpened (remember, it was my first saw sharpening practice). But much, much better. So I am going to need to try to focus on sharpening a few more saws.

Then I cleaned up, watched “Cops,” and went to bed.

Today, I set about the task of flattening one face of the board. I selected my half-tuned Stanley #6 to do the rough work, did a somewhat slapdash job of sharpening the blade, then set out to work:

This image is after about 15 passes or so; there’s still a lot of fuzz in the front of the board and at the rear, and it’s still cupped. By this point, though, it was apparent that this fore plane was doing a much better job than I had anticipated. My original plan was to move to a jack plane as soon as the board was halfway flat. However, the surface left by the #6 is pretty nice and probably ready for a smoothing plane. I should have probably flattened and waxed the plane’s sole, I guess… this would have made it a lot less work.

After working up to full-length shavings, I used the plane and the ruler in the background as winding sticks to determine when the top was flat:

It’s actually reasonably flat. Not perfect, but close enough. There was now a huge pile of shavings on the bench.

I hadn’t expected the board to be this flat on the first try. I also hadn’t expected the board to be significantly thicker than one inch (it was). Because I have a goal of 3/4″ thickness, this is the part where I think that a scrub plane would be really handy right now. Alas, I do not have one. Perhaps I’ll use one of my jack planes set for thick shavings.

The question is if I’ll do this today or not. It’s still early, but I am dedicated to taking an agonizingly long time to learn how to do this stuff. Decisions, decisions.

A-Lumberin’ We’ll Go

I finally made it to the lumberyard today. My official excuse was that I was waiting until I fitted the roof rack to my car. I did that last weekend, and then today, I decided that since I don’t have any fancy needs right now, that I’d just have it chopped into 5-foot lengths, which do fit into my car. That’s a hell of a lot easier than strapping boards to the rack.

This was pretty much my first experience at a place that actually has a lot of hardwood. The English spoken there was kind of spotty, but they were nice enough, and after a lot of back-and-forth, I’d selected a few FAS roughsawn yellow-poplar boards, and one nice roughsawn piece of cherry.

Roughsawn wood is not exciting for most people to behold.

That’s the cherry on the left, and one of the pieces of poplar on the right. However dull this looks to most people, though, it’s thrilling to me. And somehow I feel like I’m on some sort of slippery slope now, because my downstairs storage now contains a bunch of boards, just waiting for me to take a whack at them.

So now I’m ready. The only excuses I have for not seriously practicing joinery are either that I’m being lazy or I’m doing something stupid, like playing a video game or doing laundry.

In other news, I finally got a low-angle block plane. I had a prepaid visa gift card to blow, so I blew it on the offering from Lee Valley/Veritas. It was not a trivial expense.

Some people complain that it “doesn’t look traditional.” Traditional compared to what? The cast iron planes that looked all non-traditional in the 19th century? Yeah… okay… right.

Anyway, that plane is freakin’ awesome. Those guys do not monkey around when making a tool.

Oh, yeah, and I have my 8000x waterstone now. Yippee.

Plane and Sharpening Notes

I bought a Norton 220x waterstone today to add to the lower end of my arsenal. I was really eager to see how quickly it would flatten the back of a blade, so I tried it on the big Hock blade for my #7. It’s pretty impressive–that would have taken a million years on almost anything else. I would imagine that the only way to do it faster would be to scrape it with a file, but I’m not sure that I am comfortable doing that.

It’s fairly clear that I should get an 8000x stone. The 4000x/honing compound combination works adequately, but it takes longer with the compound than I would like. It seems to me that going 4000x-8000x-compound would work very quickly with better results, because you can get the whole blade on the stone at once.

Over the past few weeks, I’d been fiddling with my two Millers Falls #9 smoothing planes, trying to work out the kinks in them. I accomplished that goal (I think), but I’m now starting to think that the fancy-schmancy frog adjusting screw that Stanley introduced in 1902 is the devil. On my type 4 plane, the boss wasn’t tapped hard enough or something, so the frog wouldn’t move forward as much as it should have. I fixed that by using my socket wrench, a big screwdriver bit, and some lubricant to drive the screw farther in.

On the other plane, a type 3 (wartime) model, I couldn’t figure out why the stupid frog wouldn’t seat straight on its mating surface. It turns out that the stupid frog adjusting screw boss was tapped off-center. I fixed this by shoving the little pressed plate with the notch that fits into the adjusting screw off to the side as well.

Neither of these planes would have had any problems if they didn’t have frog adjusting screws, and that feature just doesn’t seem like it’s really that great anyway. I even thought about removing the plate.

On the brighter side, I don’t think that any of my other planes have these problems. In addition, my #7 definitely doesn’t have this problem because it doesn’t have the screw. Neither does my Millers Falls #900. My guess is that the MF #900 can be made to perform as well as any of the other smoothers because it’s basically like a #9 without the frog adjustment screw and a simple lever cap instead of the three-pointer. Not that I feel the need to prove this point at the moment…

First Waterstones

My waterstones arrived today. They are 800x and 4000x.

Of course, I was very eager to try them out. Goodness, what a difference. I flattened a plane blade back, and that took a little bit of time, but once flat on the 800x, the 4000x did its job with amazing speed.

Then I honed the bevel–in just a few minutes. But the real surprise came when I did the final hone with the green compound on wood. I knew that the edge was pretty sharp, but it didn’t look too shiny. Well, the green compound made the blade shine like nothing I’ve ever done before.

Well, that’s all fine and good. And I did shave off the requisite arm hair. But I really wanted to see how the blade worked, so I put that bad boy back into its type 4 Millers Falls smoothing plane, clamped in a yellow-poplar board, and set the blade for a very fine cut.

Holy crap. Now, granted, I’d been fiddling around with this plane recently, but I did not expect so see shavings so consistent and thin. The blade zipped through like it was almost nothing and left my best surface yet. Even on the part of the board where the grain reversed direction!

I guess it’s so long for Scary Sharp for me–it was a nice cheap way to get started, but even though waterstones are slightly messy, the speed, ease, and consistency of results are really hard to deny.

[edit: I still use sandpaper (Norton 3X, then grit progressions) on a surface plate to initially flatten faces of tools. It’s faster and less error-prone because you don’t have to worry about keeping a stone flat. But I always turn to my waterstones for final sharpening, and I generally don’t use the sandpaper after the initial flattening.]