After waiting a day for the glue to cure, I removed the clamps and set out to remove the center of mallet head. It was a piece of cake with that small tenon saw:
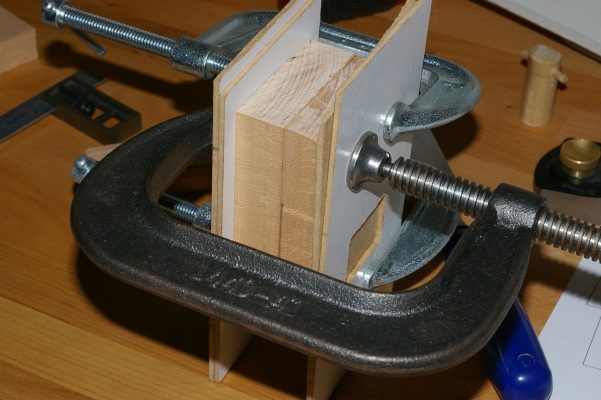
Then it was time to glue and clamp the third piece of the head:
Then there would be another day of waiting. Well, I did mark out the piece for the handle before calling it a day, but that’s not much work.
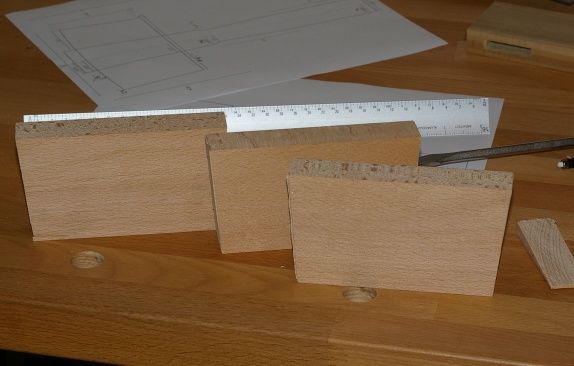
I marked out three sections of the milled lumber in the shape of the mallet head and cut them out. Except that I didn’t do the top bevel; I figure that I can do it after I glued the thing up.
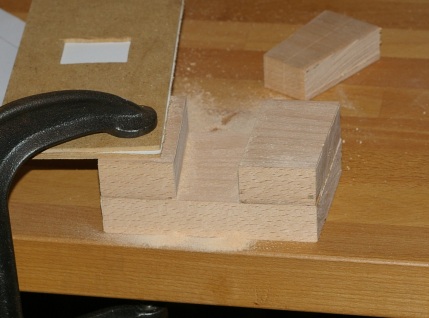
I picked out a piece for the center and marked out the part where the handle will go through. After paring to the knife edge, I sawed partway down the sides. Finally, I knocked out a little bit off the top area between the saw kerfs so that it ended up looking like this:
The reason for removing that piece was that my plan was to glue that face to another piece like this:
The theory is that when the glue is dry, I’ll be able to saw from the other side, remove the center (where the handle will eventually go), clean it up, then glue on the last piece. The center will now comprise of two parts, perfectly in-line. Well, I hope I used enough glue.
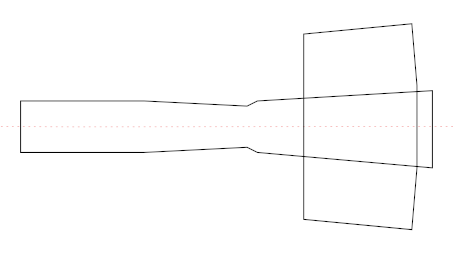
I sat down today with some graph paper and tried to get a concrete drawing for the mallet. After a little fooling around, I was happy with one that I came up with, then drew it up in Inkscape:
The planned dimensions are 5″ wide and 10″ long. The striking faces are about two and a half inches long.
The mallet will be roughly 2 5/8″ deep. I don’t know for sure, because I’m too lazy to check the exact width of my newly-milled piece of lumber. The idea here is to laminate the head, and at the same time, eliminate the need for making a complicated angled mortise for the handle (as well as save a lot of money on lumber). We’ll see how this works out. In any case, the striking faces should be roughly square.
Though the drawing’s handle is rather angular-looking, it will be oval in the final product.
One very amusing thing about the design is that all fits in actual size on a printed sheet of 8.5×11″ paper. Useful, too, I guess.
[Update: Here are the SVG plans for the mallet.] sigh
So the old ridiculous teeth were all filed off, and it was time to put on new teeth. On Thursday, I decided on 14 TPI (teeth per inch), put the saw along with a tooth guide in the saw vise, and set out to rock and roll.
It was not as easy to get the new teeth started as I would have hoped. I tried a small hacksaw at first. That didn’t work out, so I moved to a handsaw file. That wasn’t fine enough, so I finally dug out a set of hobbyist-grade needle files and found one that had sort of a knife-like edge. That worked, but it was slow, because that file sucked. It took forever to get the 140 little notches cut for the teeth, and my hand felt a little funky after doing it, but it was precise, so I was happy, and left it for a while.
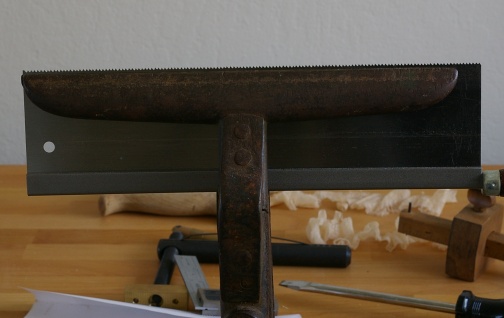
On Sunday, I picked a rake angle of 20 degrees, and went to town shaping the teeth. Here’s what it looked like halfway through:
And close up…
After setting the teeth and a jointing, it was time to point the teeth. I chose 20 degrees for the fleam as well.
The result was far better than any crosscut sharpening I’d done before. (I don’t have a closeup, maybe on the next installment.) The best part, though, is the way the saw cuts–smoothly and quickly.
So now I have a workable small tenon saw. I don’t like the gent’s handle, and I do want to replace it with a closed-grip handle, but this is not an immediate need; I want to practice making tenons with it before going into further modifications. I’ll make the handle later.
I’m so happy with the way this has turned out that I’m considering buying a second saw for use as a ripsaw. It would only set me back another $10. Whee…
I’ve had the fantasy of making my own backsaw ever since I heard of someone else doing it. Unfortunately, I have an immediate need: A crosscut tenon saw for, well, cutting tenon shoulders. I do not have time to fool around forever, and I do not want to grind off any more of my current Jackson backsaw.
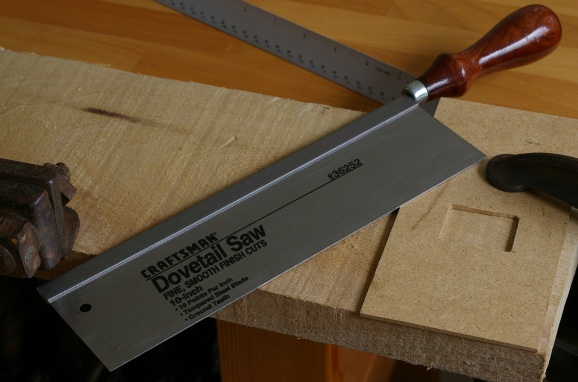
When I was in OSH the other day, though, I noticed that among the usual crud, there was a 10-inch Craftsman-brand “dovetail saw.” It featured the same general dimensions of the tenon saw I’d envisioned. In addition, the blade was moderately-sized–not as thick as a handsaw or the bigger backsaws, but not as thin as a dovetail saw is supposed to be.
I thought, “heh.” The teeth were ground in an absurd way; it was sort of a semicircular-type pattern. Plus, it had wavy set (on a 16 TPI saw!). Gee, thanks for trying, guys.
But it was only $10, and was purported to be made in the USA, so I thought, well, hmm, maybe I can make something of this, since it does have a blade and a back that I wouldn’t need to make and attach. So I bought one, then promptly went to town milling off the teeth with my saw jointer:
(“Fine, smooth finish cuts.” Yeah, sure, buddy.)
Well, at least the first stage seems to have gone fine. Next, I ought to cut new teeth. I’m thinking that I’d like somewhere around 14 TPI. Then I want to make a handle to replace that silly gent’s handle. I’d like to make the handle from beech or cherry. After today’s episode with beech, I’m not sure I want to mess with that so soon again (at least, as long as I do not have a scrub plane), but then again, I don’t know much about cherry’s durability, and these are not large parts that we’re talking about here. Eh, I don’t have to decide tonight.
I finally made it to the lumberyard today. My official excuse was that I was waiting until I fitted the roof rack to my car. I did that last weekend, and then today, I decided that since I don’t have any fancy needs right now, that I’d just have it chopped into 5-foot lengths, which do fit into my car. That’s a hell of a lot easier than strapping boards to the rack.
This was pretty much my first experience at a place that actually has a lot of hardwood. The English spoken there was kind of spotty, but they were nice enough, and after a lot of back-and-forth, I’d selected a few FAS roughsawn yellow-poplar boards, and one nice roughsawn piece of cherry.
Roughsawn wood is not exciting for most people to behold.
That’s the cherry on the left, and one of the pieces of poplar on the right. However dull this looks to most people, though, it’s thrilling to me. And somehow I feel like I’m on some sort of slippery slope now, because my downstairs storage now contains a bunch of boards, just waiting for me to take a whack at them.
So now I’m ready. The only excuses I have for not seriously practicing joinery are either that I’m being lazy or I’m doing something stupid, like playing a video game or doing laundry.
In other news, I finally got a low-angle block plane. I had a prepaid visa gift card to blow, so I blew it on the offering from Lee Valley/Veritas. It was not a trivial expense.
Some people complain that it “doesn’t look traditional.” Traditional compared to what? The cast iron planes that looked all non-traditional in the 19th century? Yeah… okay… right.
Anyway, that plane is freakin’ awesome. Those guys do not monkey around when making a tool.
Oh, yeah, and I have my 8000x waterstone now. Yippee.
So I had my first attempt at honing today. My 3/4″ chisel was my first victim of the Scary Sharp system. I was a bit nervous about it because, well, this was it, you know… the last thing that I needed to do in order to have a usable tool. That, and I’d been reading about how to sharpen stuff for a long time.
It actually worked. I used a variety of sandpaper grits with repositionable spray adhesive on glass. I learned the following:
Don’t use too much adhesive. Just a little bit makes the sandpaper stick and keeps it from sliding around. Too much makes it goopy and slippery. Repositionable is great because you can clean it with citrus cleaner.
Lapping the back of a blade is the hardest part and takes a long time. Thank goodness you really only have to do this once. I need some more sandpaper grits to do this more quickly; it took me a long time to work out the original milling marks and skip between the various grits.
Corollary: It’s gonna take forever to lap the soles of my planes.
Honing the bevel is pretty fast and easy, especially when you have a honing guide.
A mirror finish on a blade makes things really, really interesting.
It’s pretty easy to tell if you’ve done it right. You really can shave your arm hair, and a sharp blade cuts across endgrain with the greatest of ease.
I need a real strop.
I still need more practice. But the today’s results are much better than I expected.
Through the last few weeks, I’ve been getting the final pieces necessary for me to start cutting wood. I finally got a piece of plate glass for sharpening and lapping. For that, I went to a salvage yard and, well, it might have been overkill, but I found a 4-foot piece of 3/8″-thick tempered glass (for almost nothing). You can’t cut tempered glass, but I thought that it might be nice to have something this big for lapping plane soles.
I also broke down and bought a Veritas honing guide.
To give you an idea of the budget I’ve been using, this is definitely the most expensive tool that I’ve bought so far. Now that I’ve got it, I’m glad that I splurged on this, because it’s gonna be awfully handy in getting bevel angles correct.
So at this point, there’s just one thing separating me from sharpening: spray adhesive. To lap planes, I also need a sheet of Mylar. So I’m going to work on this stuff this week. And then I’m gonna get some actual wood!
The chisel problem had been weighing hard and fast on my mind, and today I did something about it. After picking my car up from its regular service, I remembered that there was one of those Woodcraft stores in San Carlos, which is relatively close to the mechanic. Having that convenient mode of transport ready, I went there to see if they had any new chisels that were okay and didn’t cost like a million dollars. Also, I’d never been to one of those stores before, and I was kind of curious to see stuff like the Lie-Nielsen planes.
So I asked the guy there about the chisels. He was really helpful. He understood exactly what I was trying to do, and basically said, “Yeah, we have a lot of really spendy chisels, but these plastic-handled Irwin/Marples ones that are much cheaper and available in this handy four-pack will be great for what you’re trying to do. You just gotta put the time and effort into honing and learning how to use them. Then, when you are good at that, and properly addicted, come on back, purchase the really expensive stuff, and take lots of classes ‘cuz you’ll like that.”
I paraphrase, of course, but I have to admit that it was rather refreshing that the guy wasn’t trying to sell me the most expensive thing in the store. This might be partly because there is no shortage of Yuppie Bastard (and his silly German car) in the bay area, and therefore, no shortage of chumps throwing money around like candy at a parade. He asked me if there was anything else I needed, and I told him that maybe my small try square might not be very useful, but he said, “Nah, it may be a little small, but for now, it’ll be fine; sometime later you might need something bigger.” Odd, all of this, but it definitely means that I’ll probably go back there on similar occasions.
Anyway, the store definitely has some drool appeal. Those Lie-Nielsen planes sure do look nice, but, uh…


