I haven’t made much in the past few months because I moved. That’s always a pain. However, I now have a shop. This seems like it will be a pretty big improvement.
In preparation for the move, I rebuilt the base of my workbench. I replaced the legs with 4x4s, widened the depth of the side stretchers, and replaced the lower side stretchers with much larger timber.
No pictures at the moment, though. I’m still getting things organized. There’s a lot to do here.
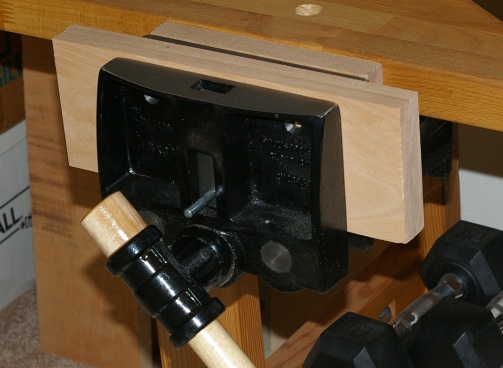
Yesterday, I put the roof rack on the car and got a big board of european beech at the lumberyard. And now I can’t believe that I spent most of the day making these silly liners for the vise jaws:
Beech, as it turns out, is quite a lot tougher than the stuff I’ve been working so far and it does not work as easily. Basically, ugh. I got the brilliant idea of resawing a board with my ripsaw, and well, now I know why people like to do that with bandsaws. Ugh.
Then I screwed around forever trying to do the surfacing until I finally wised up and sharpened my plane blades correctly. Sheesh. The good news about all of this, though, is that I finally got around to using one of my smoothing planes for its proper intended purpose, and it did a great job.
I suppose that more good news was that shooting the sides and cutting to length was really easy. Of course, something funny had to happen, and that funny was that the bosses for the machine screws that attach the rear lining are drilled off-center. This after all of the effort I put in to get the holes just right. Oh well.
Still left to do is fasten the front jaw and apply the finish, but this is pretty much done.
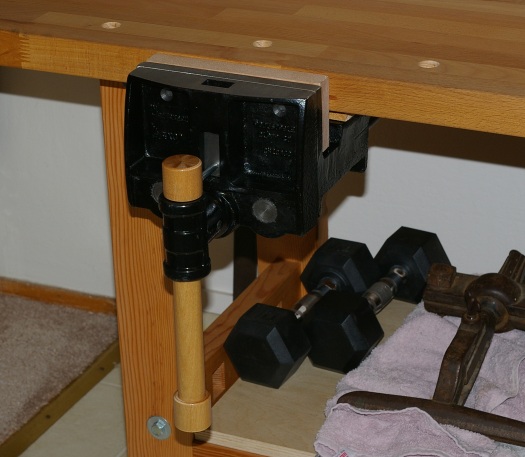
After having trouble holding a board to cut a tenon, I decided that it was about time to install the front vise (a medium-sized Adjustable Clamp Company “Jorgensen” model; staying true to my time in Chicago, I guess). Not only did I need something better for holding boards vertically, but I was also sick of having the vise lying around in its box on the floor.
I installed it over a period of several days. First, I cut and milled birch shims that I needed because the benchtop is a little thinner than the vise depth. Then I determined the mounting hardware. Finally, I attached the front shim, then dragged the bench upside-down into the living room.
By today, I had all of the components ready, so I put everything together. Drilling the holes was a little tricky, but worked fine with my brace, and I was ready to go soon:
That sucker is heavy. Lugging the bench back into the “shop” was not altogether fun. I am a little unsure of how the front shim will hold up, but it should be okay–birch is very strong, and the front of the bench can support my weight (several times the vise) with no problem. Wood movement should, in theory, not be a problem with the screw clearances and slotting that I used. With all of the planes, weights, and other crap on the bench shelf, there’s no danger of the bench tipping over; the edge can still support my weight without tipping.
I mounted the vise across from one of the dog holes. I don’t know how much I’ll use its pop-up dog, but I figure I ought to have the option, since it doesn’t cost me anything.
Still left to do is line the jaws with hardwood so that it doesn’t mar boards. I want to line it with beech, because that’s what the top is made of, but I first need to find some beech. Sigh.
I’m going to take a break for a few days from doing anything in particular. I have a few odds and ends to catch up on, including these wood-related things:
Figure out a way to mount the vise on the front of the workbench. Well, okay, I know how I’m going to mount it, but I don’t know what materials I’m going to use yet.
Affix the roof rack to my car, so that I can carry boards on it.
Drive to a lumberyard with said car (and rack) and get some roughsawn wood. There are a couple of sources here in the city, and since I’m just getting some fairly cheap wood, this should not be a big deal.
Wait for my newly-ordered waterstones to arrive, and practice sharpening on those.
It’s supposed to be hot here this week, so I don’t really want to work up much of a sweat anyway.
Last night, I marked out the dog hole calculations from the other day to the workbench top.
Then, this morning, feeling tanned, rested, and ready, I started boring the holes. I clamped my drill guide to the bench to drill a small pilot hole. Then I put my 3/4″ auger bit in the brace, and… UHHHH, wow, beech is just a wee bit tougher than that fir! Setting the brace to ratchet made the job much easier.
It took a while, because I was being extra careful to get all of the holes straight, but eventually got all of them done in a day:
I do not think that I would have been able to do those holes if I had not sharpened that auger bit. I also think that I may be able to do a better job sharpening it, but it’s not my primary concern right now.
So what are these things good for, anyway? Well, this:
The thing on the right that’s doing the clamping is a Veritas Wonder Dog™. The dogs on the left and background are the dogs that I originally made for the Workmate®. Not too surprisingly, they actually work a lot better in this bench. I still need to chop a face into the dogs.
Since I clamped that board in there, I thought, “Hmm, I wonder just how much better this is for handplaning?” So I pulled out my jack plane (that I hadn’t sharpened for a while), set for a thin shaving. Okay, I don’t want to ever try handplaning without a stable bench again. It was spiffy, to say the least.
I also bought a vise for the front today. I’ll need to do some measuring for that, but it’s not a pressing concern, and it shouldn’t take much time.
Forgive me St. Roy, for I have used a spreadsheet to do woodworking calculations.
I was trying to figure out the dog hole spacing on my workbench. Most guides say that they should be somewhere in the neighborhood of six inches apart, but my main concern was spacing them out in such a way that I’d have them symmetric on both ends of the bench, with a nice distance for each end.
After using “dc” to do some back-of-the-envelope calculations, I got to thinking, well, you know, instead of looking at these numbers one at a time, why don’t I pull up the openoffice spreadsheet and see everything at once?
Column A is the length of the bench, B is the spacing between dog hole centers, C is the number of spaces between dog holes (one less than the total number of dog holes), and D is the distance between the end and the first dog hole center. I wanted about two inches, and row 5, with six and a half inches between dog holes, purports to have exactly that.
So I mocked it up on the bench, and it seems dead on. Drat it. You always want the computer to be wrong, because it’s so stupid.
Oh yeah. And I did the second oil finish application the other day. Looks good now.
While preparing to apply the initial oil finish on the top yesterday, I got to thinking about how to smooth the surface. I didn’t want the ultra-smooth finish from a handplane because it might cause work to slip around.
Then I remembered how most people smooth stuff: sandpaper. Hey, I happened to have a bit of that, so I lightly hand-sanded with 360, then 600 grit paper. The effect was just what I wanted: a top that’s smooth, but not slick.
Finally, it was time to apply the oil. Looking at the surface made me glad that they had the beech top in stock.
A photo like this doesn’t do justice to how nice this wood looks. The reddish board is the classic steamed beech color. It got me thinking of why I wanted to take up woodworking in the first place. So I feel all encouraged. And stuff.
To bore the dog holes, I picked up a 3/4″ auger bit–new, unfortunately. There were two in stock, and one looked just my 3/8″ bit from the factory: cutting edges that look like sofas. The other one was a little better, so I bought that one and didn’t even bother to try it until I had touched it up with the auger bit file. It seems to work fine, though of course, it requires a lot more muscle to put a hole through wood than the smaller bit.
Incidentally, this test hole (done in a Douglas Fir 2×4) was the first time I used my new bench. I clamped the board to the top, letting part of it overhang.
My improvised Workmate® dogs from several months ago will work for my new workbench, because they are made from 3/4″ dowels. However, I want to cut faces in them for a slightly better grip. Also, several of them may not be optimally long, but that’s no big deal. I still have lots of the dowel stock left.
Yesterday evening, I did the second application of Danish oil to the frame pieces. Because the wood had absorbed the first application nicely, I decided that it would only need two applications for the moment. I’ll need to reapply periodically in the coming months anyway, since that is the nature of oil finishes.
Today, I assembled the frame again and decided that the time had come to put the top on. Given how much time everything else had taken, I figured that this would take forever, so I braced for the worst.
But when I opened the Ikea packaging, I found that they had actually included mounting hardware that wouldn’t cause the top or frame to crack, if put on properly, that is. After measuring everything and drilling a few pilot holes, it went on quickly:
The top isn’t really finished right now; I think there’s a light application of oil on there, but it needs more. In addition, whatever they used to surface the top did not exactly leave a smooth surface. I could plane it down to fix this, but I’m considering leaving it mostly as-is if the top is flat enough, because a rougher surface has higher friction, which could be desirable. Not like applying oil, then planing and reapplying is going to hurt, though.
Other than finishing, I need to drill dog holes. I haven’t planned that yet, nor do I have the 3/4″ auger bit required to make the hole. I have a shelf planned for the top of the big stretchers, so that I can bring in a secret weapon for weight. I should get a front vise at some point.
All in good time, though. I’m in no big hurry, it seems.
I put the first application of Danish oil on the stretcher components today. This is not terribly exciting; it’s actually very easy to do and doesn’t take much time. Depending on how well this sinks in, I’ll do one or two more tomorrow. Then I’ll be able to assemble the frame again and attach the top.
Today’s work was preparing the frame surface for its oil finish. This mostly means taking a very light shaving off the surface to remove the lumberyard chalk, pencil marks, blood, dirt, and so on that got on the boards as I was working them.
This is a pain in the ass to do with a handplane on a Workmate®, having to put your foot down on the damn step to keep the thing from shifting all over the place. But I did it, and did it with a lot less effort than sanding, and much less sawdust. So yay. The final result is not a perfect job, but it’s a little better than the lumberyard surfacing.
More importantly, I hope that this is the last time I ever have to do handplaning on a Workmate®.