
Normally I wouldn’t write about the mundane process of purchasing and transporting some wood for a project, but after some thought, I noticed that I really haven’t talked much about how I’ve gone about that process. Then, I realized that I actually hadn’t done any halfway serious wood shopping in a few years. I’d gotten the beech for the stool and first nightstand projects through a group purchase off of craigslist, and a fellow BAG dropped it off at my house (thanks again, Kirk!), and the rest of it was either really cheap home center softwood or some stuff I’d gotten long ago in this initial purchase (wow, is that ever a blast from the past–I was still living in my Inner Sunset apartment then!).
I’d also gotten another piece of beech somewhere between those two, which marked the first time that I’d used my roof rack for that purpose. We’ll get back to that rack in a second–it goes along with this post. I’ve seen a few posts from other folks regarding wood transport (including some crazy(?) stuff like bicycles), but not many, which probably indicates that a lot of people have trucks. And for those of you wondering, yes, I may do all of my work by hand, but when I need to move some wood around, you can believe that I’m not going to do it by wheelbarrow or drag it on the sidewalk. [Edit: Turns out that was wrong about that last method, but that’s another story.]
Let’s go back and start with the wood selection. My design was for cherry and called for 1.25″ thick legs and 1″ frame pieces, meaning that I’d some 6/4 or bigger stock . Then each nightstand will have drawers, panels, a top, and a shelf, which calls for the usual 4/4 stuff. I had the amount of board-feet and linear feet necessary for 6″ wide stock computed before I went.
But when you go to the lumberyard, you really don’t know what they’ll have. That especially holds true for cherry, where the stock on hand has all sorts of variations in in color, grain straightness, and especially defects. So you have to have a basic plan at what stock you’ll need for your cutting list, but you need to be able come up with a plan B.
And plan B it was. I really didn’t like any of the 6/4 cherry boards that I saw today. However, the 8/4 stock was only 16 cents more expensive per board-foot, and far better-looking. So even though it will mean a bit of exhausting resawing, I bagged a decent-sized one of those for the legs and the frames, and a 4/4 piece for panels and drawer fronts. I may get another piece for the top later, if necessary.
I also got a piece of 4/4 birch for my secondary wood. I don’t know if that was a great idea or not, but I like birch, and it doesn’t cost much.
Now we get to transporting the wood, and it’s where we get back to the story about the rack. Here’s the load of three boards back at my place:

The rack is a Yakima system that I’d gotten off ebay when I had my CRX. Now, if you know anything about these rack systems, you can switch them from one kind of car to another, as long as you’re willing to pay the king’s ransom that Yakima wants for the little clips that will fit your car (essentially, very expensive powdercoated pieces of pressed steel). As a special surprise, I also had to get new crossbars, because the new Civic’s roof is much wider than the old one. Thankfully, I was able to dodge Yakima’s cash vacuum on that one by just getting some 3/4″ galvanized pipe from the hardware store.
Now here’s how the choice of car gets a little tricky. I like my 2-door, mostly to annoy any passengers that may end up in the back seat, but this is one instance where having the 4-door is better. You see, on the 2-door, you place the bars only 18″ apart (unless you pay another arm and a leg for Yakima’s extender kit), but on the 4-door, you put them 32″ apart. A longer spread helps keep the load from rotation forces and keeps boards from springing around so much. To avoid that altogether, you can tie the load down in the front and the back. Because this was a short trip (and wood has a much smaller aerodynamic profile than, say, a canoe), I didn’t need to do that.
So, yeah, had I thought about this when deciding between the coupe and sedan, it would have been a consideration. However, the 4-door had a big problem that I don’t think I could have overcome: You can’t get it in the color you see above. [Edit: Also, new for the 2012 Civic 4-door, you can’t get the EX trim with a manual transmission. This is far worse than the wrong color. But you can still get it with the EX coupe.]
[Note: The Schwarz also has a what is essentially a Civic, and but he’s basically gone the infill route by getting the old Acura version. I have to admit that I miss the hatch of the CRX.]
Okay, back to the load. Let’s see how I fasten the boards to the roof. Here is the driver’s side, which has the 8/4 cherry:
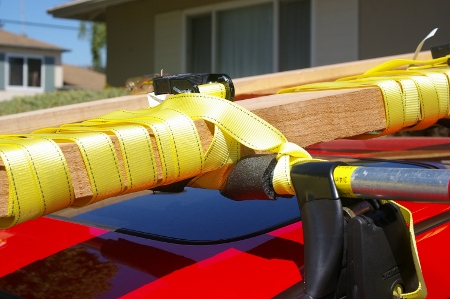
I put pieces of foam pipe insulator around the bars, then put the wood on top, and fastened things together tightly with a ratchet tie-down–which is essentially a band clamp. The ratcheting ones let you get the grip good and tight, compressing and locking the board into the foam. This not only takes a lot of slop out of the fastening, but also adds some friction to the surfaces; everything is always in contact with something else, even if you hit a bump in the road (and California roads have plenty of those). The boards were shorter than the length of the car, so I did not need to put a red flag on the end to indicate an overhang (as you would need to do if you let your boards hang out the back of a pickup or van).
These tie-down clamps have really long cords, so you have to do something with the excess. On the driver side, I’ve wrapped them around the board several times, then tied the loose end to the bar. It doesn’t need to be a strong knot because the ratchet mechanism is doing all of the hard work.
On the passenger side, I put the two thinner boards together, but this time, I got lazy and put the loose end of the straps into the car. I wouldn’t do this on a long trip because it makes too much noise:

Once I was finished fastening everything, I gave them a bunch of pretty hard shoves to make sure that they wouldn’t budge.
As far as the capacity of the rack goes, I’m pretty comfortable with these two boards on top of each other, but I don’t know about three. In any case, there isn’t room for much more. The weight limit on the rack and the roof itself is 125 pounds, which translates to around 35 board-feet of this density of wood. There were 23 board-feet on there today. This is just fine for a small-time woodworker like me; it’s just very unlikely that I’d ever need to buy much more wood than this at once, given what I currently do.
But what if I did need to haul more? Would I get a truck? A significantly cheaper option would be to get a trailer. My car’s towing capacity is 1000 pounds.
