
When it dawned on me that I needed a workbench, I really didn’t know my requirements. The only thing that I knew for sure is that it had to be really strong, pretty heavy, and be able to resist racking forces. I hadn’t studied workholding all that well, but there is so much conflicting information on this subject that it probably wouldn’t have helped.
Now that I’ve used the bench that I made for about four years (and read about many other kinds of benches), I have a much clearer picture, and, well, it’s time to evaluate how I did. Since this post falls under the “goofs” series, you probably have an idea of how this is going to go.
However, let’s start with something that really worked for me: the base.
It’s a very simple knockdown design secured with bolts and captured nuts out of douglas-fir. In general, bigger is better when building the base. I used lone 2x4s for the legs on my first build, and despite looking a little flimsy in the front-to-back direction, it still worked fine. One of the reasons is that I used big 2x8s as stretchers in the front and back. That created so much surface area that a simple butt joint secured with the bolt meant that it never, ever racked side-to-side.
However, it was still a little on the light side for what I wanted, so when I moved out of the apartment and to my first shop, I replaced the legs with 4x4s and the side stretchers with 2x8s.
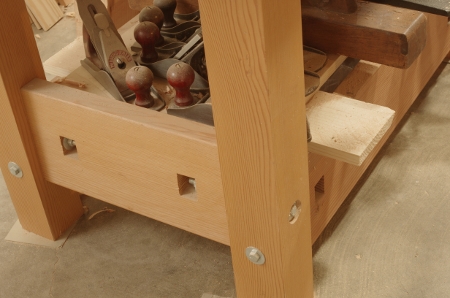
That change removed any doubts I had about this design. The Schwarz slightly poo-poos knockdown construction, complaining that you have to tighten up the bolts from time to time. I have not run into this as an actual problem. It’s just not that hard of a thing to do, and it’s not like it happens all of the time, either, especially when your wood is reasonably dry and stable (think douglas-fir), and you have an enormous joint mating area. I may have done it twice during the whole time I’ve used my bench.
With the added mass, I didn’t have a problem with the bench moving around as I used it in the old shop. I do have that problem when using the frame saw in the new shop, however (but not when planing or anything else). It’s primarily because the polished concrete floor is significantly slippery. I need to put down some really grippy rubber feet to fix this (or something of that nature).
I also put an improvised shelf in almost immediately–just a piece of plywood suspended over two boards. I put my larger bench planes there. It’s a great feature to have on a bench.
The top I used was a mixed bag of results. On one hand, it’s thick enough to take a pounding and it’s reasonably heavy. On the other hand, it really didn’t want to stay flat, it still could have been a little thicker, and it’s too deep. Let’s look at these one-by-one.
When I bought the top (an Ikea countertop made from beech), it was quite flat, but it started sagging at some point. I don’t know when that was, but it was pretty severe by the time I decided to flatten it. If I’d been paying attention, I would have flattened it earlier. It seems to be OK now, though. Sure, you have to flatten all workbench tops, but I have a feeling that something a little thicker wouldn’t have moved so much (unless it was a solid hardwood slab).
Yes, thicker would have been better. Being beech, the top was fine for taking a pounding as long as you were working near a leg (and that’s what you’re supposed to do anyway). However, a thickness of not even two inches has two weaknesses. The first is that it’s not as heavy as it could be. That’s not such a big deal, but the second issue is that it was difficult to mount the front vise. The model I have really wants something thick, and if you don’t have that, you have to improvise. I did so in an odd way; I’ll talk about that in a bit. But let’s not forget about the lack of dog holes in the front–I couldn’t put any in at that thickness.
The final problem with the top is that it’s too deep. That wasn’t a problem at my old shop, with the bench flush against the wall, but it’s no longer in that configuration, and I have a lot less room to walk around now. And stuff accumulates at the rear of the bench. Given the shop’s current transitional state of tool storage, there’s not much I can do about that, except that if I didn’t have that space, I’d actually be forced to resolve the tool storage issue and not have this problem in the first place.
Now, let’s talk about the junction between the top and base. Much has been written about the advantages of aligning the top and base along the front of the bench, and they aren’t lies. I should have done this and it’s still an option. Were I to do this, I’d need to bring my front vise chops into alignment as well (see below). One thing I’ll say about the top overhang is that I wonder why I put in an overhang of a half-inch at the rear of the bench.

Yeah, that’s just weird.
The top is attached to the base with flimsy L-bracket-style hardware. Strangely enough, it works. The top is so heavy that even with the most measly of lag screws holding things together, it never moves. It doesn’t vibrate. This still surprises me, given what the benchtop has to endure. Were I doing this over again, I’d probably do mortises just to keep it aligned (it’s a pain to put the top back on when you move from place to place), but I wouldn’t do Schwarz-style through mortises. They just don’t need to be that deep. However, it should be secured in some way just to keep the top from jumping around.
Keep in mind that this particular junction matters a lot more if you’ve got a leg vise. With a leg vise, you’re typically applying (very strong) pressure from the legs to the top, so something flimsy like my current setup wouldn’t work. However, if you’re using a front vise, that’s mounted on the top alone, so it doesn’t matter as much. I have my own ideas for the ideal joint in this situation, but they are just ideas at the moment.

So, speaking of workholding, I learned a lot about it from this bench. Before I even installed the front vise, I used a Veritas Wonder Dog, homemade bench dogs, clamps, and a handscrew to get things done. I still haven’t installed a tail vise-like thing (see below). You don’t need too many dog holes, and I prefer the round ones because they’re just more flexible.
You don’t need an end vise, but they are faster to move into position. If you decide not to do an end vise, you should probably put a couple more intermediate dog holes at the end, and bore a second set of aligned holes so that you have two points of pressure for the double-wedge method. You will use this method eventually, even if you have a wonder dog, because the wonder dog is hard to use with thinner boards.
And then there’s the matter of the front vise and the overhang.
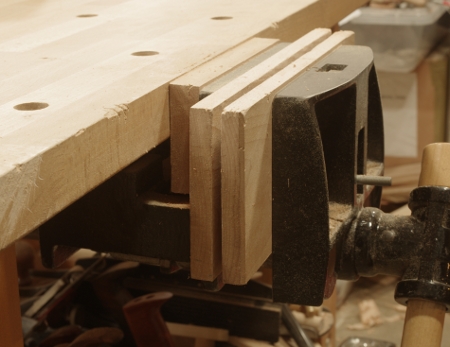
My install of the front vise is, to say the least, one of the stranger features of the bench. Due to the way that the Jorgensen front vises are designed, you secure it through the front and underneath (other manufacturers have you do it all from the bottom). And here’s where the thickness of the bench got to be an issue again. The vise wants a certain thickness that I don’t have, so I ended up shimming the bottom and the front of the vise. The result looks strange, and in use, it’s got some “special” working qualities. If I were doing this again, I would glue a thick strip of hardwood or douglas-fir to the front of the bench as an apron-like thing, inset the vise into that, get everything flush to the front of the bench, and be done with it.
The major issue is the overhang. Much has been written about the advantages of having the top flush with the front legs, so I won’t bother with repeating that here. But another disadvantage is that if you have a front vise sticking out with so much overhang like this, if you put something really heavy in there, the bench gets to be a bit front-heavy. It’s not enough to have it tip over, but it is enough to get the rear legs to very slightly lift up when you’re doing a heavy sawcut (not coincidentally, the most likely thing you’re going to do when clamping something very heavy).
Despite the strangeness, the front vise does a pretty good job, about as well as you can expect for a vise of this design. The quick-release design is polarizing. On one hand, it’s very fast. A half-turn back and it releases. On the other hand, you can’t use the vise for spreading operations, as you would be able to on a model with the little release trigger. One common complaint about these types is that the guide bars make it difficult to secure boards vertically (for dovetailing, for example). The good news is that the guide bars of this model are well-made, so the racking is kept to a minimum. I hardly ever need to use spacers to even things out.
An advantage by accident is that having the vise protrude so much allows you to get behind the cut when you’re sawing tenons.
So that’s the bench evaluation–that’s what I’ve learned from this one. There are lots of things I could do to improve this bench, but I won’t. Why?
Because I’ve got the green light to make a new bench. And I’ve already started.
